This is an empty post
Hi @aibd,
I can’t login to TWRP screen using easy installer after the download mode. I’m in HK and got that EMEA exynos S9+ SM-965F (grey import). I don’t know if it’s becoz of the regional lock as you mentioned but I don’t see RMM State at all. I guess it’s not a problem.
I did get into the TWRP screen once when I followed the steps in the below link for old phone SM-J500FN, of course with update img / tar files for S9+:
However, I noticed I forgot to download the /e/ zip file for S9+ at that time and I chose to reboot it to the system.
When I compared the /e/ installation for old model SM-J500FN with the updated instruction for command line installation for S9+ (https://doc.e.foundation/devices/star2lte/install), I found that I needed to install a custom recovery by heimdall. But this step was not shown in the installation guide for SM-J500FN. So my questions are:
-
Can I just follow the old installation guide for SM-J500FN but with the update files for S9+?
-
I notice the difference on “wipe” the data on the phone SM-J500FN as compared to the official command line installation for S9+. Should we follow the memory wiping guidelines of SM-J500FN for S9+ as below?
-
If I wipe away all the data but fail on the installation at the end, will I still be able to reboot back to Samsung OS? Is the disc image file “recovery-e-0.23-q-20220406175186-dev-star2lte” the same as the Samsung ROM file downloaded from sammobile site? The Samsung ROM file for S9+ is missing on the sammobile site.
-
Is the command line installation the only way to install /e/ OS on S9+?

Thanks so much for your assistance and patience.
1 Like
Correct, no problem.
So the two instruction sets are not interchangeable, but both are correct. Did you follow the Windows tutorial because you have a Windows computer – in which case we will look for Windows solutions, or do you have Linux available as well ?
You are correct to be wary of Wipe. If you stick rigidly to the Windows tutorial you will be ok.
You will have felt safer if you had found the Factory stock ROM as a means of recovery in_the_event_of_failure ! However as you have a working TWRP I would assume you are beyond the point of no return – but that is ok.
No. But this is no time for cold feet, you did the hard part, you will find you can solve issues with TWRP, but please be sure to keep to one set of instructions and keep doing things in the specified order. A computer will always wait … (I think ! )
recovery-e-0.23 is an alternative to TWRP.
The /e/ image is the whole of /system in the finished device.
The Samsung ROM includes “lower layers” upon which /e/ depends.
Where is you /e/ main ROM image at this time ? Please avoid confusion with recovery-e-0.23
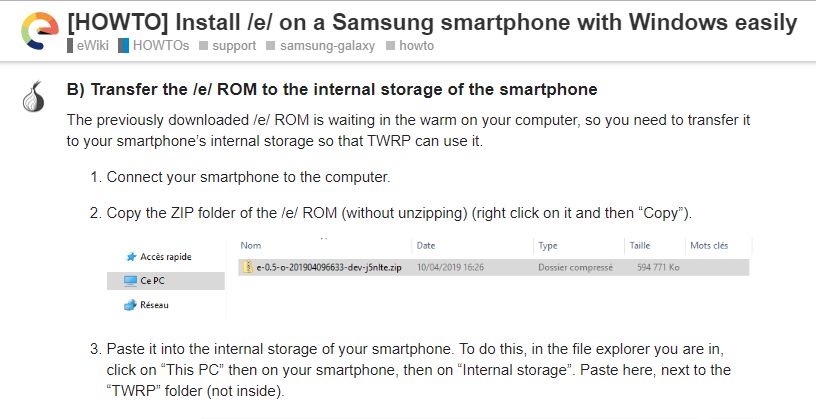
I download both e-0.23-q-20220406175186-dev-star2lte and recovery-e-0.23-q-20220406175186-dev-star2lte. I copied the ZIP folder of the /e/ ROM (without unzipping) and pasted it at the root of the internal storage. But I don’t understand the meaning of “next to the TWRP folder”. I should have recreated a folder called “TWRP” in the internal storage, right?
So where can I get the Factory stock ROM file for S9+ now? Do you have the update link? Do I need to download teh ROM file first before I continue the operations?
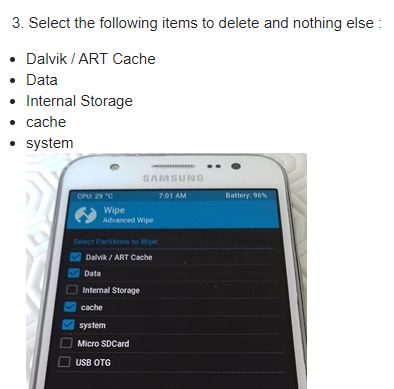
Then I will follow the window tutorial to wipe the data as below:
- Dalvik / ART Cache
- Data
- Internal Storage
- cache
- system
But I notice “wiping Dalvik / ART Cache” is not in the command line installation for S9+. Is it necessary? The command line installation for S9+ also requires “Resize userdata”. Do I need to resize userdata too as mine is a new phone?
Thanks again.
Neither do I ! What is the context ?
You should probably put the “need for” Samsung ROM on the back burner for now ! The “lower parts” which I mentioned are expected to be still on the device at this time (unless you already did something really obscure).
Oh I just notice the difference between the descriptions and the screen shown in the window tutorial. So, I just need to delete 4 items which are Dalvik / ART Cache, Data, cache and system. I should not delete “Internal Storage” right?
Correct, you probably would like to keep anything on “Internal Storage” intact.
I think the instruction for copying it next to TWRP folder might not be correct as I can’t find the e zip file. But becoz I’ve made a copy in the SD card, I can install it at the end.
Nothing I say is contrary to your tutorial; the tutorial is not incorrect. However /e/ Recovery is newer than the Tutorial. You already have TWRP; /e/ Recovery is an alternative to TWRP; you just_don’t_require_/e/Recovery !
I think you told me that you met the requirement of that image when you said
Edit, I do see that
Paste here, next to the “TWRP” folder (not inside).
looks unhelpful in this context, I had not noticed it before – the root of the internal storage is just fine !
You always can revert back to samsung OS at any moment you want, using Odin,
but you have to choose, dual boot is not possible (except switching between two entire TWRP differents backups)