/e/ OS “easy” installer: development thread about adding new devices

I’ve just opened a new issue https://gitlab.e.foundation/e/backlog/-/issues/1307 because the FP3 does not use “heimdall” for the OEM unlocking step (or better: it doesn’t use “heimdall” at all).

And I’ve updated the issue https://gitlab.e.foundation/e/backlog/-/issues/1276 about running the installer in an IDE so that it is possible to do it without any manual changes to the build file or file locations.

:slight_smile: looks like we were too focused on the Samsung devices while writing the code.

1 Like

I solved this issue this way. I think one universal script to flash all will be to complex. I suggest to prefix device specific scripts. This way developers will not break other device code. For leeco the prefix would be le_s2_ww.

2 Likes

Today I pushed my work-in-progress for the FP3 to the /e/ gitlab instance.

Basically one has to do the following things

  • create two config files (YAML format)
    • one to call the actual flashing scripts with the right parameters
    • a second one to customize the screens with instructions and error messages matching the steps in the first file
  • add scripts to do the actual flashing if necessary

I’ve done that and tested the flashing scripts manually. Now I’m in the process of testing them as part of the installer.

At the moment I’m faced with one problem:
The currently supported Samsung models are flashed by a combination of download and recovery mode, but for the FP3 it’s done in fastboot mode all the time.
That means for now the step to flash the partitions starts too soon. It checks that the device is in fastboot mode, but it is always in fastboot mode after the OEM unlock step, even if the user has not confirmed the unlocking yet. That way the installer already starts flashing while the bootloader is still locked.

Two possible solutions come to mind

  • force the user to click ‘continue’ in the UI instead of continuing as soon as the correct mode is found
  • make the second time the phone is checked for fastboot mode also wait until the state of the bootloader is ‘unlocked’

I’ll keep a list of detailed todos at

Edit: went for option 2 and added a new script to check if the unlocking was successful. Currently pushed version ran successfully from my IDE and flashed the FP3. But the phone had /e/ on it already. Should probably test by first flashing the stock ROM again to both slots.

3 Likes

Currently I’m stuck again where I want to test the packaged installer with added FP3 support.

I’ve run ./gradlew dist which creates build/distributions/easyInstaller-linux-x64.zip

When I unzip that archive and run easy-installer from the bin subdirectory, the installer comes up and I can proceed to the screen where my FP3 gets detected.
But then the ‘Continue’ button is greyed out and the console shows an error:

Exception in thread "JavaFX Application Thread" java.lang.IllegalAccessError: class org.yaml.snakeyaml.TypeDescription (in module Easy.installer.merged.module) cannot access class java.util.logging.Logger (in module java.logging) because module Easy.installer.merged.module does not read module java.logging
        at Easy.installer.merged.module/org.yaml.snakeyaml.TypeDescription.<clinit>(Unknown Source)
        at Easy.installer.merged.module/org.yaml.snakeyaml.constructor.Constructor.<init>(Unknown Source)
        at Easy.installer.merged.module/org.yaml.snakeyaml.constructor.Constructor.<init>(Unknown Source)
        at Easy.installer.merged.module/org.yaml.snakeyaml.Yaml.<init>(Unknown Source)
        at ecorp.easy.installer/ecorp.easy.installer.threads.ThreadFactory.loadYAMLFile(Unknown Source)
        at ecorp.easy.installer/ecorp.easy.installer.threads.ThreadFactory.changeMould(Unknown Source)
        at ecorp.easy.installer/ecorp.easy.installer.controllers.MainWindowController.setDevice(Unknown Source)
        at ecorp.easy.installer/ecorp.easy.installer.controllers.subcontrollers.DeviceDetectedController.lambda$startDetection$0(Unknown Source)
        at javafx.base/com.sun.javafx.event.CompositeEventHandler$NormalEventHandlerRecord.handleBubblingEvent(Unknown Source)
        at javafx.base/com.sun.javafx.event.CompositeEventHandler.dispatchBubblingEvent(Unknown Source)
        at javafx.base/com.sun.javafx.event.EventHandlerManager.dispatchBubblingEvent(Unknown Source)
        at javafx.base/com.sun.javafx.event.EventHandlerManager.dispatchBubblingEvent(Unknown Source)
        at javafx.base/com.sun.javafx.event.BasicEventDispatcher.dispatchEvent(Unknown Source)
        at javafx.base/com.sun.javafx.event.EventDispatchChainImpl.dispatchEvent(Unknown Source)
        at javafx.base/com.sun.javafx.event.EventUtil.fireEventImpl(Unknown Source)
        at javafx.base/com.sun.javafx.event.EventUtil.fireEvent(Unknown Source)
        at javafx.base/javafx.event.Event.fireEvent(Unknown Source)
        at javafx.graphics/javafx.concurrent.EventHelper.fireEvent(Unknown Source)
        at javafx.graphics/javafx.concurrent.Task.fireEvent(Unknown Source)
        at javafx.graphics/javafx.concurrent.Task.setState(Unknown Source)
        at javafx.graphics/javafx.concurrent.Task$TaskCallable.lambda$call$1(Unknown Source)
        at javafx.graphics/com.sun.javafx.application.PlatformImpl.lambda$runLater$10(Unknown Source)
        at java.base/java.security.AccessController.doPrivileged(Native Method)
        at javafx.graphics/com.sun.javafx.application.PlatformImpl.lambda$runLater$11(Unknown Source)
        at javafx.graphics/com.sun.glass.ui.InvokeLaterDispatcher$Future.run(Unknown Source)
        at javafx.graphics/com.sun.glass.ui.gtk.GtkApplication._runLoop(Native Method)
        at javafx.graphics/com.sun.glass.ui.gtk.GtkApplication.lambda$runLoop$11(Unknown Source)
        at java.base/java.lang.Thread.run(Unknown Source)

I’m not familiar with the Java module concept. It seems I need to grant access to module java.logging for module org.yaml.snakeyaml (or for the entire bundled application?).
But I don’t know how to do that. My naive though was to try something like

opens java.logging to org.yaml.snakeyaml;

in module-info.java, but that gives an error:

> Task :compileJava
/x01/user/ingo/FP3/eelo/easy-installer/src/main/java/module-info.java:32: warning: package is empty or does not exist: java.logging
    opens java.logging to org.yaml.snakeyaml;
              ^

Any idea how to fix this?

Edit: Not sure if that is a good solution, but it works when I add mergedModule setting as below in build.gradle:

jlink {
    imageZip = project.file("${buildDir}/distributions/${appPackaging}.zip")
    options = ['--strip-debug', '--compress', '2', '--no-header-files', '--no-man-pages']
    mergedModule {
        requires "java.logging"
    }
    [...]
}

Unfortunately then the next error is when wiping the user data with fastboot -w:

/x01/user/ingo/FP3/eelo/linux-installer/bin/adb/mke2fs failed with status 1

fastboot: error: Cannot generate image for userdata

So I also need to package mke2fs.

I now have a working alpha version for the FP3 support :slight_smile:

No binary package yet, but in order to test it on Linux, you can try this (needs a working Java Development Kit)

  1. Download the sources: https://gitlab.e.foundation/Ingo-FP-Angel/easy-installer/-/archive/fp3/easy-installer-fp3.zip
  2. Unzip the sources to a folder of your liking; let’s assume /tmp/easy-installer-source
  3. Open a terminal and execute the following commands
    cd /tmp/easy-installer-source
    ./gradlew dist
    
  4. The last command creates a binary package /tmp/easy-installer-source/build/distributions/easyInstaller-linux-x64.zip; unzip that to a new folder; let’s assume /tmp/easy-installer-linux-x64
  5. In the terminal from step 3 run the installer by executing
    /tmp/easy-installer-linux-x64/bin/easy-installer
    
  6. Follow the steps in the installer UI

By running the installer from the command line you can see some debug output as it progresses. That might be helpful in case there is a poblem.

Things that still need to be done, known problems and a few ideas for future improvements at: https://gitlab.e.foundation/Ingo-FP-Angel/easy-installer/-/blob/fp3/TODO_FP3.md

Edit: if anyone wants to skip steps 1 to 3, I have uploaded the binary package to my e.cloud storage at https://ecloud.global/s/QLxnQj49iHKxtQz

5 Likes

Hi @Ingo_FP_Angel I am sorry I missed your call for help, as I am interested in this tool too, to ease /e/OS installation by Commown’s customers themselves. I just built and launched it successfully, but still need some time to try it. If you already see some work / review / fr t10n I could do, I’d be glad to help. Just to let you know, my java knowledge is completely out of date but as an experienced python dev I might be of some help.

Hi @fcayre, I think at this point in time it might not even be necessary to touch the java codebase. The design of the installer is such that adding a new device would mainly require just editing config files or batch scripts.

Right now I’d say the best ways to help are

  • testing my changes with an FP3
    • “works for me”; but I’ve done the flashing manually and with my version of the installer so many times, I might overlook problems others might be having
  • testing my changes with the initially supported Samsung models
    • sure, I don’t think I’ve touched any parts that could break the initial functionality of the installer, but I don’t have a Samsung device I could use to verify that assumption
    • ideally someone with both an FP3 and a supported Samsung model would test to identify what screenshots/images need to be created for the FP3 (I’ve never seen the screens of a successful installation on Samsung phones; so I’m not 100% sure how it’s supposed to look for the user)
  • finding out how to actually create a snap package and then testing that

I’ve encountered a problem. The locale object is used to determine what file should be used to display instructions, and images (instructions folder). In my case i’m implementing leeco s2. The device id is “le_s2_ww”. Resource bundle does not accept underscores or numbers in variation field of the locale object, it throws an exception. Futher AppConstants.DEVICE_MODEL is never assigned, it is null. I have this proposal to fix the problem: (i’ll make merge request when gitlab is up again).

I looked into the java locale classes and it seems that variants are allowed to contain underscores and numbers, but with certain restrictions.

le_s2_ww would be split into three sub variants: le, s2 and ww and each of the three is then checked individually by

    public static boolean isVariant(String s) {
        // variant       = 5*8alphanum         ; registered variants
        //               / (DIGIT 3alphanum)
        int len = s.length();
        if (len >= 5 && len <= 8) {
            return LocaleUtils.isAlphaNumericString(s);
        }
        if (len == 4) {
            return LocaleUtils.isNumeric(s.charAt(0))
                    && LocaleUtils.isAlphaNumeric(s.charAt(1))
                    && LocaleUtils.isAlphaNumeric(s.charAt(2))
                    && LocaleUtils.isAlphaNumeric(s.charAt(3));
        }
        return false;
    }

That means all of the three parts do not have the minimum length of 4. Which would also be the case for FP3.
Seems like it was pure luck it would have worked with the device names for the initially supported Samsung models.

1 Like

Ok, so that has to change :thinking: 
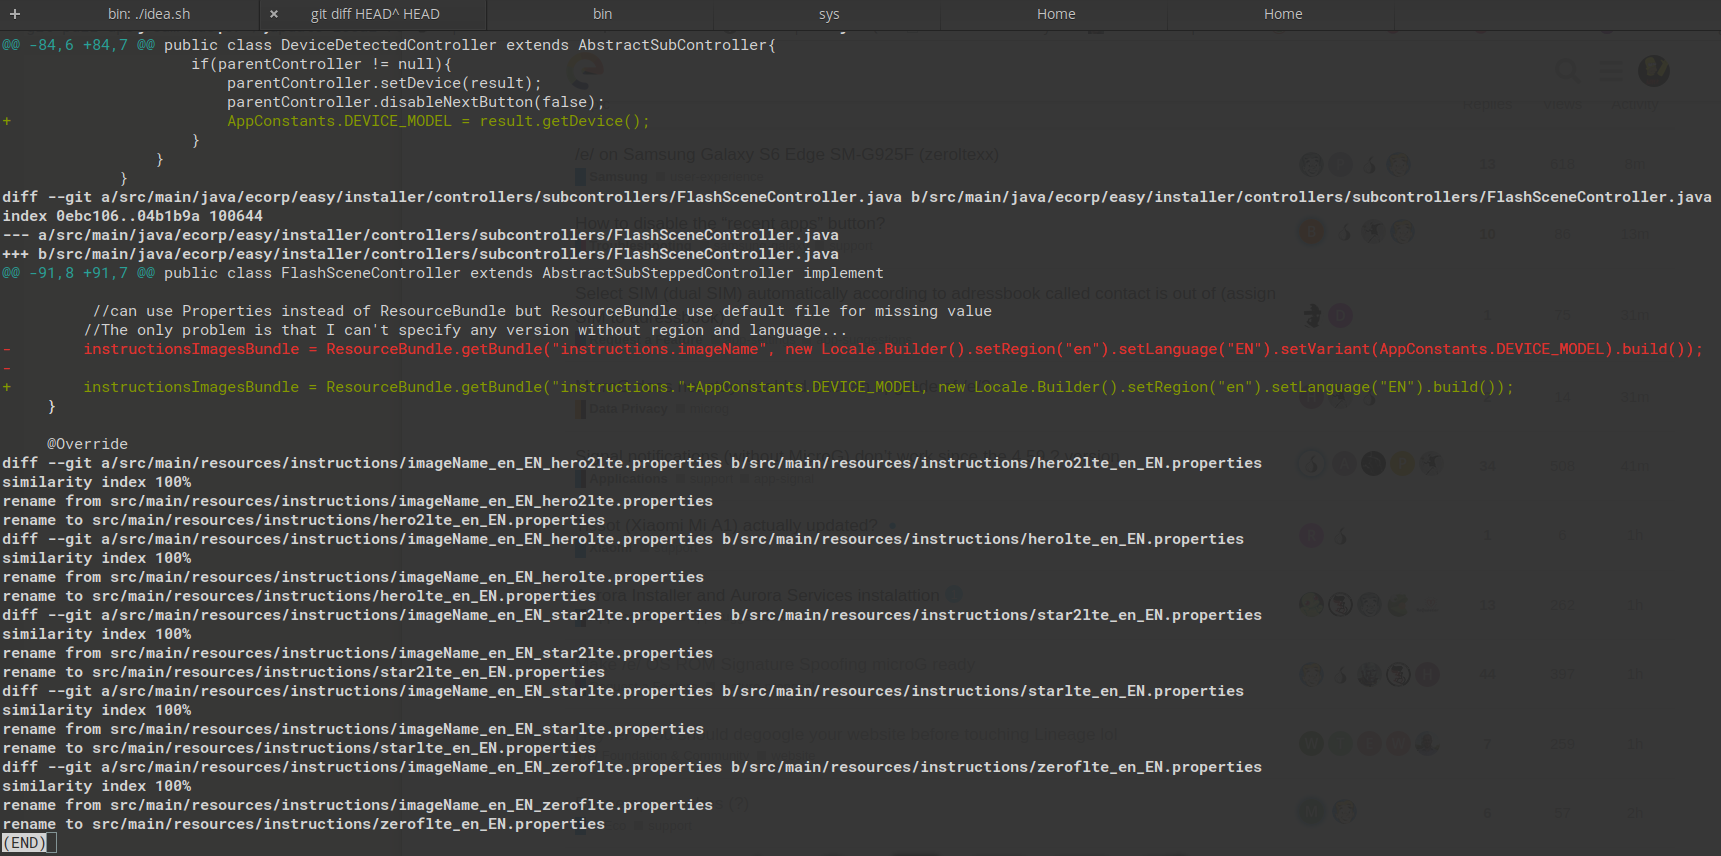
I did not noticed it until i wanted to create custom instructions and pictures.

Hi @Ingo_FP_Angel I am testing the installer with a fresh stock-flashed FP3. I have some questions/ remarks below:

  1. I’m surprised the installer asks the user to configure “Default USB config” (not sure about the label, I use the french t10n) in the Developer options instead of activating the adb interface: this is the only thing that works for me to have the installer detect the phone. Am I missing something?
  2. When adb debugging is already configured, the installer does not detect it before the user passes all the steps describing how to enable it (but it does at the end); not sure it is an FP3-only behaviour.
  3. It is not asked to retrieve the unlock code from Fairphone’s website and enter it in the dedicated UI in the developer options before restarting to bootloader, so unsurprisingly the installer fails with the message “Can’t allow custom OS installation on your device”. Again, am I missing something? Maybe your entered this unlock code once for all in your phone and it is no more required for you (sorry I ignore how this unlock code is supposed to allow fastboot oem-unlocking).

Waiting for your feedback before going any deeper in the code.

I’ll try to answer your questions

  1. I didn’t touch that part of the installer, I have no idea if it (default USB config) is necessary for Samsung devices, I’m pretty sure it isn’t needed for the FP3. Unfortunately, this is the part of the installer that is not device dependent, i.e. it happens before the phone is detected. So right now it’s not yet possible to customize that (and I wouldn’t know how, except for maybe having the user manually select the device, like the Ubports Installer does as a fallback)
  2. This is not device specific. Yes, if USB debugging is already enabled, one would have to skip through all the instructions again and again. But then I guess it was decided to do it that way with the typical user in mind: someone not familiar with flashing phones who will do this only once during the lifetime of their phones. I assume the target audience will not have to go through this twice ore more times.
  3. Yeah, good point, I need to add this to the TODO list. My FP3 didn’t need the unlock code and according to several reports on the Fairphone forum some needed it and some didn’t. But I have no idea if it’s 50:50, 80:20 or some other ratio. And I also have no idea if the code is needed only once (on top of my head I don’t even remember which step is affected by that as I never had to do it).

Hi Ingo, thanks for your answers!

  1. I’m testing with the FP3 and experienced what I described: I had to enable “USB debugging” in the developer options for the installer to detect the phone. This is consistant with the source of runAdbDevicesCmd (from ecorp/easy/installer/threads/DeviceDetectionTask.java), which shows that a simple adb devices -l is issued to detect the phone. Its looks like a (device independent) bug, doesn’t it? I’d like to report this but issues aren’t activated on the dedicated gitlab project page unless I need a special authorization to report?
  2. you’re right, this is an improvement I could suggest or try to develop myself.
  3. very interesting, I’ll ask Fairphone support about this.

You can create a new issue here: https://gitlab.e.foundation/e/backlog/-/issues
It will then assigned to the easy-installer by /e/ staff.

@fcayre One more question: could you please open a terminal and cd to the unzipped installer and then execute

./bin/adb/fastboot flashing unlock

Please post the full output of that command.

I can’t say when I have the time to work on this particular issue, but it would be good to know what error occurs (I can’t reproduce with my FP3).

Edit: sorry, the FP support pages at https://support.fairphone.com/hc/en-us/articles/360041655711 were helpful, i.e. that the code is necessary when doing the “allow unlocking” in the Android developer options.
In that case the fastboot command simply finds the unlocking is not allowed.

So it’s basically a question of how to best make the steps device specific that are done before the device is detected…

Hi @Ingo_FP_Angel of course, there you are:

$ ./bin/adb/fastboot flashing unlock
                                                   FAILED (remote: 'oem unlock is not allowed')
fastboot: error: Command failed

(the whitespaces are copied as they are).

Note that the official Fairphone guide mentions the unlock code twice: in the developer options UI and in fastboot mode. You cannot avoid inputting it in the Android UI (in “developer options”), and I am not sure you can avoid it in the “fastboot oem unlock” command line either. I can test that again if you need.

1 Like

I thought a little about the problem that the instructions how to enable USB debugging and OEM unlock are device specific. That is, before being able to use adb to detect the phone model, detecting the phone model in order to display the instructions how to make it detectable by adb… :thinking:

On linux one could query the usb system like this:

$ lsusb   
Bus 002 Device 008: ID 18d1:4ee1 Google Inc. Nexus Device (MTP)
...
$ udevadm info --name=/dev/bus/usb/002/008
P: /devices/pci0000:00/0000:00:1d.0/usb2/2-1/2-1.8
N: bus/usb/002/008
S: libmtp-2-1.8
E: BUSNUM=002
E: DEVLINKS=/dev/libmtp-2-1.8
E: DEVNAME=/dev/bus/usb/002/008
E: DEVNUM=008
E: DEVPATH=/devices/pci0000:00/0000:00:1d.0/usb2/2-1/2-1.8
E: DEVTYPE=usb_device
E: DRIVER=usb
E: GPHOTO2_DRIVER=PTP
E: ID_BUS=usb
E: ID_FOR_SEAT=usb-pci-0000_00_1d_0-usb-0_1_8
E: ID_GPHOTO2=1
E: ID_MEDIA_PLAYER=1
E: ID_MODEL=FP3
E: ID_MODEL_ENC=FP3
E: ID_MODEL_FROM_DATABASE=Nexus Device (MTP)
E: ID_MODEL_ID=4ee1
E: ID_MTP_DEVICE=1
E: ID_PATH=pci-0000:00:1d.0-usb-0:1.8
E: ID_PATH_TAG=pci-0000_00_1d_0-usb-0_1_8
E: ID_REVISION=0409
E: ID_SERIAL=Fairphone_FP3_A209GPVJ0202
E: ID_SERIAL_SHORT=A209GPVJ0202
E: ID_USB_INTERFACES=:ffff00:
E: ID_VENDOR=Fairphone
E: ID_VENDOR_ENC=Fairphone
E: ID_VENDOR_FROM_DATABASE=Google Inc.
E: ID_VENDOR_ID=18d1
E: MAJOR=189
E: MINOR=135
E: PRODUCT=18d1/4ee1/409
E: SUBSYSTEM=usb
E: TAGS=:uaccess:seat:
E: TYPE=0/0/0
E: USEC_INITIALIZED=10515153869

Then only take devices into account with E: ID_MTP_DEVICE=1 and then take this property: E: ID_MODEL=FP3

But then, I have no idea if that works on all Linux distros. And of course someone would have to come up with an equivalent way to be used on Windows and Mac OS.

1 Like

New idea :wink:

I’ve been playing around with LibUsb, and it seems I can detect the Phone model by looping through all connected USB devices and checking which of those has a “mtp” configuration.

Some quick console program test: https://github.com/Ingo-FP-Angel/usbdetector/blob/master/src/main/java/de/ingofpangel/Main.java

For my Fairphone 3 it returns “FP3” which is the same as in the output of adb devices -l
Not sure if that’s true for other manufacturers, though.

3 Likes

Yeah, as I feared, my Samsung tablet returns SAMSUNG as Manufacturer and SAMSUNG_Android as Product. And checking for mtp or adb mode requires additional steps. :frowning:

Edit: also, on Windows LibUsb.getStringDescriptorAscii doesn’t return anything for the FP3 but for a Webcam it does. Guess I’ll have to forget about this approach…

Edit 2: some new ideas for the initial steps of the installer

  • check, if devices already is in adb mode
    • if yes, skip the instructions how to enable usb debugging
    • if no, show instructions how to enable usb debugging (should be rather device independent) and check adb mode again
  • once it’s clear that the device is found by adb
    • determine model to see if it’s supported
    • check if bootloader is unlocked (adb shell getprop ro.boot.flash.locked)
      • if not, check if unlocking is allowed (adb shell getprop sys.oem_unlock_allowed)
        • if not, show device-dependant instructions how to enable oem unlock
    • eventually show other device-specific instructions (e.g. that default MTP mode that seems to be required for Samsung devices)

But then, those properties also do not exist on all phones (e.g. for FP2).
Which isn’t too bad, the installer would just show instructions that are not really needed. But as the device is already identified, the instructions can at least be specific.