
Photo by Taylor Vick on Unsplash
Remember the time when you felt happy that free emails services like Gmail were handing out 15 GB of free storage space? Most of us started uploaded our selfies, family photos and those ‘not-to-be-shown-in-public’ photos onto the online cloud storage folders.
As a generation, we rejoiced at this new and ‘safer’ way to store important files and document. No more worrying about the moisture in the cupboard or the water dripping from the ceiling destroying your precious wedding photos. The trick was to convert all the music CDs or photos into digital files and then upload everything onto the cloud and live happily ever after…Right?
Wrong.
Our bubble burst all to soon when we realized that our private photos and documents was not all that safe. We found out for instance that technical support staff could have a peek at our data if they wanted to. Over the years the situation has not changed much.People now are ‘slightly’ more aware of the dangers of storing their personal information online. We have realized that the storage repositories controlled by the bad boys and girls of the tech world like Google, Amazon , Microsoft or Apple to name a few are not all that safe.
All this leads to the question - Is there no way to safely store our personal information?
One option which has gained some traction in recent years is to store it in our own cloud. The team at /e/ has come out with a way for their users to host their own cloud services. For the uninitiated /e/ OS is a Google-free, privacy-focused, android smart phone Operating System. Forked from Lineage, it uses MicroG to run apps which need Google services.
On signing up for an /e/ ID, a user gets a 5 GB free storage space. This storage space is used to save user data in an encrypted form on the /e/ servers. Now the team at /e/ OS has taken the concept of user-data privacy to the next level. In addition to operating a full setup at https://ecloud.global, they have started providing users the ability to self-host their data on the cloud. In this article lets have a look at how this self-hosting actually works.
A word of caution the /e/ ‘Host-Your-Own Cloud’ project is still in its beta phase. It requires some prior Linux server administration experience to implement.

The team of Thilo, Felix and Jo who worked on the project from the /e/ development team shared some inputs on how a user can set up cloud storage on his or her own.
Lets begin…
Objective of Self-Hosting
The ‘host your cloud’ project allows /e/ users to install cloud services on their own server, using a single identity. Users by self-hosting can syncing data from their smartphones on to their own cloud. As to what can be stored includes :
- Your Smart phone settings and customization
- Pictures, videos, documents
- Calendars
- Contacts
- Notes
- Tasks
the list goes on
The setup uses NextCloud, OnlyOffice, Postfix besides other open source components.

/e/ product eco-system
System Requirements
For the full setup, the following server hardware is recommended:
- 2 core CPU (x86/x86-64 only, ARM not supported yet)
- 4 GB RAM
- 20 GB disk space
For the setup without OnlyOffice, requirements are a bit lower:
- 1 core CPU (x86/x86-64 only, ARM not supported yet)
- 2 GB RAM
- 15 GB disk space
Please note that Disk space above only refers to the basic installation.
You will need additional space for any emails, documents and files you plan to store on the server.
Additionally you will need to have a minimum of one domain registered.
You can register a domain name from many providers.
A TLS certificates will be added automatically during setup, using Certbot.
Installation
Create an Ubuntu server instance
The project should work with any Ubuntu server (Virtual Private Server (VPS), dedicated server…) versions 18.04 (should work on 16.04).
Debian server should work as well, though the development team mentioned that they have only tested it on Ubuntu as yet.
Hosting at home is also possible in principle. That is if you know how to get you email across providers who may classify it as spam!
Create your hosting server
Follow your hoster documentation to create your server or VPS.
Set your server with proper DNS settings
- Point your domain DNS entries to your server
- Then set the reverse DNS of this server to the same domain (this is usually possible in the VPS settings on the hoster’s website).
An example :
The below example will use yourdomain.com to explain the (initial) DNS setup you need to have for this to work.
It is assumed that your VPS is up and running
This example uses IPv4 address 1.2.3.4 .
Create two A records in the zone file of your domain on your DNS server (or the corresponding webui of the domain registrar):
Then set the reverse DNS of 1.2.3.4 to mail.yourdomain.com.
(note the final dot ‘.’ at the end of our fully qualified domain name).
This is usually possible in the VPS settings on the hoster’s website.
In the following text, $DOMAIN refers to the domain (youdomain.com) that you configured for your selfhosting server.
Start bootstrap process
Login to the server via ssh as root (on Linux/macOS the ssh client is available out of the box
On Windows you need to use an ssh client like Putty for example).
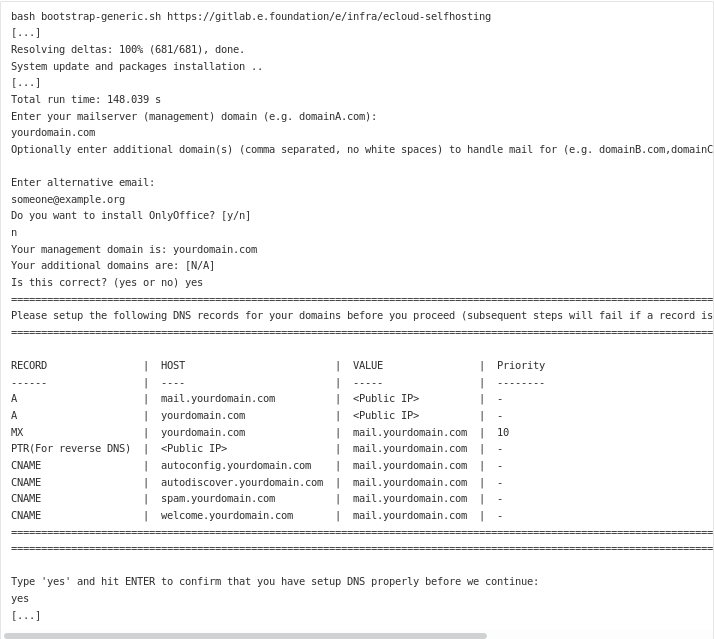
Execute this command and follow its on-screen instructions:

The setup script will ask you to input some details of your setup (like your domain name) and to setup additional DNS records (the two A records plus the PTR record were set already above).
Example session for yourdomain.com:
Manual account creation
A few services can’t be configured automatically and need manual account creation to secure them:

Available Services
You can find login information for these services by running
bash /mnt/repo-base/scripts/showInfo.sh.
Sample output of showInfo.sh:

- $DOMAIN: File hosting with Nextcloud, email with rainloop
- welcome.$DOMAIN: Allows users to sign up for a new account (you can create signup links with bash /mnt/repo-base/scripts/generate-signup-link.sh, account creation with this “self service” is only possible when such a link is generated)
- office.$DOMAIN: Create and edit office documents (OnlyOffice) (only when you answered yes to the question “Install OnlyOffice?” during setup obviously)
Administration
- spam.$DOMAIN: Email spam filter (rspamd)
- mail.$DOMAIN: Administrate email and create accounts (postfixadmin) when not using the “self service” welcome.$DOMAIN - this requires you to set a intermediate password during account creation.
Setting up /e/ OS with /e/ self-hosting
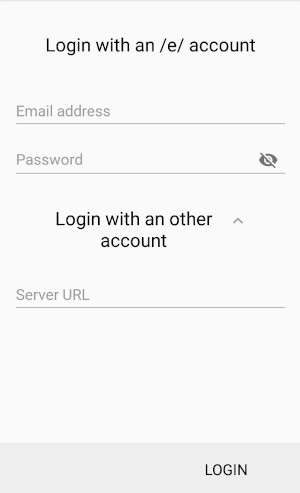
For a new installation, enter login (email address - username@yourdomain.com), password and selfhosting domain FQDN in the fist time usage wizard.
Using login (email address - username@yourdomain.com), password, and specifying your custom server URL using the “Server URL” (https://yourdomain.com) field in “Login with another account”:
If you already have /e/ OS installed, you can add your selfhosting domain under
Settings->Users & accounts->Add account->/e/ account

Settings->Users & accounts->Add account->/e/ account
The team agrees that the setup process as it is at present is a bit ‘technical’.
The plan is to switch to Ansible to make the deployment process simpler.
We will be waiting for that update, team!!
Additional Resources for Reference :
/e/ cloud storage project source code
You can also read this post on Medium