Hi from Japan. Lots of help needed

Well, there’s no coding, but advanced usage with shell (command-line).
If you really need this app, please let me know (I have to test the installation process, as I only have few free time I’ll dig into this only if needed).

1 Like

Such a kind offer but I don’t want to use your time. I’ll figure something out. I’ll try searching in Japanese as well.

Hi, thank you for your purchase !

Sadly some apps need too much Google and that’s probably what’s happening with the app you want to use (see this issue).
As far as I know, only advanced steps can bypass this limitation (and it doesn’t always work).

MicroG is here is replace the “Google Play Services” installed by default on common Android devices. MicroG fakes the Google Play Services and removes unnecessary calls toward Google to protect the privacy. The main function of MicroG is to be able to receive notifications from apps that rely on Google for notifications.

Before summer 2019 MicroG was also able to bypass “SafetyNet”, the thing your app needs to run, but Google changed something and it broke the ability of MicroG to bypass SafetyNet.

1 Like

Thank you. It took me a while but I finally figured out the settings on that app that are good enough to use. The layout isn’t great but it does the job. Hopefully it will just take me a little while to get used to. I’ve been an apple user for over 10 year so my fingers are kind of conditioned to their keyboard.

This message ?

Ok, I managed to get some free time (you may receive messages from unhappy people :laughing:).

Tada !


It survives a reboot without problem, but doesn’t work very well in Shelter.
For the reference my testing phone is running 0.11 Pie /e/.

It’s not as difficult to have LINE working, but it will need some extra care …

The goal is to install LINE with Google PlayStore “marker”, unfortunately it can only be properly done using command-line.

First of all, make sure you have a computer with working adb.
If not, you may follow the guide here : https://wiki.lineageos.org/adb_fastboot_guide.html (this is the guide which is used in /e/ installation guide, for reference https://doc.e.foundation/devices/FP3/install).
I prefer Windows as adb is likely to work out-of-the-box :wink:
In my Windows 10 computer, I installed it in C:\Adb.

Then, before uninstalling the app, download the installation package (.apk) using Aurora.
From left menu choose “My apps”, scroll to LINE, then push the three-dots on upper right :


While you are here, note the package name (behind my arrow).
After some time, you will find the files in your Aurora folder :

Yes, not only one apk file, but a bunch of them. We’ll get back on this later.

Now you can uninstall LINE.

For the next steps, we will need to send commands to your phone, so Developer mode is to be activated with root option.
If not already activated, please follow these steps :
First, tap 7 times on “Build number” in About :


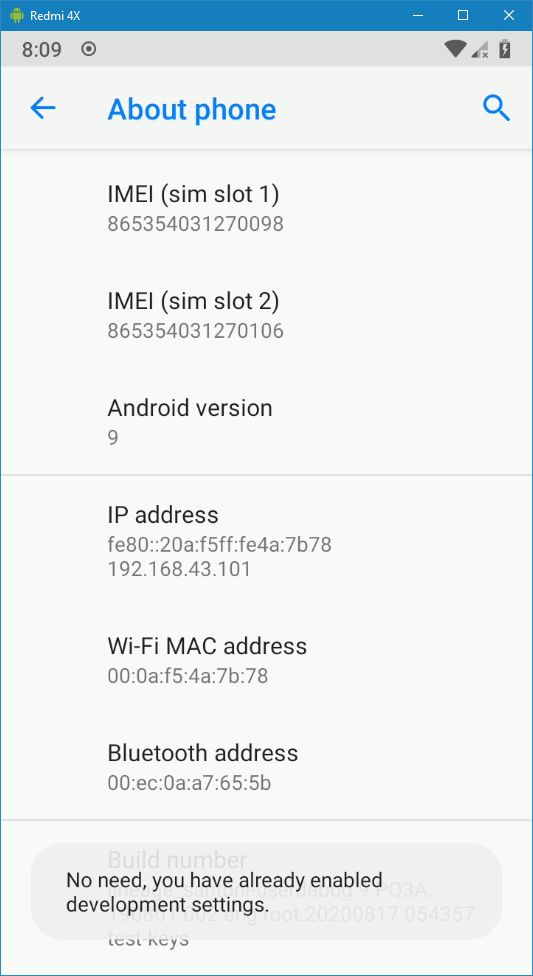
Then go back, System, unfold Advanced, you should find “developer options” at bottom, so we can raise the hood and look at the engine :wink:
Scroll to Debugging, activate ADB, scroll 2 lines upward and activate root access for ADB :

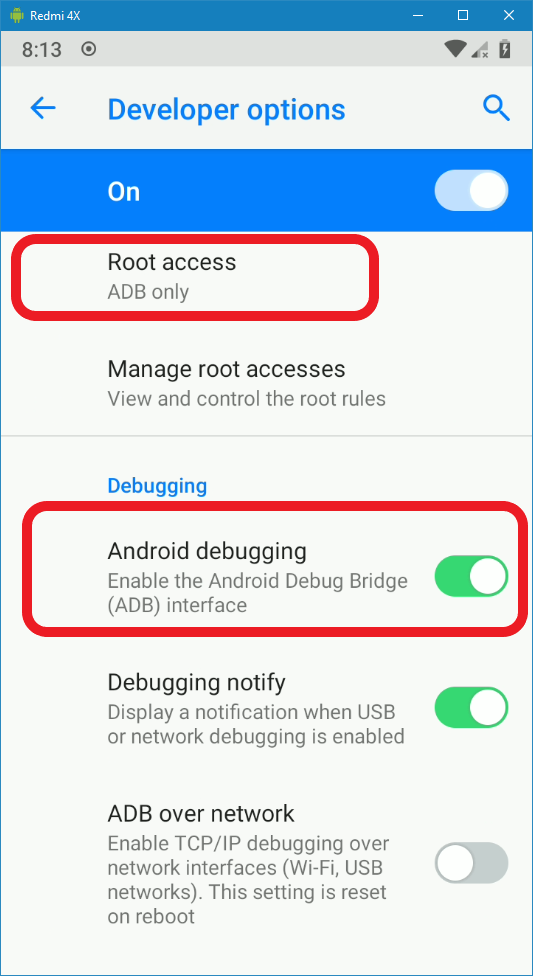
! Note ! When everything’s fine, you may want to deactivate ADB as a matter of security !

Then, if not already done, plug your phone to your computer and launch a command interpreter (in Windows, don’t use Powershell but the good old “Command Prompt”).
Using the “cd” command (https://docs.microsoft.com/en-us/windows-server/administration/windows-commands/cd), go to the folder where your adb.exe is located :


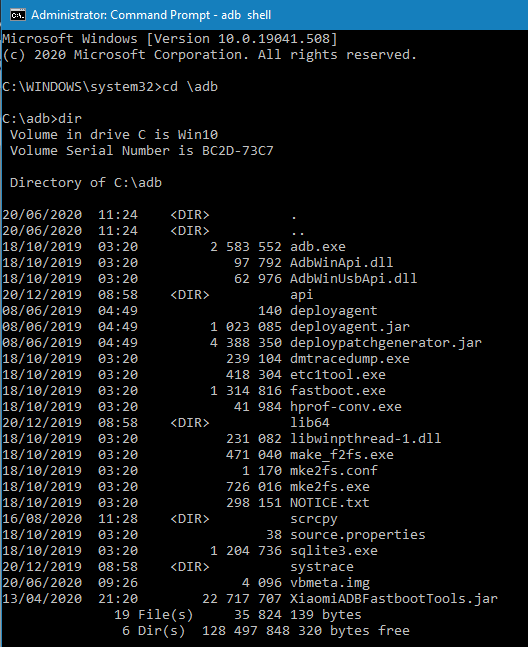
(you may have less files, if adb.exe is present it’s ok :wink: ).

Check that your device is recognized :
image
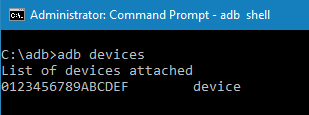
For the first use, you may have to acknowledge the computer key on the phone.

Switch to “root” mode (you may also have to confirm on the phone), and launch a shell (command interpreter) :
image
Note the “#” after your device name : it confirms the root mode.

Then we go to the Aurora folder, and check our apk files :
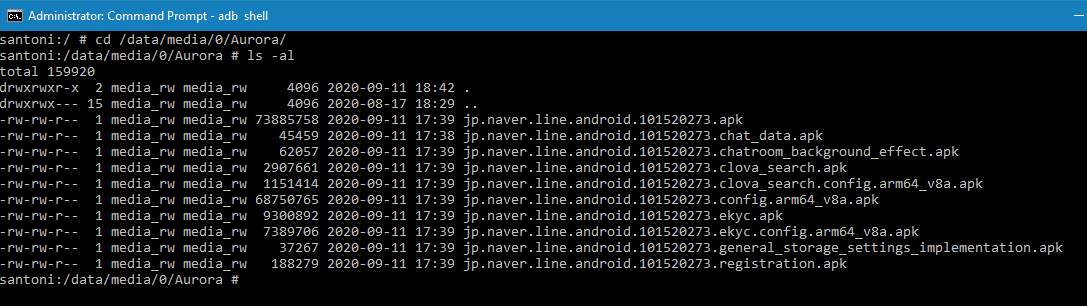

Notes :

  • cd is acting like Windows, but as it is a Unix-like system the path syntax differs
  • ls command lists files, -al is to get an expanded listing

Well, we have our files … Why not only one ? Well, many Android app are provided within only one file, but Google allow developers to split the installation package in pieces. That’s why they are called “split apk”.
Is it a problem for us ? No, but … Installing a one-file apk is easy, installing a split-apk needs some additional efforts :wink:

To achieve our goal we will use the “pm” tool (as for Package Manager I guess).
You can launch it without parameters, it will display it’s help.
Just focusing on the part we need :


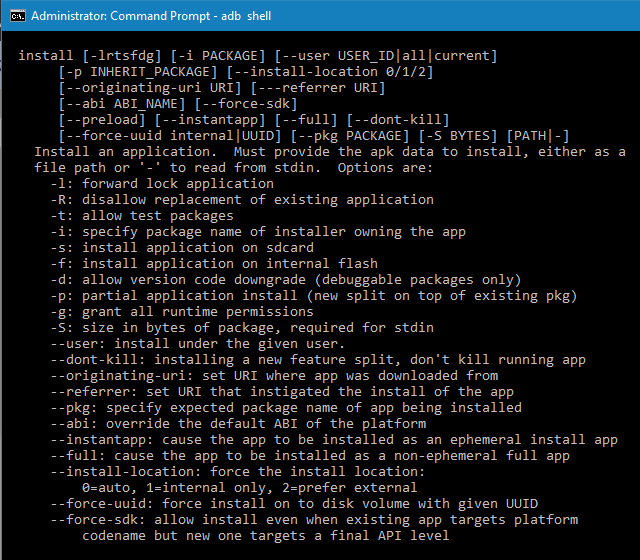
Look at the “-i” option : seems promising, right ?
That’s all we need :slight_smile:

First, install the main package :


What happened here ?
I entered “pm install -i com.android.vending” followed by a space, and a tab.
A Android shell is not as rough as it seems, it outputed the files list and filled my command with the common part of their names (com.android.vending jp.naver.line.android.101520273.).
I just entered “apk” at the end and sent my command.
Of course, you can also enter the whole file name :wink:
About the “com.android.vending” thing : it’s the Google Android PlayStore app name !

Okay, we installed the main package, but what about the others ?
As it is a split-apk, we also have to install them, one by one.
But wait ! Here is the tricky part : as they are additional parts of our main package, they have to be somehow “linked” to it.

Here is how !
First, we need the package name.
To get it, our friend pm is helpful :
image
Note: apk files are commonly named after the package name, but not always … Remember, you can get it from Aurora :wink:

Then we can install all the apk’s as additional packages, one by one (tab completion is very helpful here) :


Note the “-p”, indicating that we are installing additional package to this one.

Once all installed, the app should fire (as least, it did on my test phone, all the three times I installed it :slight_smile: ).

This method seems long and complicated, but in fact it’s very easy once we know what we’re doing.

Hope it will help !

6 Likes

It appears to be no longer maintained. At least there were no updates for quite some time. In case no one else gives a better suggestion you may consider to raise an issue.

In the meantime you may also have a look at AnySoftKeyboard. Maybe there is support for Japanese. I haven’t found any.

Thank you so much for such a detailed tutorial. I’m definitely going to have to read it a good few times and perhaps do some studying before I feel confident doing all that. Yes it is that app and yes it was that message. Thank youuu!

2 Likes

Konnichiwa!
Sorry, that I can not help!
But want to sent greetings from Germany to Japan. Have strong connection to your country as my wife is japanese. :smiling_face_with_three_hearts:

1 Like

Hi @Nyanzai welcome to the forum …always good to meet users from different countries. We do have a few users from Japan and other countries on the forum who have mentioned this issue with lack of support for more languages on the keyboard. Hope the detailed process mentioned by @smu44 works for you.

2 Likes

Thank you! Yes, I would love to see Japanese keyboard support for the main keyboard on /e/ especially being able to input in romaji to kana/kanji like how a Japanese PC keyboard would work. Would make a MASSIVE difference to the experience as you use the keyboard for almost everything. Is there anything in the pipeline to include more language support?

Hi! I’m actually British but my husband is Japanese. I live here permanently :slight_smile:

You’re welcome :slight_smile:

I must admit I had a personal interest in installing split-apk in such way, so it can be a win-win :+1:

Please feel free to ask if something’s unclear !
I forgot to mention : unless you wanna play with other commands or tools while in root shell, this is totally harmless to your phone.

Why not give Android AOSP japanese keyboard a try ? :wink:

Search Aurora for “com.google.android.inputmethod.japanese”.
Once installed, it adds an icon, which is a simple guide to setup :

Once activated, it can be used by the language selection icon :

1 Like

I didn’t think of it mostly because of the “google” in the name. I’m mostly trying to stay away from google due to ethical reasons but also more and more privacy concerns. Are the other keyboards basically google code too? I don’t know much at all about android as this is my very first experience and the switch has been a lot tougher than I imagined (I’m so used to the ease of iphone) I’m sure I’ll get used to this but not sure how much I’m going to understand about the android system, codes, roots and what not hahaha. Soo much to learn it seems. Both my sister and my husband are developers so you’d think I’d know a bit about something but nooope haha :see_no_evil:

Fortunately you don’t need to be a developer to use /e/, leave that to others :smirk_cat:

Most of alternative Android ROM (all ?), including /e/, are based on Google AOSP project : they released Android source code to community to spread it. More readings here : https://www.androidexplained.com/aosp-android-open-source-project/
In short, /e/ devs “just” removed all the calls to Google servers, and some intrusive packages.

But AOSP lakes some features, and sometime we have to deal with Google …

As the Google Japanese AOSP keyboard is advertised as being able to operate without network, we can guess it doesn’t need Google server to work :wink:
AFAIK it has no logger and only one tracker : firebase, which is commonly used to report bugs, crashs, …

You may want to read about TrackerControl is this forum, they are plenty of posts :slight_smile:

Android vs iOS compares to Ubuntu Linux vs macOS : it works flawlessly out-of-the-box, but you can also dig under the hood and tune what you want, which is forbidden by Apple :face_with_symbols_over_mouth:

1 Like

Thank you, I decided to use it. Shame I couldn’t choose one without any trackers but as we’d say in Japan “shoganai” (can’t be helped). Thank you so much for all your help so far!! I do have another problem…I’m trying to set up my calendar to be able to share with my husband, (he uses google calendar) and I read it could be done. I signed up for an /e/ account so I could use the calendar but for whatever reason it keeps telling me I can’t log in and I need to check the credentials (except I use a password manager so I know they are correct). Seems like /e/ is going a bit weird…

If you don’t want any communication between this keayboard and Google, you can simply go into Settings > Apps & notifications > See all > Google Japanese > Data > and remove all permissions to access the internet.

2 Likes

That one doesn’t even have a toggle for internet. Only storage. I gave it no permission anyway when I was setting it up.

Here ?