I compiled my experience while building an /e/OS ROM the Repo Sync way for an unsupported device.
Please have a look and comment or suggestions to improve or correct the instructions ![]()
To prepare everything you need you can have a look e.g. here how to install platform-tools and repo and everything else you need to build yourself the Repo Sync way.
https://wiki.lineageos.org/devices/gts4lv/build
I would recommend to start building with LineageOS and when successful then build with /e/OS. But you can skip this step. In this example /e/OS-R version is used (Android 11/Android R)
So you create a folder where you want to put the /e/OS sources and run following command in the terminal:
repo init -u https://gitlab.e.foundation/e/os/android.git -b v1-r
Start download: (this will take a while, depending on your internet connection it might took some hours)
repo sync
To download the prebuild apps of /e/OS:
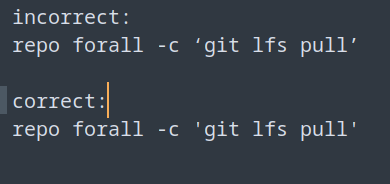
repo forall -c ‘git lfs pull’
Take care of below:

Commands you need to know (mandatory):
Initialize the environment with the envsetup.sh script:
source build/envsetup.sh
Choose a target (in this case its gts4lv)
breakfast gts4lv
Start the build where gts4lv is the device code in this case. The device code are different for every device.
brunch gts4lv
Build Options you should know:
Clean previous builds:
make clean
change to root directory of the project
croot
Caching to speed up build, here its set to 100GB:
export USE_CCACHE=1
ccache -M 100G
export CCACHE_COMPRESS=1
This is often shown when using LineageOS 14.1 and running out of memory, I don’t know if this is still applicable for newer LineageOS versions:
export ANDROID_JACK_VM_ARGS=“-Dfile.encoding=UTF-8 -XX:+TieredCompilation -Xmx4G”
If you have an AMD CPU and get this error during the build: ERROR: Dex2oat failed to compile a boot image.
export CPU_SSE42=false
A good source to find unsupported devices is the XDA forum.
In this how-to I took the Samsung Galaxy Tab S3 as example using LineageOS 18.1 (Android 11/Android R)
https://forum.xda-developers.com/t/rom-unofficial-11-eas-signature-spoofing-ota-sm-t820-sm-t825-2023-08-01-lineageos-18-1-for-galaxy-tab-s3.4293069/
That mean you need to use the /e/OS-R sources (repo init -u https://gitlab.e.foundation/e/os/android.git -b v1-r)
In that above link you find the GitHub sources for this device which you need to download
Sources
Device Tree
    gts3l-common: https://github.com/awesometic/android_device_samsung_gts3l-common
    gts3llte: https://github.com/awesometic/android_device_samsung_gts3llte
    gts3lwifi: https://github.com/awesometic/android_device_samsung_gts3lwifi
Kernel: https://github.com/awesometic/android_kernel_samsung_msm8996
Vendor: https://github.com/awesometic/proprietary_vendor_samsung
You need to grab via git or via web download the respective sources. Just ensure you download the correct branch. In this case its lineage-18.1.
The device tree contain the respective device codes, here you have the ones for the Samsung Galaxy Tab S3 WIFI and LTE version. You have also a common device tree you need to download, ie you need to download the common device tree in every case and wifi or lte version as needed for the device you want to build.
Kernel is one file and contains the respective chipset for this device.
Vendor is similar to device tree and you need the common as well as the WIFI or LTE version.
In the /e/OS folder you created and were you put the /e/OS-R sources you copy now the device sources into:
The device files go into device/samsung, ie you have now device/samsung/gts3l-common and device/samsung/gts3llte and/or device/samsung/gts3lwifi
The kernel file goes into kernel/samsung/msm8996
The vendor files goes into vendor/samsung
Also you need the following to download from GitHub in this case:
LineageOS/android_device_samsung_qcom-common
This file you put into folder: device/samsung/qcom-common
LineageOS/android_hardware_samsung
This file you put into folder: hardware/samsung
The device names and codes are the following:
Galaxy Tab S3 LTE (gts3llte, SM-T825)
Galaxy Tab S3 WiFi (gts3lwifi, SM-T820)
The manifest for the WIFI version is here: https://github.com/awesometic/android_device_samsung_gts3lwifi
The manifest for the LTE version is here: https://github.com/awesometic/android_device_samsung_gts3llte
Just copy the respective xml code into a text editor and save with xml suffix, eg. as gts3llte.xml
You can also create one manifest.xml containing all code for both devices.
The manifest file needs to go into .repo/local_manifests folder. Ensure that this folder contains only one manifest file.
Not in every case you find a manifest.xml for a device in the XDA forum. Then you need to create the manifest.xml your own.
After putting all the sources into the respective folders and store the manifest.xml file into the correct folder you run the following commands to build for the Galaxy Tab S3 WiFi:
source build/envsetup.sh
breakfast gts3lwifi
brunch gts3lwifi
Building will take a while depending on your CPU, RAM and SSD power. If all went fine you find the ROM here:
out/target/product/gts3lwifi
If you have the ROM you need to look at the install instructions for that device.
When you receive an error you need to address it and then you can restart with brunch gts3lwifi.
For the Galaxy Tab S3 LTE you need to use device code gts3llte.
I got an error which I needed to address with the following command. If you encounter the same error you can use below command (adapt for you paths and file):
ln -s lld /mnt/media/e/eos_R/prebuilts/clang/host/linux-x86/clang-r383902b/bin/ld
General information:
Usually you have in the sources the device, kernel, vendor and hardware files you need to put into the respective folders of your /e/OS source folder.
When running breakfast with respective device code you might get an error message pointing out which files are missing. Grab them form the GitHub sources and put them into the respective folders until you don’t get any error any more.
Further information:
Ensure the platform toosl and the build packages as outlined in the https://wiki.lineageos.org/devices/gts4lv/build are correctly installed. Also that repo sync does perform a full sync without errors…
Sometimes you need to apply a patch as per instructions eg.
repopick -f 331661
Just ensure you run source build/envsetup.sh prior to run repopick.
Why not using docker?
Sure you an use docker if you want and if you know where to put the sources and manifest.xml file. I prefer the repo sync way because I can terminate the build easily.