Hello folks,
it’s been a while since my last post and my popular(-ish) step-by-step guide for the initial install of /e/ OS on OnePlus 6.
The reason for being silent is that I stayed on Android 10 for a long while, since any subsequent major update of the OS would have required flashing the stock firmware, which in turn seemed to require wiping and resetting the phone, which was not something I was looking forward to.
But these days I am on holiday and I decided to take the bull by the horns.
Since in the process of upgrading I have discovered some interesting information and facts that are not in the documentation, I thought it was useful to wrap up a new guide to share with the community.
So my present to you for the new year is:
How to dirty flash /e/ OS “T” (Tiramisu, Android 13) over /e/ OS “Q” (Quince Tart, Android 10) without wiping the phone
FROM:
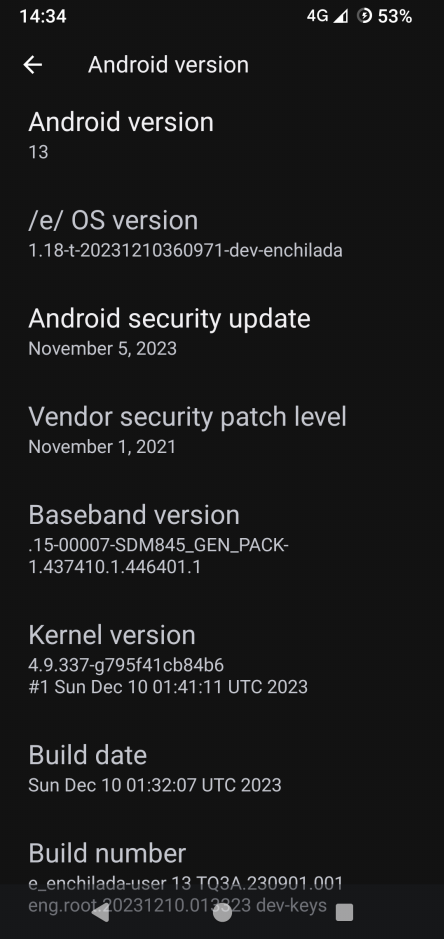
TO: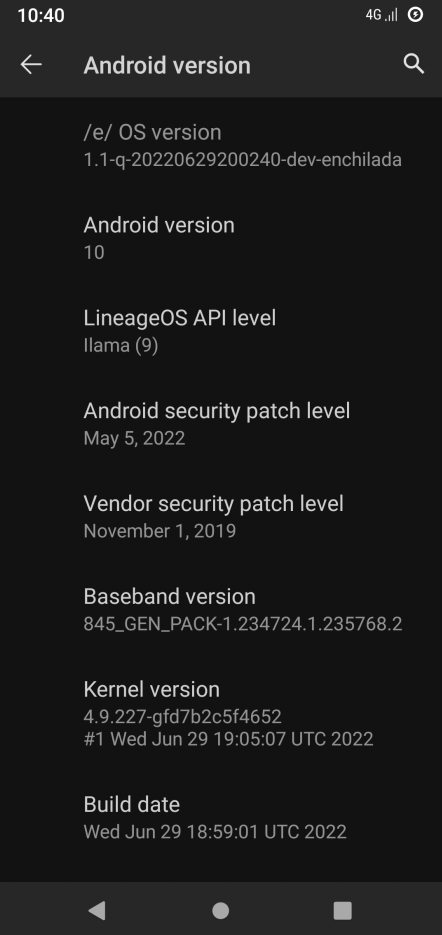
Disclaimer
This procedure worked for me executing the commands exactly as reported and while using the specific origin and destination OS versions that are documented.
Before trying this, you must take a backup of all your data, including but not limited to: contacts, chats, messages, pictures, videos, music and all relevant apps’ data that is stored on your phone.
This is necessary as, if things go wrong, you may have to reset and wipe the phone, which entails all your data will be erased and gone forever.
I shall not be deemed responsible if you ran outta gas, have a flat tire, don’t have enough money for the cab, earthquakes, floods and locusts.
I personally did use a CygWin shell on Windows 11, but the commands illustrated in this guide should be identical on any computer operating system.
Reference documentation
- Lineage OS - Enchilada - Update to a newer vendor firmware version
- Lineage OS - Enchilada - Update to major new version
Note: I used Lineage OS’ documentation instead of /e/ OS’ as the former was more detailed.
Download sources
- /e/ OS downloads - Enchilada - /e/ releases and recovery images for OnePlus 6
- OnePlus Oxygen OS 11.1.2.2 - January 26, 2022 - Latest official “Stock ROM” for OnePlus 6
- payload-dumper-go releases - Firmware extractor for Stock ROMs
- Latest Android platform tools - optional if you already have adb and fastboot
- TWRP - releases for Enchilada - Latest Team Win Recovery Project package for OnePlus 6, optional
- MsmDownloadTool V4.0 for OnePlus 6 - OnePlus unbrick/restore tool, hopefully not necessary
Before you start
- Read the documentation in full at least once, make sure you understand the process and have all the tools and packages at your disposal
- Ensure your smartphone is fully charged
- Take a complete backup of your apps’ data, contacts, images, videos etc. and make a copy of it to your computer, cloud drive or anywhere else outside of your phone
- Download the latest /e/ OS release, the latest Stock ROM, the firmware extractor tool (all mandatory) and, optionally, the additional tools and packages listed in the Download sources links provided above
- check that the files are not corrupted by checking corresponding md5 or sha256 checksums using the most appropriate tools or commands that are available for your computer and operating system
Preparations
You made the backup, haven’t you?
- Install or upgrade Android platform tools (adb, fastboot) on your computer (instructions here)
- Enable USB debugging mode on your phone
Settings > About Phone > Build Number- Tap 7 times to enable Developer Options
Settings > System > Developer Options > Android debugging > Enable
- Remove screen lock password or PIN before starting the upgrade operations
Extract firmware from latest Stock ROM
- Unzip latest Oxygen OS Android 11 stock ROM from OnePlus:
OnePlus6Oxygen_22.J.62_OTA_0620_all_2111252336_287bcb1636d743d3.zip - Follow the instructions below to extract the firmware files from the
payload.binfile found in the uncompressed Stock ROM- the operation should take a couple of minutes
[op6user@hal-9000:~/Downloads] ./payload-dumper-go ../OnePlus6Oxygen_22.J.62_OTA_0620_all_2111252336_287bcb1636d743d3/payload.bin
payload.bin: ../OnePlus6Oxygen_22.J.62_OTA_0620_all_2111252336_287bcb1636d743d3/payload.bin
Payload Version: 2
Payload Manifest Length: 153240
Payload Manifest Signature Length: 267
Found partitions:
LOGO (8.0 MB), abl (2.2 MB), boot (67 MB), dtbo (8.4 MB), fw_4j1ed (352 kB), fw_4u1ea (352 kB), system (3.0 GB), vbmeta (8.2 kB), vendor (1.1 GB), aop (184 kB), bluetooth (766 kB), cmnlib64 (500 kB), cmnlib (381 kB), devcfg (41 kB), dsp (34 MB), hyp (397 kB), keymaster (234 kB), modem (120 MB), qupfw (66 kB), storsec (25 kB), tz (2.1 MB), xbl_config (98 kB), xbl (3.3 MB), oem_stanvbk (975 kB), reserve (968 MB), india (321 MB)
[...]
The operation will create a subdirectory called extracted_[date]_[time] with all the individual firmware images:
[op6user@hal-9000:~/Downloads/extracted_20231227_121513] ls -l
total 5479180
-rwx------+ 1 op6user None    8011776 Dec 27 12:15 LOGO.img
-rwx------+ 1 op6user None    2183168 Dec 27 12:15 abl.img
-rwx------+ 1 op6user None     184320 Dec 27 12:15 aop.img
-rwx------+ 1 op6user None     765952 Dec 27 12:15 bluetooth.img
-rwx------+ 1 op6user None   67108864 Dec 27 12:15 boot.img
-rwx------+ 1 op6user None     380928 Dec 27 12:15 cmnlib.img
-rwx------+ 1 op6user None     499712 Dec 27 12:15 cmnlib64.img
-rwx------+ 1 op6user None      40960 Dec 27 12:15 devcfg.img
-rwx------+ 1 op6user None   33554432 Dec 27 12:15 dsp.img
-rwx------+ 1 op6user None    8388608 Dec 27 12:15 dtbo.img
-rwx------+ 1 op6user None     352256 Dec 27 12:15 fw_4j1ed.img
-rwx------+ 1 op6user None     352256 Dec 27 12:15 fw_4u1ea.img
-rwx------+ 1 op6user None     397312 Dec 27 12:15 hyp.img
-rwx------+ 1 op6user None  321073152 Dec 27 12:15 india.img
-rwx------+ 1 op6user None     233472 Dec 27 12:15 keymaster.img
-rwx------+ 1 op6user None  119820288 Dec 27 12:15 modem.img
-rwx------+ 1 op6user None     974848 Dec 27 12:15 oem_stanvbk.img
-rwx------+ 1 op6user None      65536 Dec 27 12:15 qupfw.img
-rwx------+ 1 op6user None  968146944 Dec 27 12:16 reserve.img
-rwx------+ 1 op6user None      24576 Dec 27 12:15 storsec.img
-rwx------+ 1 op6user None 2998927360 Dec 27 12:17 system.img
-rwx------+ 1 op6user None    2056192 Dec 27 12:15 tz.img
-rwx------+ 1 op6user None       8192 Dec 27 12:15 vbmeta.img
-rwx------+ 1 op6user None 1073741824 Dec 27 12:15 vendor.img
-rwx------+ 1 op6user None    3289088 Dec 27 12:15 xbl.img
-rwx------+ 1 op6user None      98304 Dec 27 12:15 xbl_config.img
Upgrade firmware
Important: if you are not running /e/ OS recovery or Lineage OS recovery, the operations described in this section will always fail with one of the following errors:
- Could not check if partition abl has slot all
- Flashing is not allowed for Critical Partitions
I figured out that the reason is that TWRP recovery, that I was using, does not seem to provide access to the fastbootd (note the trailing “d”) mode that is required to perform the firmware update operation that takes place on critical partitions.
Flash over either one of the above mentioned recoveries (e.g.fastboot flash recovery a_working_recovery.img) to fix the issue.
In short, if you don’t have access to a screen similar to the following, firmware flashing won’t work:
Please note the screenshot is not from /e/ OS recovery nor OnePlus 6, but gives the idea.
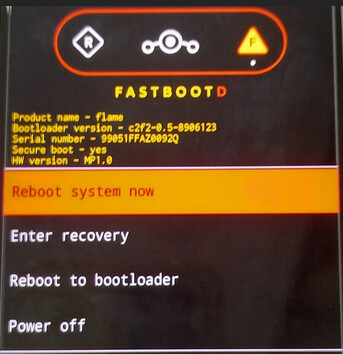
- Reboot the phone into recovery mode to launch /e/ OS’ recovery
/e/ OS recovery > Advanced > Enter fastboot- Stop here, at the
fastbootdmenu level, ignoring the additional options
- Stop here, at the
- With the phone in fastbootd mode, check if the phone is correctly connected:
[op6user@hal-9000:~/Downloads] fastboot devices
a92743xx         fastboot
- Once the connectivity is OK, send to the phone all the necessary firmware images by issuing the following commands:
fastboot flash --slot=all abl abl.img
fastboot flash --slot=all aop aop.img
fastboot flash --slot=all bluetooth bluetooth.img
fastboot flash --slot=all cmnlib cmnlib.img
fastboot flash --slot=all cmnlib64 cmnlib64.img
fastboot flash --slot=all devcfg devcfg.img
fastboot flash --slot=all dsp dsp.img
fastboot flash --slot=all fw_4j1ed fw_4j1ed.img
fastboot flash --slot=all fw_4u1ea fw_4u1ea.img
fastboot flash --slot=all hyp hyp.img
fastboot flash --slot=all keymaster keymaster.img
fastboot flash --slot=all LOGO LOGO.img
fastboot flash --slot=all modem modem.img
fastboot flash --slot=all oem_stanvbk oem_stanvbk.img
fastboot flash --slot=all qupfw qupfw.img
fastboot flash --slot=all storsec storsec.img
fastboot flash --slot=all tz tz.img
fastboot flash --slot=all xbl xbl.img
fastboot flash --slot=all xbl_config xbl_config.img
- When successful, each of the above commands should give an output similar to the following:
[op6user@hal-9000:~/Downloads/extracted_20231227_121513] fastboot flash --slot=all abl abl.img
Sending 'abl_a' (2132 KB)                          OKAY [  0.062s]
Writing 'abl_a'                                    OKAY [  0.019s]
Sending 'abl_b' (2132 KB)                          OKAY [  0.047s]
Writing 'abl_b'                                    OKAY [  0.016s]
Finished. Total time: 0.204s
Before proceeding any further, double check that you have sent over each and every firmware image in the list and that the execution of each command was successful.
- If that is not the case, issue or repeat the necessary commands
Dirty flash new OS (Android 13 “T”)
At this stage, you should be still in the fastbootd menu of /e/ OS recovery (/e/ OS recovery > Advanced > Enter fastboot), from which you can enter the recovery mode to install the new /e/ OS release file in zip format.
Proceed as follows:
/e/ OS recovery (fastbootd) > Enter recovery/e/ OS recovery > Apply update > Apply from adb- With the phone ready to receive the zip file, send the new /e/ OS package (Android 13 “T”) from your computer:
[op6user@hal-9000:~/Downloads] adb sideload e-1.18-t-20231210360971-dev-enchilada.zip
serving: 'e-1.18-t-20231210360971-dev-enchilada.zip'  (~47%)
Total xfer: 1.00x
Please note the transfer progress may stop at 47%, but that’s OK.
It takes about 3 minutes in total (1 min for sending) to complete the installation.
- If you need to install additional zip packages, do it now and before booting into the new operating system: this is especially true if you need to install Google apps/Google Play store
- If desired, restore TWRP recovery as per below
- Be prepared to give OK on the phone in case of warning about unsigned package
[op6user@hal-9000:~/Downloads]  adb sideload twrp-installer-3.7.0_11-0-enchilada.zip
serving: 'twrp-installer-3.7.0_11-0-enchilada.zip'  (~47%)
Total xfer: 1.00x
- Once all the necessary packages are installed, reboot system:
/e/ OS recovery > Reboot system now - Enjoy /e/ OS “T”!
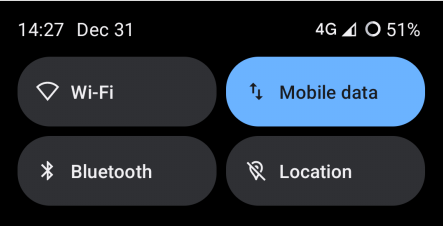
Bonus: restore separate Wi-fi tiles in Quick Settings
As of Android 12, Quick Settings have changed, and Wi-fi is aggregated together with Mobile Data under the Internet tile. I don’t like this, so I found a way to separate these.
Proceed as follows:
- If not already done, enable USB debugging mode:
Settings > About Phone > Build Number- Tap 7 times to enable Developer Options
Settings > System > Developer Options > Android debugging > Enable
- Connect the phone to your computer via USB, then issue the following commands from the computer:
[op6user@hal-9000:~] adb shell
OnePlus6:/ $ settings put global settings_provider_model false
OnePlus6:/ $ settings put secure sysui_qs_tiles "wifi,cell,$(settings get secure sysui_qs_tiles)"
OnePlus6:/ $ exit
Result:
…