Bonjour,
Je suis complétement perdu ! Mon téléphone Pixel 8 a complétement planté lors de l’installation avec le nouveau Web Installer !
Je suis arrivé jusqu’à l’étape ou il faut lancer le “recovery mode” et là Web Installer a planté.
Depuis ce moment le téléphone ne fait que rebooter dans le vide.
J’arrive à lancer le FastBoot Mode (Power + Down), mais Web Installer /e/os n’arrive pas a détecter le téléphone en Fast Boot Mode, par contre le système de récupération de Google (Google Pixel - Update and Software Repair) oui, sauf que lorsqu’on relance “Recovery Mode” ou “Rescue Mode” dans le FastBoot, le téléphone redémarre en boucle et perd la connexion USB.
Avez-vous une idée de comment réparer mon téléphone, il paraît désormais irrécupérable ?
Pierre
Hello,
I’m completely lost! My Pixel 8 phone completely crashed during installation with the new Web Installer!
I got to the step where I had to launch “recovery mode,” and then the Web Installer crashed.
Since then, the phone has been rebooting indiscriminately.
I can launch FastBoot Mode (Power + Down), but Web Installer /e/os can’t detect the phone in Fast Boot Mode. However, Google’s recovery system (Google Pixel - Update and Software Repair) can, except that when I restart “Recovery Mode” or “Rescue Mode” in FastBoot, the phone restarts in a loop and loses the USB connection.
Do you have any idea how to fix my phone? It now seems unrecoverable?
Merci Piero. Je viens d’essayer l’installation via la command windows mais j’ai l’impression que cela ne fonctionne pas, notamment avec la commande adb
J’ai le message suivant,
C:\platform-tool>adb devices
List of devices attached
Du coup, je n’arrive pas à installer la build avec "adb sideload … ".
Je n’ai également pas trouvé le fichier “recovery”…
pour une comprehension globale du processus voir :
comme beaucoup, tu as probablement un soucis de driver Windobe :
ouvrir le gestionnaire de périphériques avec l’appareil branché, mode USB debugging activé (et ordinateur authorisé), puis lancer Windobe Update ET choisir l’option mise à jour des composants optionnels (ou un truc comme ça…)
Mais là, le plantage a l’air particulier. J’ai bien pu mettre à jours le gestionnaire de périphérique “Android Bootloader Interface” mais uniquement lorsque le téléphone est en mode Fastboot.
Le PC ne reconnait pas le téléphone s’il n’est pas en Fastboot. Et quand il démarre sans que je le mette en Fastboot, il tourne en rond… Interface “The bootloader is unlocked and software…” avec le bouton power qui peut juste faire “Press power button to resume” ou “Press power button to pause”, puis j’ai l’écran blanc avec le logo (Google) et écran noir et de nouveau la première interface, etc., etc.
Je suis obligé d’entrer dans le Fastboot Mode pour sélectionner “Power Off” et l’éteindre…
Et ce depuis que j’ai utilisé le WebInstaller qui a planté.
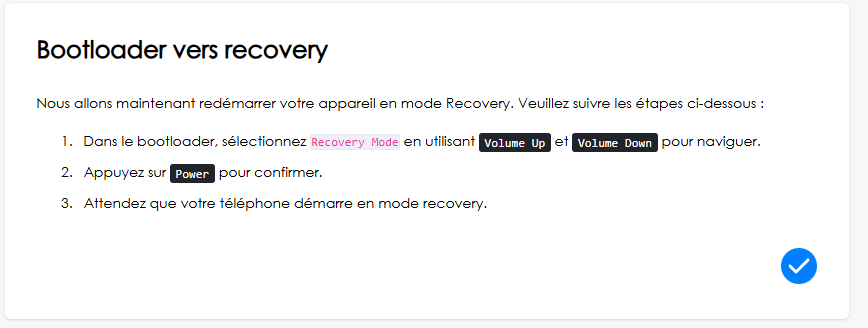
il faut etre en mode recovery pour faire cela,
tu dois d’abord flasher un “custom-recovery” en utilisant fastboot
le fichier recovery.img est dans le IMG-e-2.8-a14-20250219469961-official-shiba.zip que tu as déja téléchargé… mais s’appelle vendor_boot.img
OUPS !
la documentation est correct pour la version 2.6.3,
mais ne correspond plus aux fichiers fournis pour les versions 2.7 et 2.8
sur la page https://images.ecloud.global/official/shiba/
je vois 3 options :
plus prudent, installer la version 2.6.3 en suivant les instructions officielles du Pixel8, puis mettre à jour depuis /e/OS → paramètres → gestionnaire de mise à jour.
Tip: The steps given below only need to be run once per device.
Warning: Unlocking the bootloader will erase all data on your device! Before proceeding, ensure the data you would like to retain is backed up to your PC and/or an online drive
Warning: Some vendors/manufacturers prevent the bootloader from being unlocked. Depending on where your device was acquired you may or may not be able to unlock the bootloader. To verify if your device is compatible please check the devices list.
Enable OEM unlock in the Developer options under device Settings, if present.
Connect your device to your PC via USB.
On the computer, open a command prompt (on Windows) or terminal (on Linux or macOS) window, and type:
adb reboot bootloader
You can also boot into fastboot mode via a key combination:
With the device powered off
hold Volume Down + Power
Once the device is in fastboot mode, verify your PC finds it by typing:
fastboot devices
8.Tip:* If you see no permissions fastboot while on Linux or macOS, try running fastboot as root.
Now type the following command to unlock the bootloader:
fastboot flashing unlock
If the device doesn’t automatically reboot, reboot it. It should now be unlocked.
Since the device resets completely, you will need to re-enable USB debugging to continue.
puis
Installing /e/OS (instructions adaptées du FP4)
Tip: For Windows users, we advise to use Git Bash. For more info about Downloads and Installation see Official Documentation
Je viens de réussir à récupérer le téléphone…
Via l’outil https://flash.android.com/ qui a bien voulu restaurer une configuration Android (Google) à partir du Fastboot…
Bon je suis un peu refroidi ce soir pour repasser sur /e/os…, j’étais sur Grapheneos juste avant avec ce téléphone.
Merci beaucoup pour le coup de main en tout cas.
Je vais encore réfléchir à tout ça.
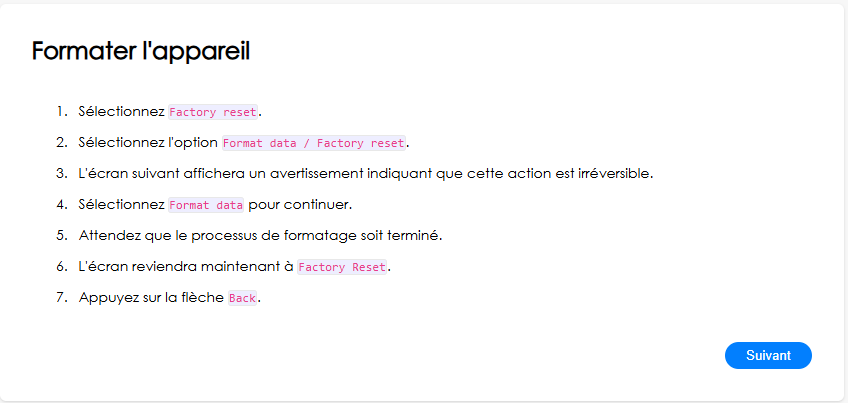
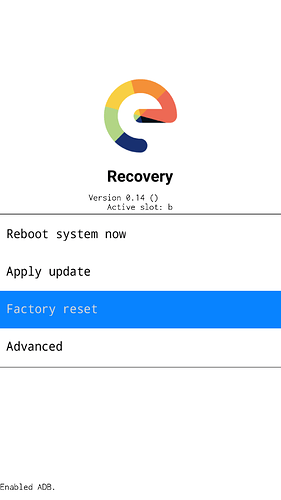
using the already installed GraphenOS recovery, you should be abble to format the /data partition by performing a factory reset,
then “adb sideload” THIS FILE : e-2.9-a14-20250321478214-official-shiba.zip coming from the OTA update server, that will overwrite the /system partition.
in this case do not use the IMG-e-2.9-a14-20250321478214-official-shiba.zip provided on the /e/ website for new installation.
there are numerous post about /e/OS web installer don’t work as expected.
don’t trust it for now !
if you want to use the “official” way to install /e/
from “bootloader/fastboot mode”, all you need to do is to launch the
Bien que je m’y connaisse beaucoup moins en la matière que notre ami @piero, j’ai également déjà vécu un problème de boot à répétition et ce, en utilisant l’ancêtre de webinstaller c’est à dire l’easy installer.
De par mon expérience, je peux te dire que ces outils censés te faciliter la vie ne fonctionnent malheureusement pas toujours…
Afin d’éviter tout problème futur je pense qu’il serait préférable de passer par adb.
Tout d’abord, comme l’a dit @piero, il te faut un custom recovery. Je te recommande perso TWRP car il est très complet mais celui de /e/ devrait également fonctionner. Rend toi sur le site de TWRP et télécharge la version pour ton telephone (tu peux trouver le nom de code de ton téléphone dans la documentation lineage).
Ensuite installe adb si pas deja fait et telecharge la rom que tu souhaites (probablement la plus récente je suppose).
Demarre ensuite adb avec adb devices dans la console windows.
Ensuite démarre en mode recovery et choisit apply update> from adb si c’est /e/ ou install> adb sideload (je crois) si c’est TWRP.
Ensuite utilise la commande adb sideload chemin\vers\le\fichier sur ton ordi.
Si j’ai bien compris ton problème ça devrait le résoudre. Mais suis d’abord l’avis de Piero
Merci à @piero et @VinK3645 pour vos conseils !
J’ai réussi à réinstaller /e/os via adb et je suis bien content de retrouver /e/os sur mon téléphone.
J’ai du passer par la ligne de commande et les conseils de @piero . Impossible avec l’installateur.