Please add your suggestions to improve the documentation for the Fairphone - FP2 - FP2 here …
I guess the following section is general and not device specific:
Tip: Installing a custom recovery or unlocking the bootloader will erase all data on your device! Take a backup of your data before proceeding!!
This is not true for the FP2. Flashing TWRP doesn’t erase data. And the FP2 comes unlocked by default and the bootloader cannot be locked (by accident which then would require a later unlock).
5 Likes
Thanks Ingo will make the correction in the documentation specific to the FP2
3 Likes
I just upgraded from Pie 0.13 to Q 0.14 successfully. For me it run as easy as a normal Pie version upgrade. Here was my very simple procedure all on FP2 :
- Download the build
- move the .zip to the SD card
- stop the phone
- Press poweroff button and volume up to start in recovery mode
- Backup the system to the SD card
- Click install and swipe
- Wait ~5min
- The phone restarts and you have android 10
- All apps and data are still there!
Prerequisites:
- TWRP 3.2.3.0 tested
- No adb fastboot required
- SD card with >4GB free
- Battery level >50% and/or phone plugged.
2 Likes
I have just installed /e/ to my FP2 following the guide.
One thing gave me a bit of a headache: After sucessfully (according to terminal output) flashing TWRP you have to reboot to recovery (step 5).
At this point a accidentally booted to system and lost TWRP. Booting to recovery now showed only the lying android, exclamation sign and “no command”, as if nothing had been flashed.
After some googling I found that if you boot to system right after flashing the recovery image, TWRP is overwritten/deleted/whatever so you must make sure to boot to recovery right away to keep it on the device.
To be sure, just use the manual method described as an alternative: press and hold power+volume up and you’re save 
1 Like
I see here
https://images.ecloud.global/dev/FP2/
that two files are present.
I do not understand, from the tutorial page, what is the use of the “recovery*.img” file ?
Self anwer
I spend hours to find out how to flash TWRP. Flashing was ok but then on each reboot I had the previous android recovery (sibon). It’s because just after flashing you need to reboot in recovery mode, but at this step you are in bootloader mode, without fastboot reboot-recovery command available (“fastboot reboot” set the normal boot process which erase the fresh flashed recovery).
So in “Installing a custom recovery”, after the step “5. Now reboot into recovery to verify the installation” it should be added "Be carefull, rebooting in normal mode can replace your recovery rom with the previous one, the first boot after flashing TWRP need to be in recovery mode : “turn off the phone then turn it up with volumeUp+power”, do not use the “fastboot reboot” command.
Using fastboot reboot is totally fine, but you have to keep Vol + pressed while the phone reboots.
So pressing the button is the important part either way to boot into recovery.
4 Likes
After sideloading the /e/ os zip package and tapping on reboot inside twrp the fairphone for some reason booted into the old os (android).
I have tried this with the 0.16 and the 0.14 release of /e/ without success.
I bought myself a FP2 with stock ROM and my intention is to go through the directions both aiming at flashing /e/ and finding what is missing in the directions themselves.
Am I supposed to write here every step I will find obscure or incomplete, or rather to detail the entire process in another thread ?
FP2 will be my 6th /e/ flashed device after 4 Samsungs and a Motorola.
I’m not in a hurry. I mean I have my S8 with /e/ perfectly suiting my needs, so I will be happy to be helpful on FP2 directions.
For example: in the directions page
the sentence
** Enable USB debugging on your device. You can find the instructions [here] **
should read
** Enable USB debugging on your device. You can find the instructions [here] but it’s not necessary to perform OEM Unlock *
as described here by our FP Angel Ingo (thanks: you are a precious resource !)
1 Like
On page https://doc.e.foundation/devices/FP2/ is offered the possibility to install or upgrade the ROM but apparently the two options lead to the same url
install https://images.ecloud.global/dev/FP2/
upgrade https://images.ecloud.global/dev/FP2/
Is that expected ?
Moreover, on both pages is written that
Caution: Before following these instructions please ensure that the device is on the latest Android firmware.
For example to install to /e/ Q the Android firmware should be Android 10 and for /e/ Pie it should be Android 9
My FP2 is currently under stock Android 9, but as far as I can understand from
https://doc.e.foundation/build-status,
the zip files named
e-0.16-q-20210424112062-dev-FP2.zip
are relative to Q build (Android 10)
Again, is that correct or I badly miss something VERY obvious ?
A user commented that the section on Installing a custom ROM is incomplete
Pl let me know what the sequence of steps would be and will have that updated.
1 Like
It used to be correct, see an older version in the Internet Archive: Install /e/ on FairPhone FP2 - FP2 | /e/ documentation
I think it is sufficient to restore the “Installing a custom recovery” section from there.
3 Likes
Thanks @Ingo_FP_Angel There were some changed made to the code base recently. Some files got overwritten. Will have it restored.
2 Likes
I just upgraded my FP2 from Q 0.21 to R 0.21, by flashing it directly with TWRP from my SD-card (something like here)
I made a TWRP backup beforehand, though.
After installing R 0.21, I cleaned cache and dalvik. Everything worked fine, all my apps are there and moreover, all my accounts!
Thanks for the good work, /e/ team!
3 Likes
Finally I got it done, installed /e/ on my FairPhone2.
Unfortunately not without hours of searching and frustration.
First it started with getting the right Windows 10 driver for the FP2 when it was booted into fastboot mode. The drivers suggested here didn’t work. I found this document and succeed with the 2nd solution and the drivers that are linked there.
Second some problems that are mentioned in this thread, but unfortunately it is only linked at the very end. Please update the https://doc.e.foundation/devices/FP2/install with the following:
- Please add the note, suggested last year by ‘nottolino’, about the fact that the FP2 is unlocked by default at the last step of the ‘Requirements’.
- Please add the explanation, suggested last year by ‘Krokofant’ and ‘DanielC’, to step 6 of the ‘Custom recovery’ about the need to reboot into recovery. And add a command code example.
1 Like
Hello and thank you so much for all your questions and answers, which were very useful to me.
Being a complete beginner, I’m quite proud of having managed to install /e/ on my FP 2 ![]()
However, there is one particular point I think I didn’t understand: to start by the result, (I think) I lost the TWRP backup… ![]()
I read very carefully (a few hundred times ![]() ) and followed very closely the instructions “Install /e/ on a Fairphone FP2 - “FP2” (beta)” (including the links regarding “Install TWRP” and “Backup and Restore with TWRP”).
) and followed very closely the instructions “Install /e/ on a Fairphone FP2 - “FP2” (beta)” (including the links regarding “Install TWRP” and “Backup and Restore with TWRP”).
I thought the backup created by TWRP somehow wasn’t affected by the formatting process (I imagined it was stored in some “magical” place, safe from formatting; for me that was the whole point of doing a backup with this particular tool…). OK, there is a warning ( Caution: Format Data will remove encryption as well as delete all files stored on the internal storage. Remember to take a backup first. Check Requirements section above.). But in that Requirements section, you are just advised to back up using TWRP; if you follow the instructions recommended in that section (which leads you to the link “Backup and Restore with TWRP”), you end up doing a backup which, I guess now, is stored in the internal storage… and which is then deleted by the formatting process, which obviously is absurd…
So in fact, I think that, if you follow those instructions, your TWRP backup is just useless, since it will later be deleted by the formatting process… Is this really so absurd or am I wrong?
I think the instructions should point out that the backup needs to be done not in the internal storage, but somewhere else, isn’t that right? (maybe on an external SD card? but not everyone has one, I don’t…).
It seems quite logical to me now, but I assumed that if that was the case, it would have been specified in the instructions…
Could anyone confirm this… or maybe tell me the good news that in reality I didn’t loose my backup? ![]()
To summarize my situation:
- I had a FP2 running on FP Open OS
- I installed and flashed TWRP (and I did rebooted into recovery the first time, to check the installation)
- I created a backup with TWRP, and checked it was completed
- I installed /e/, which is now working properly
- However, TWRP has now disappeared (when I get into recovery mode, it’s /e/ recovery that appears)
- No traces of my backup. I even installed and flashed TWRP again, but it cannot find any backup…
- So in fact, I guess, I won’t be able to go back to FP Open OS even if I needed…
(Well, at least I made a manual backup of my important files into my PC, and I’m changing to a new FP4 in a few days anyway. I just did all this because I wanted to try installing /e/ on my current old phone).
I’m sorry for this long message, but I hope it will be useful for others in the future.
Thanks in advance!
1 Like
The instructions should point out that either the backup needs to be done not in the Internal Storage but somewhere else or if done in Internal Storage the backup should be copied to a computer via USB immediately afterwards (which is possible while TWRP is running).
As it sounds like you did the “Now tap Format Data and continue with the formatting process.” step in the instructions, Internal Storage was deleted including your backup, as “Internal Storage” is a folder on the data partition.
Else you would have a “TWRP” folder in Internal Storage with the backup in it.
Your backup wasn’t complete anyway, because while TWRP saves the backup in Internal Storage if you don’t or can’t select otherwise, TWRP doesn’t backup anything in Internal Storage.
Internal Storage has to be backed up by other means, e.g. by copying it to a computer via USB (which is possible while TWRP is running).
I don’t see that mentioned in the instructions either, but at least TWRP gives a message about this …
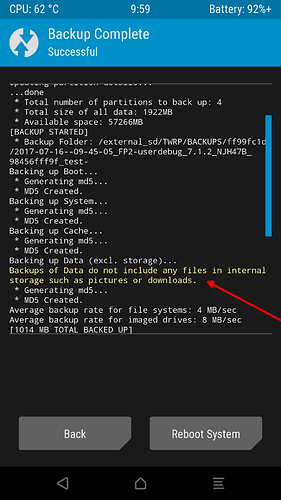
(I know … who reads those.)
Regarding just the OS, you can always install that again, e.g. with this guide here … https://forum.fairphone.com/t/installing-the-fairphone-2-from-scratch-in-case-of-failure-komplette-neuinstallation-des-fairphone-2-im-fehlerfall/46728.
These are your good news ![]() .
.
1 Like
Thank you very much for your answer!
I did learn on TWRP’s website that its backup doesn’t include elements in the internal storage (well, there’s a workaround, by changing the name of the “media” folder, etc.), that’s why I backed up the main elements manually.
However, as I said, I thought that a TWRP backup would somehow be saved in a “secure” place in the phone, safe from formatting. I couldn’t imagine that this essential alert (i. e. “do not forget to save your TWRP backup somewhere else”) would not be clearly specified in the instructions…
I totally agree. Thanks very much for this, which is perfectly clear for me now. Again, I’m a complete beginner, it might be obvious for most (advanced) users, but there might be other people like me for whom this alert would be extremely useful!
1 Like