Help needed, installing stock firmware on a LG / Google Nexus 5X (bullhead)”
.
Regain your privacy! Adopt /e/OS the deGoogled mobile OS and online services
Help needed, installing stock firmware on a LG / Google Nexus 5X (bullhead)”
.
Regain your privacy! Adopt /e/OS the deGoogled mobile OS and online services
I feel that the starting point would be Factory Images for Nexus and Pixel Devices | Google Play services | Google for Developers.
… this requires a bit of reading … and then come back and read it again … then sleep on it … then at the foot of the page … we find Acknowledge.
If you only want Stock ROM at this stage … that is fine.
… but that itself is quite a learning experience.
Well l dunno what l mean by stock rom… it is the person who helped me before and gave up because nothing worked and he felt he was not specialised enough that suggested l write this post with this choice of words so someone who specialises in google phones would want to try with me…
If l try START the phone goes black then GOOGLE appears for 2 seconds then black then battery icon… and then a loop of blach screen and battery icon…
I have a phone with a google that wont boot start or recover and l would like it to work so l can erase all for e/OS
As for reading l dont remember codes nor pathways l am only ok following tutorials but with this specific phone l get often stuck on the way with no solution at all…
Im a person with little knowledge so l need to be guided and explained sometimes basics
OK … a good starting point … this is the idea behind “Stock ROM” … the ROM the manufacturer would have offered …
… one hopes that by getting the “manufacturer” … or “Stock ROM” working would be a suitable base on which to install /e/ OS.
/e/OS really ( / ideally) needs to be installed on a working phone.
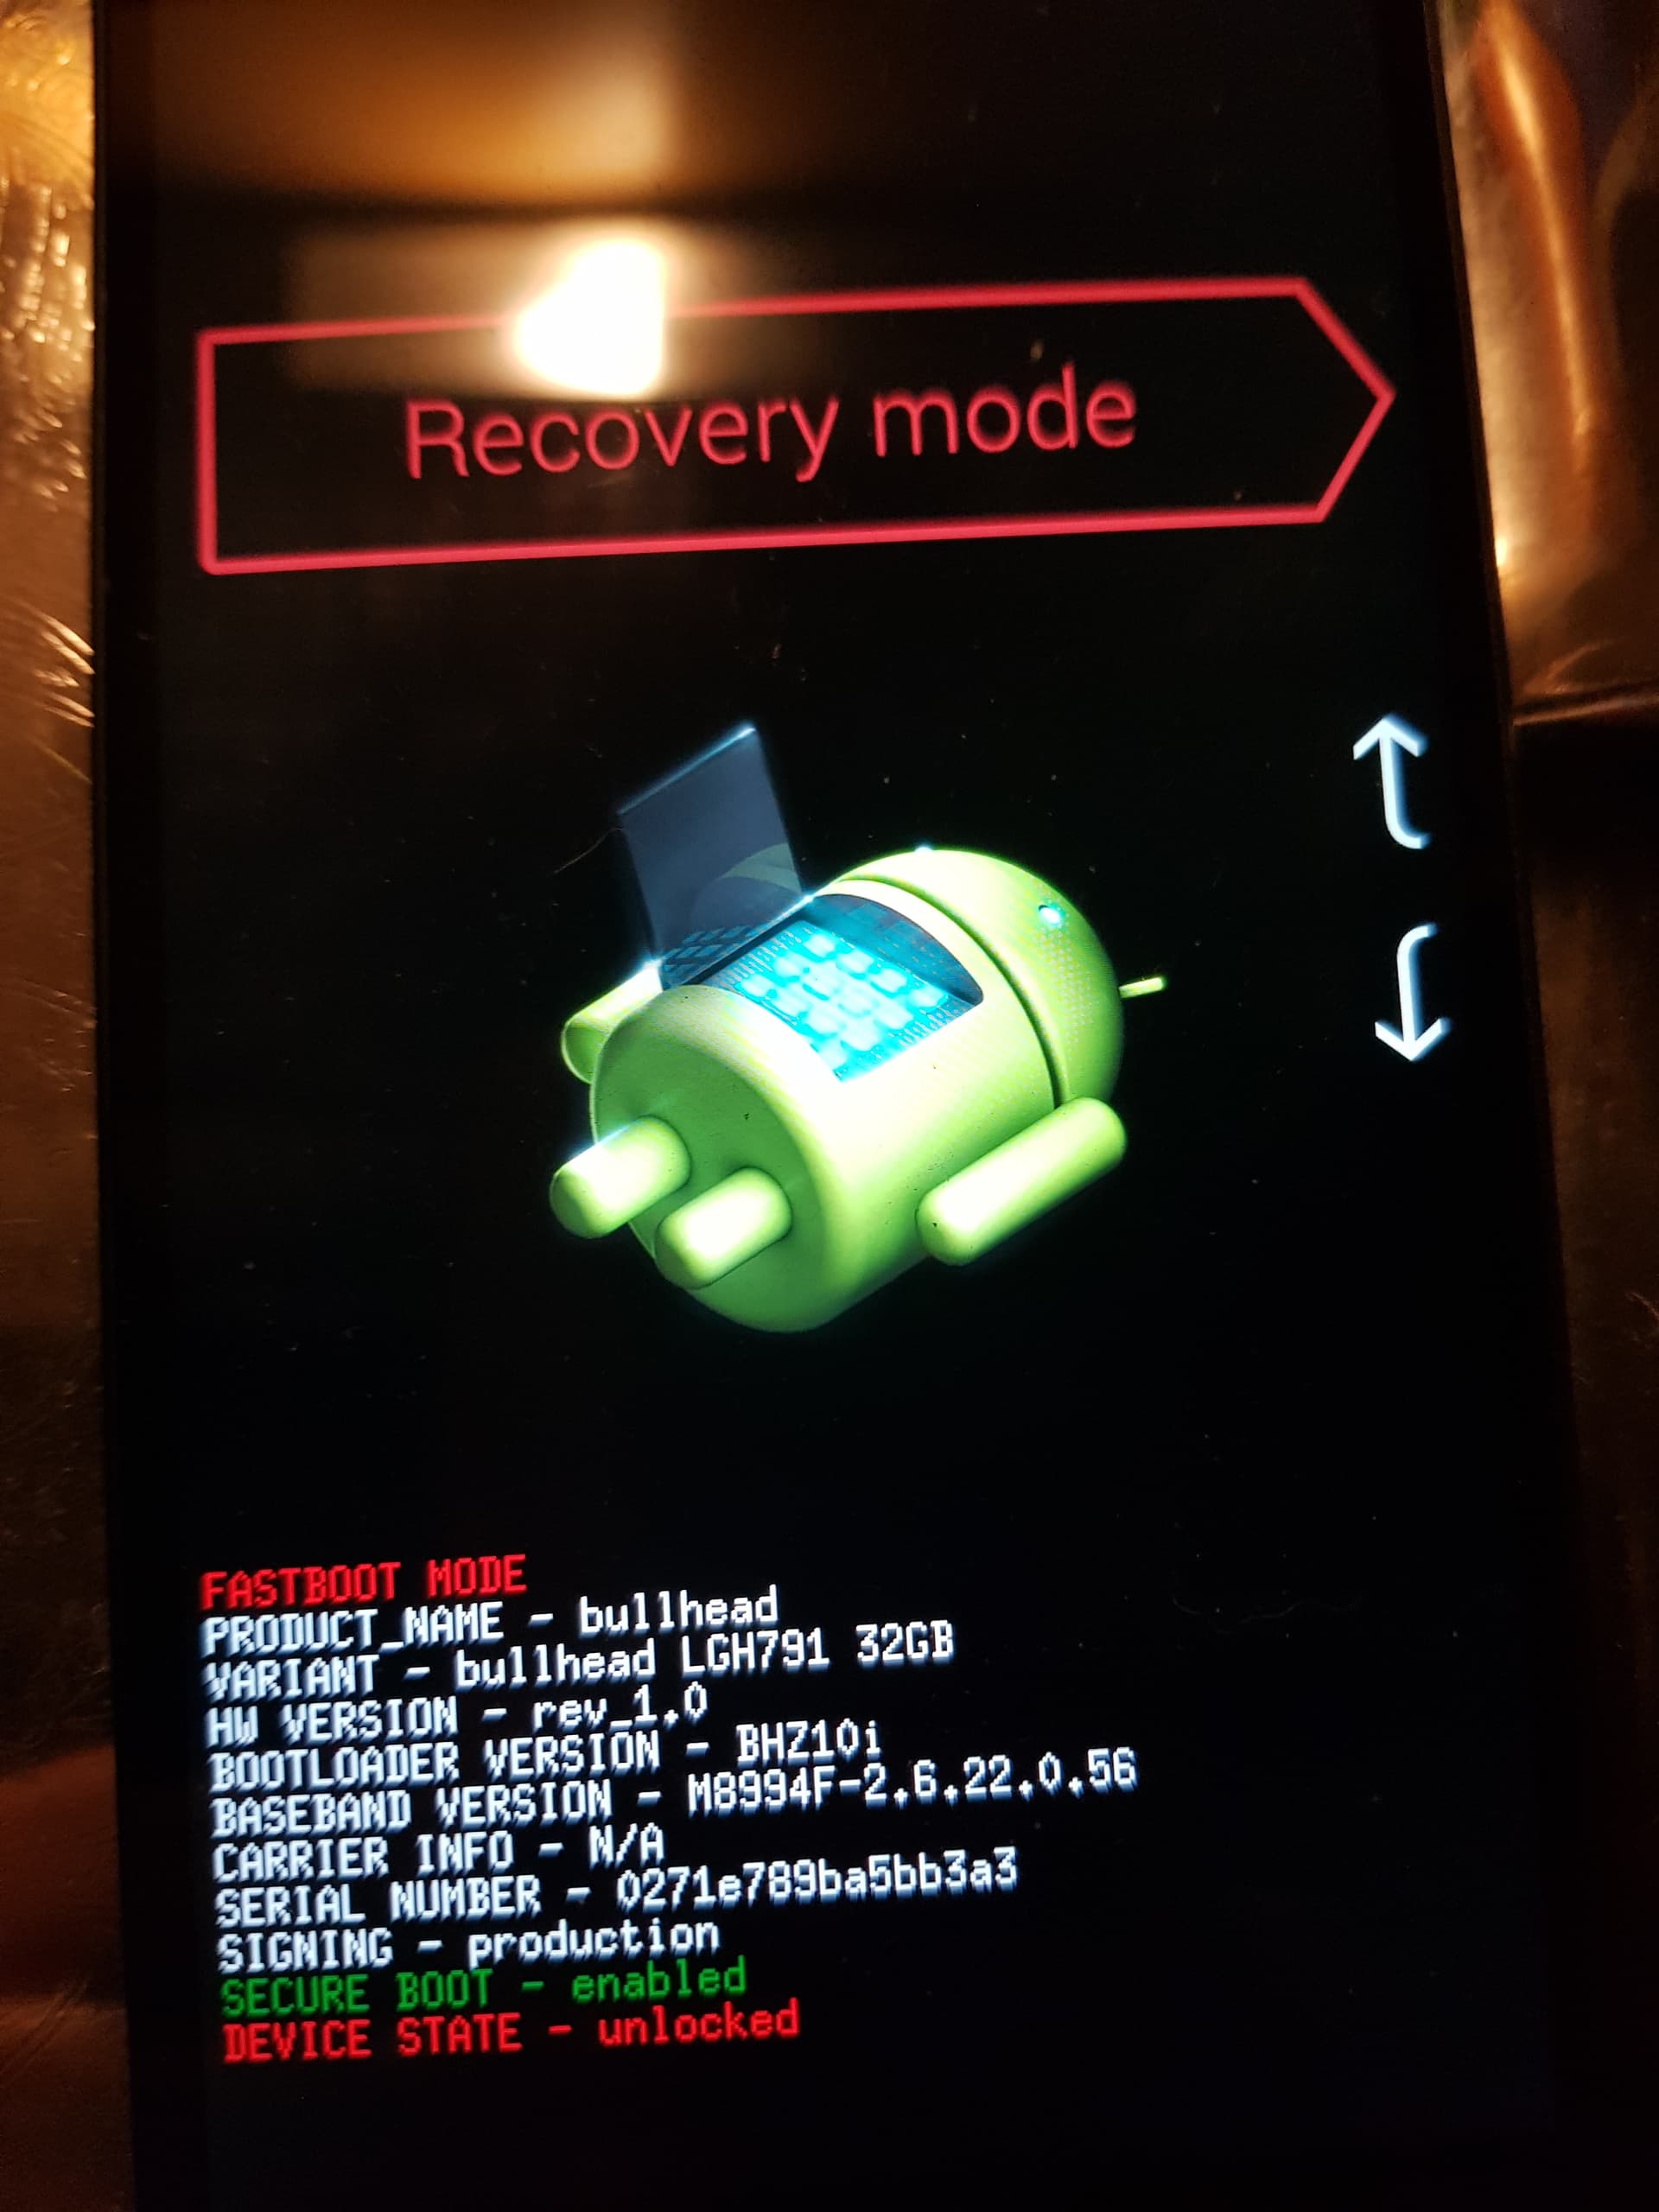
Your image added as an edit shows that you are well on the way with a working “Stock Recovery”.
Thas what we tried but failed
With fastboot
Device does not support slots
Argument something
But there is nothing wrong with my cables and one of them is brand new…
I noticed that.
There are alternatives … which might work for you ?
Im ok to read
Understand what lm reading is another matter…
Send me
I will read tomorrow and tell you if a make some sense of it…
Ok ?
Factory Images for Nexus and Pixel Devices | Google Play services | Google for Developers
This page contains binary image files that allow you to restore your Nexus or Pixel device’s original factory firmware. You will find these files useful if you have flashed custom builds on your device, and wish to return your device to its factory state.
Note that it’s typically easier and safer to sideload the full OTA image instead.
If you do use a factory image, please make sure that you re-lock your bootloader when the process is complete.
These files are for use only on your personal Nexus or Pixel devices and may not be disassembled, decompiled, reverse engineered, modified or redistributed by you or used in any way except as specifically set forth in the license terms that came with your device.
Note: For convenience, we listed the release date along with each build. Please note that sometimes the release date may be different from the security patch level (SPL) date. The SPL dates for each build can be found here.
The factory image downloaded from this page includes a script that flashes the device, typically named flash-all.sh (On Windows systems, use flash-all.bat instead).
Warning: To flash a device using one of the system images below (or one of your own), you also need the latest fastboot tool. You can get it from the Android SDK Platform-Tools package, which you can download here.
Once you have the fastboot tool, add it to your PATH environment variable (the flash-all script below must be able to find it).
Also be certain that you’ve set up USB access for your device, as described in Run Apps on a Hardware Device.
Caution: Flashing a new system image deletes all user data. Be certain to first backup any personal data such as photos.
To flash a system image:
Using the adb tool: With the device powered on, execute:
adb reboot bootloader
* Using a key combo: Turn the device off, then turn it on and immediately hold down the relevant [key combination](https://source.android.com/source/running#booting-into-fastboot-mode) for your device.
* If necessary, unlock the device's bootloader using one of the following methods:
* If you are updating a Nexus or Pixel device that is manufactured in 2015 or later (for example, a Nexus 5X, Nexus 6P, Pixel, Pixel XL, Pixel 2 or Pixel 2 XL device), run this command:

* ```
fastboot flashing unlock
Note: the ‘flashing unlock’ command is only available with fastboot version 23.0.1 or later. The latest available version of fastboot can be downloaded from SDK Platform Tools.
For Pixel 2: To flash the bootloader, Pixel 2’s boot loader must be updated to at least Oreo MR1’s version first. This may be done by applying an over-the-air (OTA) update, or sideloading a full OTA with the instructions on that page.
For Pixel 2 XL only with loader version prior to TMZ20a: the critical partitions may also need to be unlocked before flashing. The unlock can be performed with this command, and should NOT be done on other devices:
fastboot flashing unlock_critical
* If you are updating an older device, run this command:

1. * ```
fastboot oem unlock
```The target device will show you a confirmation screen. (This erases all data on the target device.)See [Unlocking the bootloader](https://source.android.com/source/running#unlocking-the-bootloader) for more detailed instructions.
2. Open a terminal and navigate to the unzipped system image directory.
3. Execute the `flash-all` script. This script installs the necessary bootloader, baseband firmware(s), and operating system.

4.*Tip:** if you're seeing `adb devices` output before reboot but fastboot or the flash script are misbehaving, it might be issues with your USB cable. Try a different port and/or switching connectors. If you are using a USB C port on your computer try a USB A port instead.

Once the script finishes, your device reboots. You should now lock the bootloader for security:

1. Start the device in fastboot mode again, as described above.
2. Execute:
fastboot flashing lock
or, for older devices, run:

1. ```
fastboot oem lock
Locking bootloader will wipe the data on some devices. After locking the bootloader, if you want to flash the device again, you must run fastboot oem unlock again, which will wipe the data.
Info about Google Nexus 5X - “bullhead”
Install /e/OS on a Google Nexus 5X - “bullhead”
The instructions in this guide will assist you to install /e/OS on your bullhead. Please read through the instructions at least once before actually following them, so as to avoid any problems later.
It is important that you know that downgrading Smartphones on OS versions greater than the /e/OS OS version you plan to install, can cause instability or at worst brick some devices. We recommend that you check your current OS version, before attempting the installation.
It is advisable to flash your device only if you know what you are doing and are ok taking the associated risk. All /e/OS builds are provided as best effort, without any guarantee. The /e/OS project and its project members deny any and all responsibility about the consequences of using /e/OS software and or /e/OS services.
adb and fastboot are enabled on your PC. If not you can find the setup instructions hereWarning: Make sure that you can send and receive SMS and place and receive calls (also via WiFi and LTE, if available), otherwise it will not work on /e/OS as well. Additionally, some devices require that VoLTE/VoWiFi be utilized once on stock to provision IMS.
Please share your experience , suggest tips or changes to this install guide documentation by visiting the Nexus 5X specific topic on our community forum.
To report issues in /e/OS please refer this guide
Tip: Installing a custom recovery or unlocking the bootloader will erase all data on your device! Take a backup of your data before proceeding!!
Custom recovery (not required if you already have it running on your phone)
/e/OS build : Oreo community
To understand the difference between /e/OS builds check this guide
Warning: Please note some of the above links can lead to external sites
Tip: The steps given below only need to be run once per device.
Warning: Unlocking the bootloader will erase all data on your device! Before proceeding, ensure the data you would like to retain is backed up to your PC and/or an online drive
Warning: Some vendors/manufacturers prevent the bootloader from being unlocked. Depending on where your device was acquired you may or may not be able to unlock the bootloader. To verify if your device is compatible please check the devices list.
adb reboot bootloader
You can also boot into fastboot mode via a key combination:
fastboot devices
5.Tip:* If you see no permissions fastboot while on Linux or macOS, try running fastboot as root.
fastboot flashing unlock
fastboot adb reboot bootloader
You can also boot into fastboot mode via a key combination:
fastboot devices
5.Tip:* If you see no permissions fastboot while on Linux or macOS, try running fastboot as root
6.Tip:* Some devices have buggy USB support while in bootloader mode. If fastboot hangs with no output when using commands such as fastboot getvar … , fastboot boot …, fastboot flash … try a different USB port (preferably a USB Type-A 2.0 one) or a USB hub
fastboot flash recovery recoveryfilename.img
Replace the
recoveryfilenamewith the name of the recovery image you downloaded in the previous section
adb reboot recovery
WipeFormat Data and continue with the formatting process.Here a new screen may show where you will have to type Yes and confirm the action by clicking a button.5.Caution:* Format Data will remove encryption as well as delete all files stored on the internal storage. Remember to take a backup first. Check Requirements section above.
Advanced Wipe.Cache and System partitions to be wiped and then Swipe to Wipe9.Tip:* Sideload requires actions in two places to be done. One on your phone in the TWRP UI and secondly on the connected PC which should have adb enabled. Also note the sideload process while running may stop abruptly around 50%. The console would show a message Total xfer: 1.00x. This would mean that the transfer has successfully completed.
select
Advanced,ADB Sideload, then swipe to begin sideload.
adb sideload filename.zip
10.Tip:* Change the filename to the name of the file you downloaded
Warning: Avoid installing any additional apps or services if suggested by the recovery. They may cause your device to bootloop, as well as attempt to access and or corrupt your data.
Success: Congratulations !! Your phone should now be booting into /e/OS !!
Total xFer ':' 0.01x message - Try to upload the /e/OS to internal storage and retry to installadb ':' sideload connection failed ':' insufficient permissions for device error - Try to execute the commands adb kill-server and adb start-server and retryadb shell twrp install /sdcard/</e/OS zip package> raise non-existent directory error - Try to check solution hereinsufficient permissions error - Try the solution given herefailed to mount /preload - Try in TWRP wipe screen in advanced menu select preload and swipe to wipe/cache/recovery/xxx -> no such file or directory error while flashing a ROM - On PC run adb shell in the console now create a folder called recovery for e.g. here the devicecode name is violet “violet :/cache# mkdir recovery”Please share your experience , suggest tips or changes to this install guide documentation by visiting the Nexus 5X specific topic on our community forum.
Ok
Gave a quick look and saw mainy of the commands we tried already…
Fastboot commands did not work at the end but we did not try twrp so l will look for that
Anyway goodnight and thanks
![]() Attention - YouTube! How to Return to Stock Firmware LG Google Nexus 5X Bullhead [Tutorial]
Attention - YouTube! How to Return to Stock Firmware LG Google Nexus 5X Bullhead [Tutorial]
.
iiiiiiiiiiiiiiiiiiiiiiiiiiiiiiiiiiiiiiiiiiiiiiiiiiiiiiiiiiiiiiiiiiiiiiiiiiiiiiiiiiiiiiiiiiiiiiiiiiiiiiiiiiiiiiiiiiiiiiiiiiiiiiiiiiiiiiiiiiiiiiiiiiiiiiiiiiiiiiiiiiiiiiiiiiiiiiiiiiiiiiiiiiiiiiiiii
.
iiiiiiiiiiiiiiiiiiiiiiiiiiiiiiiiiiiiiiiiiiiiiiiiiiiiiiiiiiiiiiiiiiiiiiiiiiiiiiiiiiiiiiiiiiiiiiiiiiiiiiiiiiiiiiiiiiiiiiiiiiiiiiiiiiiiiiiiiiiiiiiiiiiiiiiiiiiiiiiiiiiiiiiiiiiiiiiiiiiiiiiiiiiiiiiiii
.
iiiiiiiiiiiiiiiiiiiiiiiiiiiiiiiiiiiiiiiiiiiiiiiiiiiiiiiiiiiiiiiiiiiiiiiiiiiiiiiiiiiiiiiiiiiiiiiiiiiiiiiiiiiiiiiiiiiiiiiiiiiiiiiiiiiiiiiiiiiiiiiiiiiiiiiiiiiiiiiiiiiiiiiiiiiiiiiiiiiiiiiiiiiiiiiii
@piero, please make the font even larger and more eye-catching ![]()
Hello
So l did some reading…
I dont feel doing it alone because lm not experienced enough…
I also feel we been trying everything to get a working stock rom and a googlo OS with @piero and l think the stock is not ok
I like the idea of erasing all with installing twrp on it and move directly to e/OS
I am now dowloading the files through the links @piero sent me above
By the way @Xxpsilon it is good to make big letters for me trust me, he spent hours coaching me through and lm sure its not easy
It is not easy to navigate me through terminals and tutorials when l am not of the virtual world people
So
Anyone wants to try my case ?
I have tried this link to install adb and it worked, but it cant find my device
So did you get as far as
adb version
Did that work ? It is likely to be a bit old …
Please refresh … the phone does not boot, there is no bootable recovery?
But you have fastboot ?
If you boot to fastboot what comes from
fastboot devices
adb devices
only finds a booted phone or booted recovery.
fastboot devices
0271e789ba5bb3a3 fastboot
yes fastboot finds it
as for adb
adb version
Android Debug Bridge version 1.0.41
Version 35.0.2-12147458
Installed as /home/cate/platform-tools/adb
Running on Linux 6.8.0-51-generic (x86_64)
cate@cate-1011PX:~$ adb start-server
Did a refresh and l get the same
The list of devices attached is empty
The phone is like this…
Anything you try from phone or fastboot l get a Google OS starting for one second then all black, then a big battery signal and black again and battery signal on a loop
In this mode the phone is not found with
abd devices
is that correct ? Any reaction at all which might give a clue ?
Nothing absolutely nothing
Start arrow is green
Recovery mode and restart bootloader are red as on the photo
Power off is white
With all the steps you already tried … it does not look optimistic by this method.
To try to use Android Flash Tool you would have to be comfortable using a Google browser as mentioned on the page.