Note: Documentation in this section is Work in progress. Help us update it. Help us make /e/ better !!
| Camera Icon | Camera Screen |
|---|---|
 |
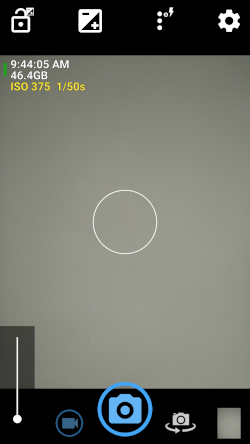 |
Features
- Option to auto-level so your pictures are perfectly level no matter what.
- Expose your camera’s functionality: support for scene modes, color effects, white balance, ISO, exposure compensation/lock, selfie with “screen flash”, HD video and more.
- Handy remote controls: timer (with optional voice countdown), auto-repeat mode (with configurable delay).
- Option to take photo remotely by making a noise, or by voice command “cheese”.
- Configurable volume keys and user interface.
- Upside-down preview option for use with attachable lenses.
- Overlay a choice of grids and crop guides.
- Optional GPS location tagging (geotagging) of photos and videos; for photos this includes compass direction (GPSImgDirection, GPSImgDirectionRef).
Apply date and timestamp, location coordinates, and custom text to photos; store date/time and location as video subtitles (.SRT).
Panorama, including for front camera. - Support for HDR (with auto-alignment and ghost removal) and Exposure Bracketing.
- Support for Camera2 API: manual controls (with optional focus assist); burst mode; RAW (DNG) files; slow motion video.
- Noise reduction (including low light night mode) and Dynamic range optimization modes for better quality photos.
- Options for on-screen histogram, zebra stripes, focus peaking.
- Focus bracketing mode.
How to use the Camera app
- To access a comprehensive guide on the Open Camera please check the document here
- Warning: This link leads to an external page which uses cookies for Google Analytics and displaying Ads
- There it is also explained how to save photos and video to your SD card, see under FAQ.
- See also Photos or videos fail to save! under FAQ
About the Project
Project Source Code
Project is forked from https://sourceforge.net/p/opencamera/code/ci/master/tree/
Regain your privacy! Adopt /e/ the unGoogled mobile OS and online services