…Enter suggestions to improve documentation in this category. Do not raise bugs or issues here…
Thank you @Manoj for preparing this topic and for it being linked from
https://doc.e.foundation/devices/gta4xlwifi/install
oEmbed / OpenGraph error
Screenshot 2021-11-26 at 00-00-46 Samsung - Galaxy Tab S6 Lite (Wi-Fi) - gta4xlwifi - Documentation Suggestions - eWiki Doc… upload://kNx1dKQUyuPY9b5NRdeJh7ELTuU.png
https://doc.e.foundation/devices/gta4xlwifi/install
Sorry, we were unable to generate a preview for this web page, because the following oEmbed / OpenGraph tags could not be found: description, image
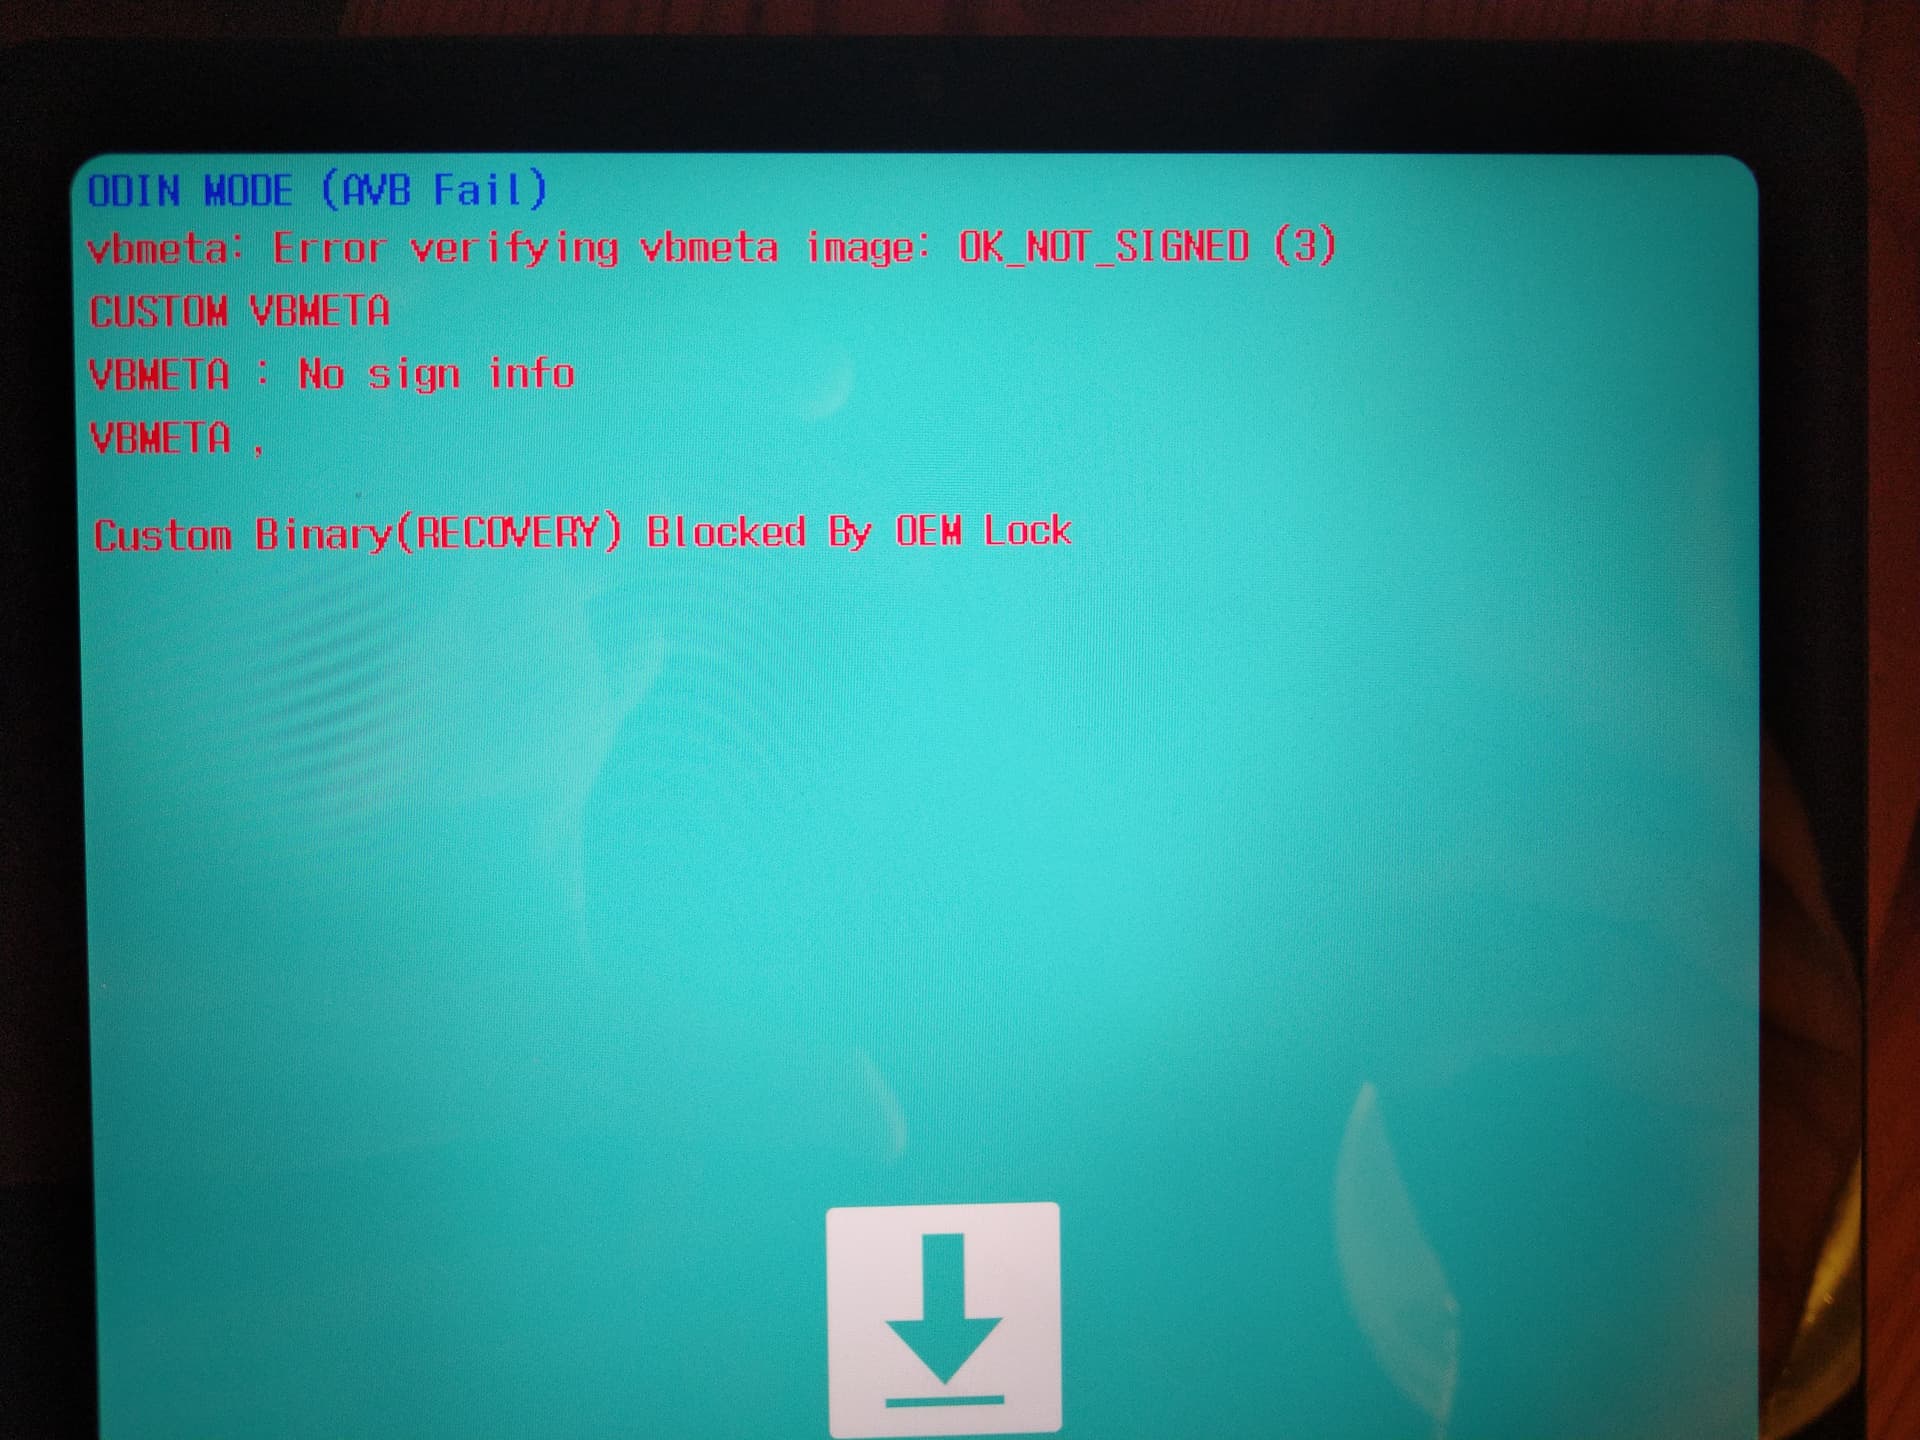
After following the installation instructions on the given page, I was happy to hold a working /e/ devices in my hands. And as I remembered from my previous installation session on a Fairphone 3+ with help of the Easy Installer, I went back disabling the OEM Lock, by entering Download Mode and long-pressing Volume Up again. Which ultimately resulted in a bricked device:
A suggestion could be to add a Caution section below the tutorial, which clearly states that it is strongly discouraged to lock the bootloader again (on Samsung phones which use the Donwload Mode/Odin bootstrap in avoiding Fastboot), because this will end up locking the device completely, and hard to restore (Timing!).
My current hope is, that after a battery cycle I will be able to enter regular Download Mode again, and be able to unlock the bootloader by long-pressing Volume Up at the time. There are some mentions on the forums, that make it appear there might still be a chance. Else this will turn out to be a very expensive learning for the report assembled in the public domain here, despite all the disclaimers at the beginning of the tutorial.
References:
- https://www.reddit.com/r/LineageOS/comments/mlq6pb/samsung_tab_s6_lite_bricked_by_locking_bootloader/
- https://forum.xda-developers.com/t/any-working-roms-for-s6-lite.4156061/
- https://forum.xda-developers.com/t/custom-binary-blocked-by-oem-lock.3916597/
- https://forum.xda-developers.com/t/samsung-note-10-lite-problem.4130329/
- Magisk-related, similar subjects
- https://forum.xda-developers.com/t/guide-flashing-with-heimdall.878686/
Unfortunately most other tutorials for restoring the stock firmware are for Odin, and also the Firmware sources appear shady.
Yet ...
… together with http://blog.manty.net/2021/05/flashing-samsung-stock-rom-using.html and such a firmware package from somewhere, plus an adapted command like
heimdall flash --resume $(cd bin;for i in *.*;do grep -B 1 -e " $i" ../pit/e.pit|tr '\n' ' ';echo;done|sed "s/.*ame: \([^ ]*\) .*ame: \(.*\)/--\1 bin\/\2/")
seems to do what it ought to do
Initialising connection...
Detecting device...
Claiming interface...
Setting up interface...

Beginning session...
Releasing device interface...
but also does not result in a bootable system.
After reassurance through a comment in https://forum.xda-developers.com/t/tab-s6-stuck-in-bootloop-cant-get-to-recovery-mode.4079469/post-82229527, I was able to restart into Download Mode an unlock the bootloader again.
This cautionary tale eventually leads to bespoke warning message at the end of the tutorial.
Secondly I was spending a lot of time with the last step in the Installing the /e/ Recovery on your gta4xlwifi section, namely
- Manually reboot into recovery:
- With the device powered off, hold Volume Up + Power.
Note: Be sure to reboot into recovery immediately after having installed the custom recovery. Otherwise the custom recovery will be overwritten and the device will reboot (appearing as though your custom recovery failed to install).
At this point of the tutorial, it is not possible to turn off the device in a convenient way, why a good timing is needed to restart and boot into recovery. The original instructions from LineageOS are much more specific at this point, under the headline *Installing a custom recovery using heimdall they read:
- Manually reboot into recovery, this may require pulling the device’s battery out and putting it back in, or if you have a non-removable battery, press the Volume Down + Power buttons for 8~10 seconds until the screen turns black & release the buttons immediately when it does, then boot to recovery:
- Reboot and immediately hold Volume Up + Power while the device is connected to a PC via USB cable.
Note: Be sure to reboot into recovery immediately after installing the custom recovery. If you don’t the stock ROM will overwrite the custom recovery with the stock recovery, and you’ll need to flash it again.
Another situation that occured to me, is the missing of the OEM Lock Developer Settings Menu entry after unlocking the boot loader. This, and ways to circumvent the “error”, are documented in https://www.thecustomdroid.com/fix-missing-oem-unlock-toggle-samsung-galaxy-devices/. One will be able to regain the display of the setting, only to find that it is permanently allowed (here by Firmware means through the bootloader itself).
3 Likes
For me, here is what was missing in the documentation :
It should be explained that the user has to “unlock OEM” before trying to flash the recovery. Else you have the red error message “Custom Binary (RECOVERY) blocked By OEM Lock” after flashing it, and you still have the original recovery (that refuses to use the /e/ adb files)
There are several steps :
- start the tablet with original Android, run system update to have the latest ROM
- go to settings and unlock developer mode, by tapping 10 times on the version number
- a new “developer settings” menu should appear, where you have to check “Unlock OEM”
- then you need to restart in download mode : turn off the device (long press on volume down + power), unplug it, press both volume up and down, keep them and plug the cable
- a screen asks you to confirm with volume up OR to unlock the device with a long volume up press : that’s what you need to do (long press on “volume up”) then confirm all the warning messages
- the tablet data will be reset and it will reboot. If you enable and enter developer settings again, the “Unlock OEM” should be grey and saying that the bootloader is already unlocked
- then you can go to download mode again, and run the heimdall/odin command to flash the recovery
- when it’s finished, the tablet is still in download mode. Check that you don’t have the red message “Custom Binary (RECOVERY) blocked By OEM Lock”. The current documentation says to reboot it but it’s tricky to rebooting it in recovery mode : you have to press power + volume down for ~7s, release these buttons immediately when the screen goes blank, and immediately press power + volume up instead
- you should then be in /e/ recovery. You should see the /e/ logo
- then you can follow the current documentation to adb sideload the image etc
On each startup, the tablet displays a big warning, but afterwards it seems to work fine (I did not test a lot, yet)
4 Likes
Thank you so much for sharing your experience @jonr ! That was very very helpful, expecially to fix the red line error “Only official released binaries are allowed to be flashed(RECOVERY)” and fix missing OEM Unlock Toggle.
I finally installed /e/OS successfully on my Samsung Galaxy Tab S6 Lite (Wi-Fi) - “gta4xlwifi” - SM-P610.
If anyone feel interested to install /e/OS on this specific device I would like to recommend to follow the tutorial below, it was very useful in my case (additionally to the official /e/ documentation page of course).
youtube version :
https://www.youtube.com/watch?v=xudEgb0QW5c
reddit version :
https://www.reddit.com/r/degoogle/comments/t74zue/installing_eos_on_samsung_galaxy_tab_s6_lite/
About this video tutorial I would like to give you some additional informations :
- At time code 15:53 when you initialise again the native samsung/android OS, connect the device to internet, I think it could avoid the missing OEM Unlock Toggle bug.
- At time code 18:27 the tutorial give you following steps to manually reboot into recovery immediately after having installed the custom recovery. The first step is “Vol down + Power (7 secs)” and not “Vol up + Vol Down” as you can read on this video.
About the official documentation page I would like to recommend to update the yellow warning message of the “Downloads for the gta4xlwifi” section.
Actually we can read :
“Warning: Before following these instructions please ensure that the device is on the latest Android 11 firmware.”
But the lastest version of Android for this device is actually Android 12 and the lastest release of /e/OS is a Android S version matching with Android 12 and not Android 11.
It would be better like that :
“Warning: Before following these instructions please ensure that the device is on the latest Android 12 firmware.”
Thank you so much to this community and to the devs, good luck to everyone to install /e/OS !
2 Likes
Was the update done on a Stock Android 12 or on eOS R version via sideload?
Thanks! That sounds great. I assume you performed a sideload then? Was your data wiped or still all data available?
Did a backup and sideload too now. Did work! Thanks a lot to the DEV team and all testers!
Did update R to latest S on my Samsung Tab s5e successfully too
Will wait for another user to confirm and have the changes made to the documentation.
I think it was the same with my Tab S6 lite flashing. However I wasn’t sure if I’m just to slow after reboot with Volume Up and Power
A guide for installation using ODIN would be very helpful.
Tried a day to install eOS on my Samsung Galaxy Tab S6 Lite (Wi-Fi) using Heimdall as in guide explained. Couldn’t get heimdall working on Win10 and on a virtual box ubuntu distribution. Pretty frustrating.
But tried an easier way like I already did for my Galaxy s4 using Odin to install the eRecovery after following steps:
-
download eRecovery and convert the .img file to .tar using this script (https://forum.xda-developers.com/t/script-tool-how-to-create-a-tar-md5-file-from-img-for-odin.2446269/) (pretty easy to handle!)
-
Boot into download mode:
→ hold Volume Down +Volume Up and connect the USB cable
→ long pressing of volume up to unlock the bootloader
→ boot in download mode again -
Start Odin: untick “Auto Reboot” and select the converted .tar file in “AP”.
→ Press start and wait till Odin shows “Pass!”. -
start eRecovery by pressing volume down and power (5-7 seconds) till screen turns black and move to volume up while pressing power. Then you should get into eRecovery.
Next steps I did after installation guide.
For adb sideload, make sure adb is working!
Took me just 5 minutes using Odin. Could be a variant for people who don’t get heimdall working!!
Generally the instructions are actually complete in respect to locking bootloader.
The instructions do not include lock because it should not be done ! A search of the forum will give some fuller answers.
Please do not attempt to lock the bootloader on this device when using /e/OS.
There is no “verified-boot” on “dev” builds, It is only available for some “stable” builds (FP3/FP4)
I can confirm what @confu wrote.
I wasted a lot of time getting into recovery mode after installing the recovery image. It definitely needs to have the USB cable connected to the PC.
The point 6 “Unplug the USB cable from your device.” should be removed.
1 Like
I do confirm this. Found out the hard way - before reading this suggestion ![]()
The point has been removed from the guide.
@Manoj at our flash-party next month, I’ll have to flash one of these devices.
I see that https://doc.e.foundation/devices/gta4xlwifi/install still mentions Android 11 as a prerequisite before flashing. Is it still true, or should this statement be updated in the doc (to mention Android 12 as a prerequisite, instead of Android 11), as @Pierro said above (it seems to make sense)?
However, as R binaries are still available for download, maybe the text should be something like:
“Warning: Before following these instructions please ensure that the device is on Android 12 firmware to flash /e/ OS version S, or on Android 11 firmware to flash /e/ OS version R (it must be the same Android underlying version)”
It should display Android 12. The guide has been updated to display the correct value. Thanks for pointing this out.
1 Like
I am stuck at the point „Only official released binaries are allowed“ after I did the „heimdall flash —RECOVERY … —no-reboot“
which ends with
ERROR: Failed to receive session end confirmation!
Releasing device interface…
The img was uploaded (progress bar moving) but at the end above message is shown on tablet and the upload is ignored by the tablet.
What exactly did you do to overcome this?
the „date trick“ from last link seems to have solved the issue
strange, but I am now in /e/ recovery mode
(OEM was already unlocked and developer mode available, I did only the date related changes)
edit:
Meanwhile /e/ is installed
Additionally the hint from above was necessary to follow:
„6. Manually reboot into recovery, this may require pulling the device’s battery out and putting it back in, or if you have a non-removable battery, press the Volume Down + Power buttons for 8~10 seconds until the screen turns black & release the buttons immediately when it does, then boot to recovery:
- Reboot and immediately hold Volume Up + Power while the device is connected to a PC via USB cable.“
The the page behind „Install heimdall“ could be updated with the information, that for Ubuntu heimdall is part of the repository and can be installed with „apt-get install heimdall heimdall-frontend“
1 Like