.
Preparation :
1) install the flashing tools
On your PC
.
see common steps for all devices ( adb & fastboot )
.
Install ADB the Android Debug Bridge,
and Fastboot the common flashing-tool for most android devices.
see Windows steps
Please improve this guide by adding Windows steps
Installing adb and fastboot on a Linux PC
see MacOS steps
Please improve this guide by adding MacOS steps
Installing adb and fastboot on a Linux PC
see Linux steps
Ubuntu is used for the purpose of this guide. Kindly change the commands and package names, if any for your distribution
- open a Terminal app to execute the following command :
$ sudo apt update
$ sudo apt upgrade
$ sudo apt install adb
$ sudo apt install fastboot
- or
$ sudo apt-get update
$ sudo apt-get upgrade
$ sudo apt-get install adb
$ sudo apt-get install fastboot
.
When done
- check with adb version command to verify.
(with the device in normal mode or in recovery mode and plugged to the PC with an USB data cable)
$ adb --version
A result as follows shall appear on your terminal screen.
Android Debug Bridge version 1.0.39
Version 1:8.1.0+r23-5
(with the device in bootloader mode and plugged to the PC with an USB data cable)
- check with fastboot --version command to verify.
(except for Samsung devices that need heimdall instead of fastboot)
$ fastboot --version
A result as follows shall appear on your terminal screen.
Version 1:8.1.0+r23-5
.
For others GNU/Linux :
download the “platform-tools for Linux”, and extract the .ZIP
Extract the .ZIP and copy adb and fastboot binaries into a directory in your $PATH, a common one on most distros will be /usr/local/bin.
sudo cp adb /bin
sudo cp fastboot /bin
.
.
see Samsung Brand Additional steps (Heimdall, Odin)
.
Windows flashing-tools for Samsung devices
.
Download ODIN
Odin is a utility used by Samsung to reset (or flash) their smartphones.
- Download Samsung Odin3 v3.14.4 Flash Tool – Odin Downloader
- Unzip the file with a right click on it then “Extract all” then “Extract”.

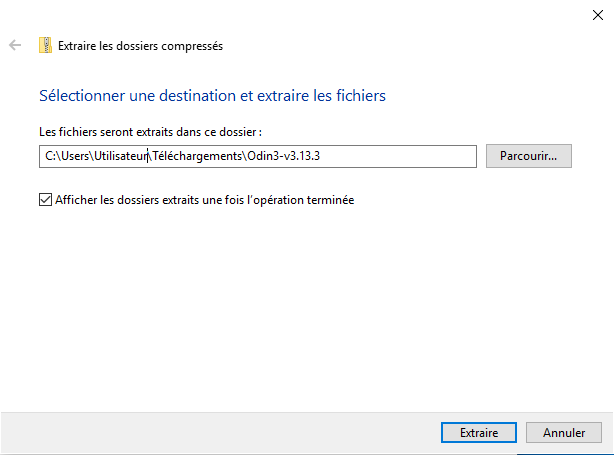
3. The unzipped folder created opens (if not, open it), then open “Odin3 v3.14.4.exe”.

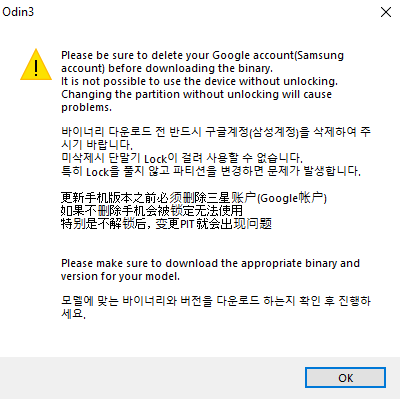
- Click on “Ok” when the warning message is prompted.
.
MacOS flashing-tools for Samsung devices
.
- Heimdall legacy 2017 (CLI and GUI)
download “The Muppets” Heimdall suite 1.4.2.dmg
or
- Heimdall revived 2025 (CLI) updated for compatibility with recent devices
thanks to @sumirati
download the (arm64) binary Release v2.2.2 - Mac only · sumirati/Heimdall · GitHub
build your own Heimdall suite 2.2.2
Install dependencies for Heimdall
Build dependencies - note pkgconfig has been added in 2.2.2 to allow Homebrew to interact with cmake
sudo port install cmake pkgconfig
Run dependencies
sudo port install libusb qt6-qtbase
Download Heimdall and follow the instructions on https://git.sr.ht/~grimler/Heimdall - with 1 path adoption
git clone https://git.sr.ht/~grimler/Heimdall
cd Heimdall
mkdir build && cd build
Modified cmake statement to hint where the Qt6Widgets cmake file is
cmake -DCMAKE_BUILD_TYPE=Release -D CMAKE_PREFIX_PATH=/opt/local/libexec/qt6/lib/cmake/Qt6Widgets ..
make
.
Linux flashing-tools for Samsung devices
.
Ubuntu Method - Kindly change the commands and package names, if any for your distribution
$ sudo apt install heimdall-flash
$ sudo apt install heimdall-flash-frontend(optional)
or
$ sudo apt-get install heimdall-flash
$ sudo apt-get install heimdall-flash-frontend(optional)
- You can verify Heimdall is functioning by opening a Terminal and running
$ heimdall version
A result as follows shall appear on your terminal screen.
v1.4.2
.
Other method for GNU/Linux distibutions
-
Heimdall legacy 2017 (CLI and GUI)
sources : Benjamin-Dobell/Heimdall - GitHub
binaries : Download The Muppets Heimdall suite 1.4.2.zip - androidfilehost.com -
Heimdall revived 2025 (CLI) updated for compatibility with recent devices
sources : ~grimler/Heimdall - sourcehut git
binaries : Download Heimdall v2.2.2 - SourceForge.net
Extract the .ZIP and copy heimdall binary into a directory in your $PATH, a common one on most distros will be /bin.
sudo cp heimdall /bin
.
[Solved] Windows does not see my phone in Fastboot mode
.
you may want or need to flash first an appropriate Stock Vendor Firmware to your device as a sane base :
Stock firmware must be the latest existing relative to the /e/Os android version you want to install (but not higher)
click here to see details
please report or edit Brand exceptions and Device specific steps
.
Asus
Asus
.
BQ
BQ
.
Essential
Essential
.
installation of the stock firmware FairPhone
FairPhone https://support.fairphone.com/hc/en-us/articles/18896094650513-Install-Fairphone-OS-manually
.
Gigaset
Gigaset
.
installation of the stock firmware Google
Instructions and Downloads :
.
from recovery :
Full OTA Images for Nexus and Pixel Devices | Google Play services | Google for Developers
.
from fastboot :
Factory Images for Nexus and Pixel Devices | Google Play services | Google for Developers
.
HTC
HTC
.
Huawei
Huawei
.
LeEco
LeEco
.
Lenovo
Lenovo
.
LG
LG
.
installation of the Stock Firmware Motorola
Motorola USB drivers
.
HowTo Identify Software Channel
.
Motorola Stock Rom
.
[Official Motorola Flash Tool[(https://rsdlitetool.com/)
.
Nextbit
Nextbit
.
Nubia
Nubia
.
installation of the Stock Firmware Nothing
installation of the Stock Firmware OnePlus
switch back to an “official” OS
OPPO
OPPO
.
Razer
Razer
.
Realme
Realme
.
installation of the Stock Firmware Samsung
choose a free from carrier CSC for your area
600+ Samsung CSC Codes - Complete List (2026) - Technastic
downloads :
-
For high speed download complete latest firmware, factory tagged “bin” ( 4 files, download filename ends by _FAC ) and update ( 1file without wiping /data, ), use sfirmware
-
For all archives high speed download update ( 4 files or 1 file ) latest firmware, use samfw (Also provide files as individual, and interesting COMBINATION FIRMWARE)
-
For all archive firmware, low speed download (and sometimes download error), use samfrew
-
For all archives, paid high speed download use sammobile
install the latest Stock Firmware with Brand specific Flashing Tools :
Using Samsung Flashing-Tools for Windows
full samsung firmware installation using Odin3
in English : Revert Samsung Device to stock ROM on Windows PC
en Français : [TUTO] installation / mise à niveau Android Samsung Stock Firmware avec Odin/ Windows
Using Samsung Flashing-tools for MacOS
Heimdall legacy (CLI)
sources : Benjamin-Dobell/Heimdall - GitHub
binaries : Download The Muppets Heimdall suite 1.4.2.dmg - androidfilehost.com
How I managed to install /e/ on a Samsung A310F with MacOs 10.13.6
Using Samsung Flashing-Tools for Linux
install in command line with the Samsung Official Odin4linux
OFFICIAL Samsung Odin v4 1.2.1 - For Linux
or
install with the Graphical Interface that can manage Thor, Odin4 or Heimdall :
Galaxy-Flasher v0.7.0, the ultimate graphical tool for Samsung devices
.
installation of the Stock Firmware Sony
Flashing Stock Firmware on Sony Devices
If you are using a Windows PC, and you have not unlocked the boot-loader on your device, you can use Sony’s flash tool EMMA to flash the latest stock firmware on your device. Full documentation and download are available on the Sony Developer World website.
Flash tool | Sony Open Devices
If you are using a MacOS or Linux PC, or if you have already unlocked the boot-loader, then you will need to use Flashtool
- Downloads for Windows, Linux and MacOS available at http://www.flashtool.net/downloads.php
- Good instructions for use on xperiafirmware.com
Finding the stock firmware
Before you can flash it, you need to find the correct firmware to flash. The EMMA tool - if it works for you - will find and download the latest official Sony firmware for your device automatically.
Otherwise, if you are using a Windows or Linux PC, you can use the XperiFirm ~ Xperia Firmware Downloader to find and download the latest official Sony firmware for your device. (The program is written in .NET and ships as a Windows .exe file, so Linux users will need to install Mono).
If you need access to an older version of the firmware, if you are running a MacOS PC, or if Xperifirm does not find the firmware for your device, then you will need to find the firmware elsewhere on the internet. Places to look include
- xperiafirmware.com has firmware for many devices, including the following devices with official or unofficial /e/OS builds
- Z3 (z3)
- Z3 Compact (z3c
- [Xperia XZ1 Compact (lilac)][https://xperiafirmware.com/sony-xperia-xz1-compact/\]
- https://xperiastockrom.com has the above, plus
- Xperia Z5 Compact(suzuran) - make sure you choose the correct version for your specific model number
- XDA Forums - find the forums for your device and then the relevant sub-forums
- AndroidFileHost - search for your specific model number e.g. https://androidfilehost.com/?w=search&s=D6603
.
Teracube
Teracube
.
Wileyfox
Wileyfox
.
Wingtech
Wingtech
.
Yandex
Yandex
.
installation of the Stock Firmware Xiaomi
flash-tool : Archives - Xiaomi Flash Tool
download firmware : https://mifirm.net/
.
YU
YU
.
ZTE
ZTE
.
ZUK
ZUK
.
.
2) Allow flashing
On your phone
see details
allow USB debugging
allow OEM unlock (on android 7 nougat or later)
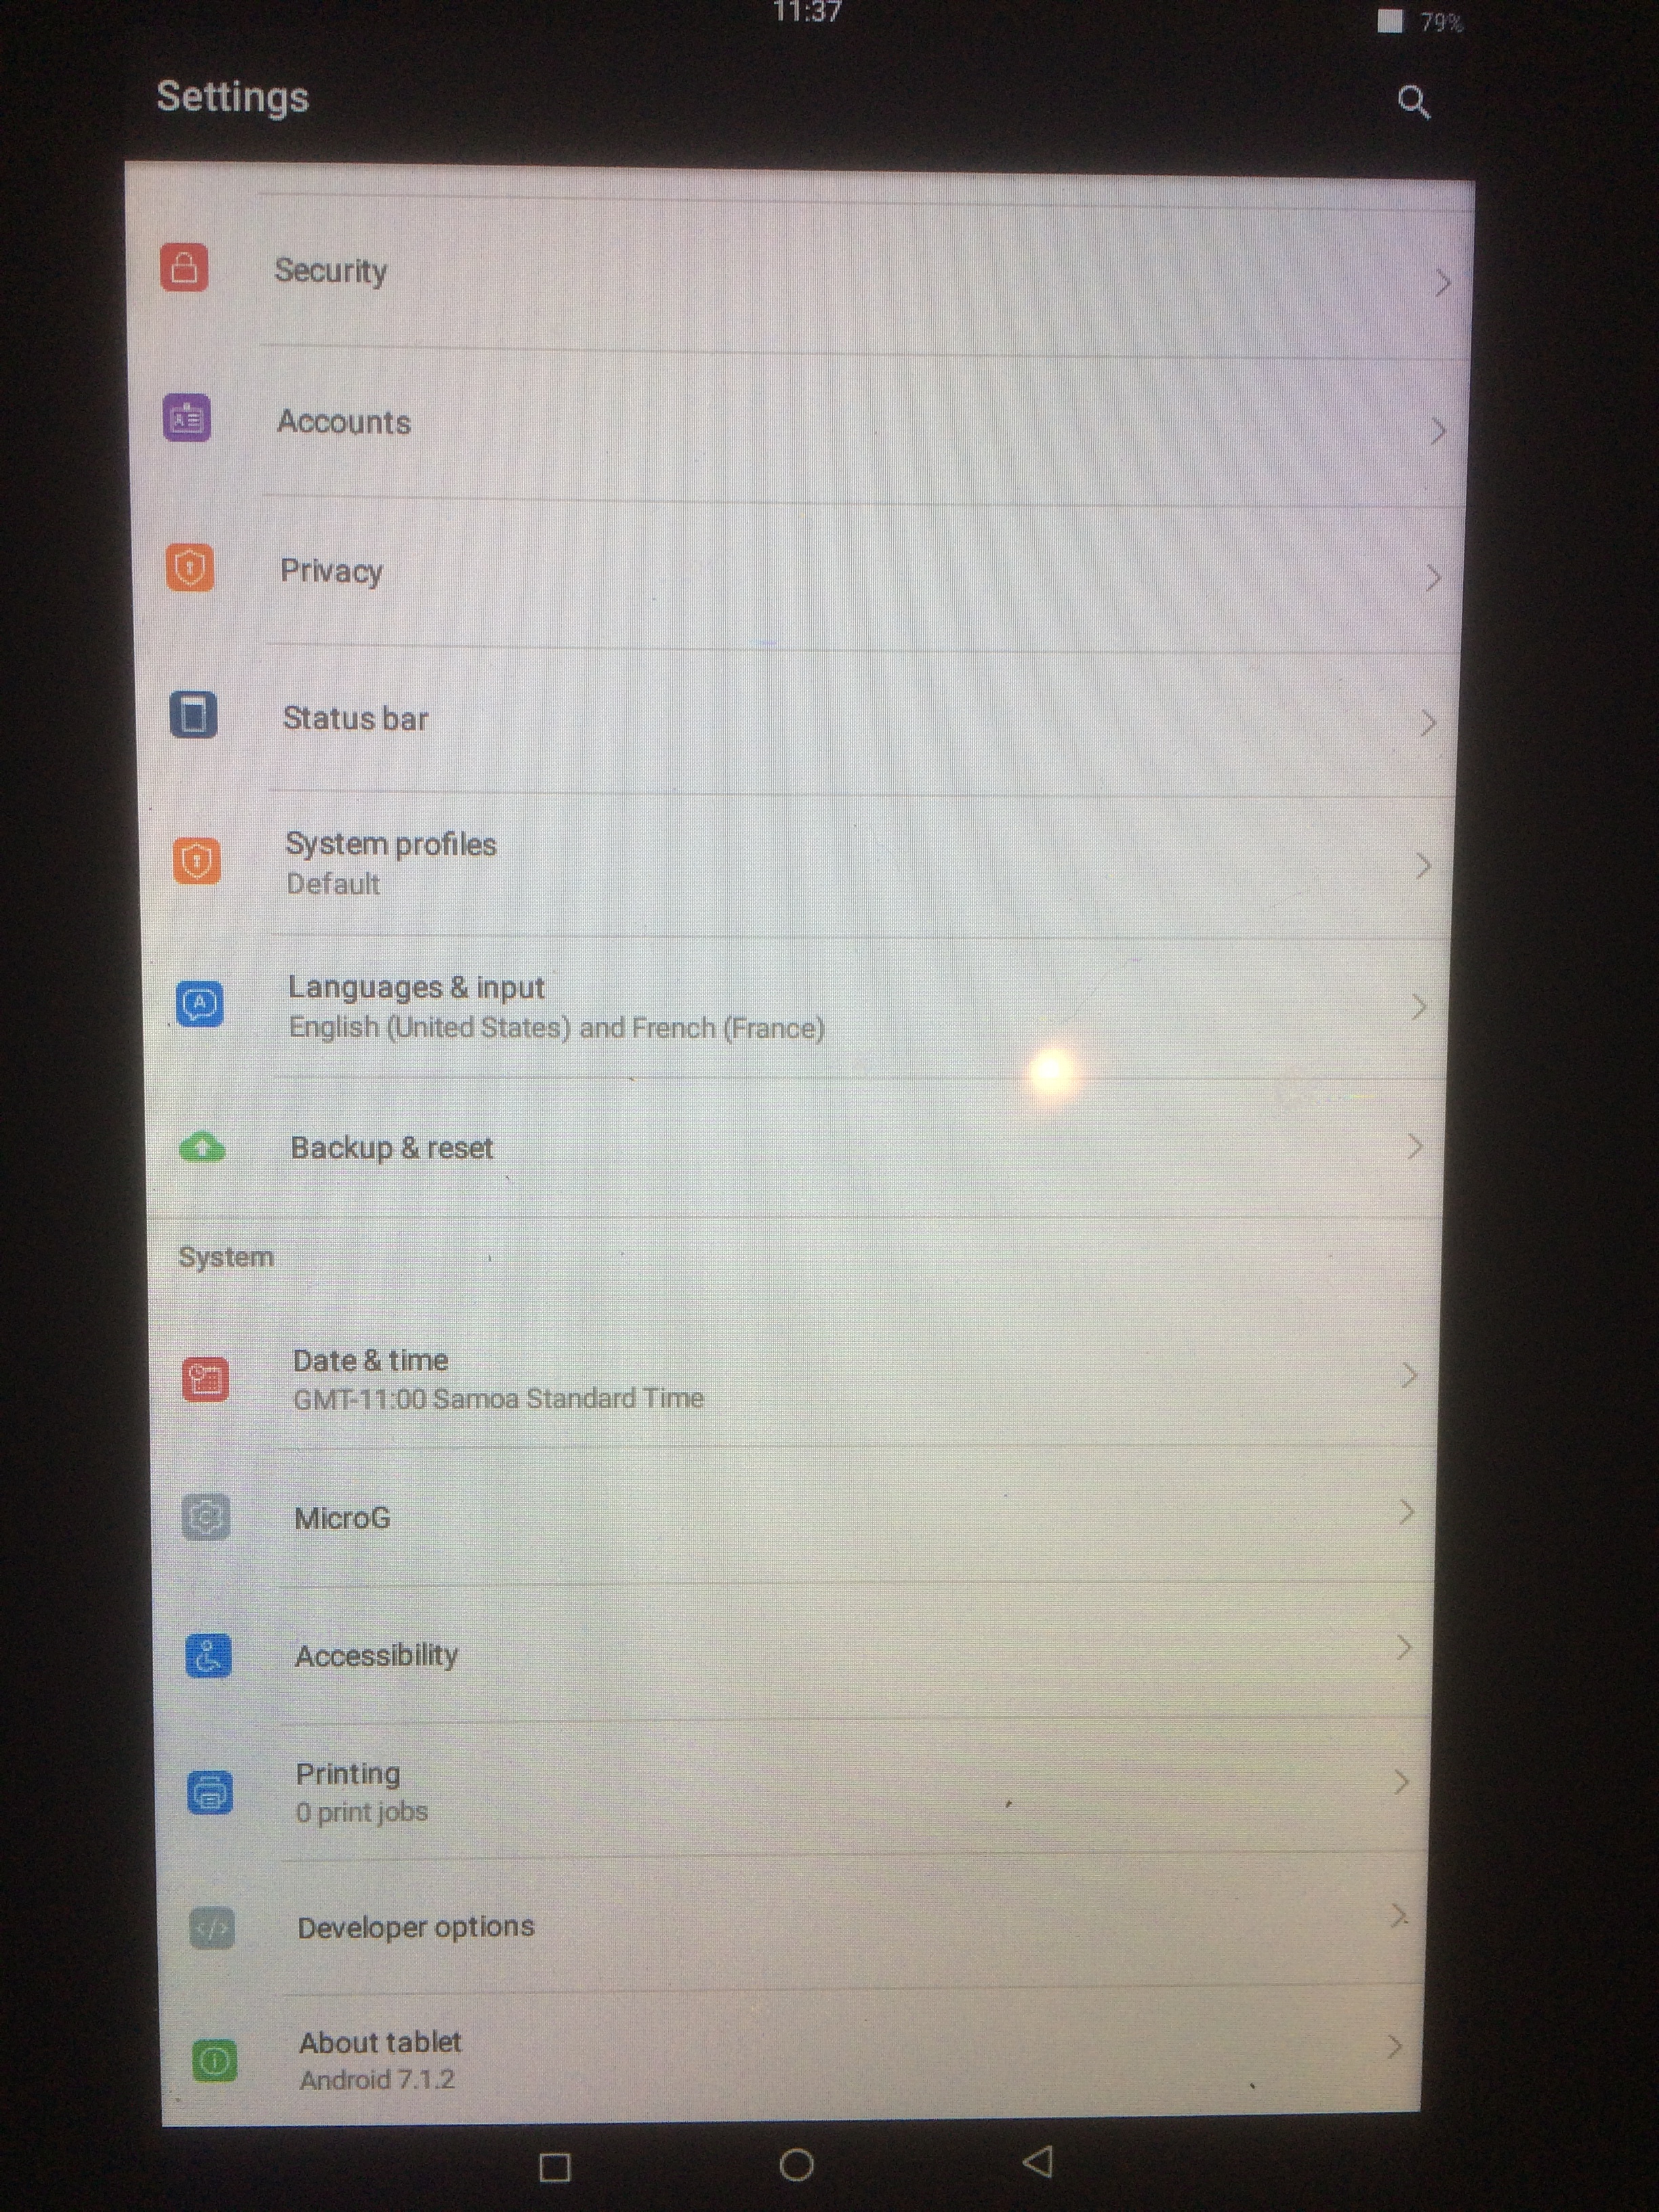
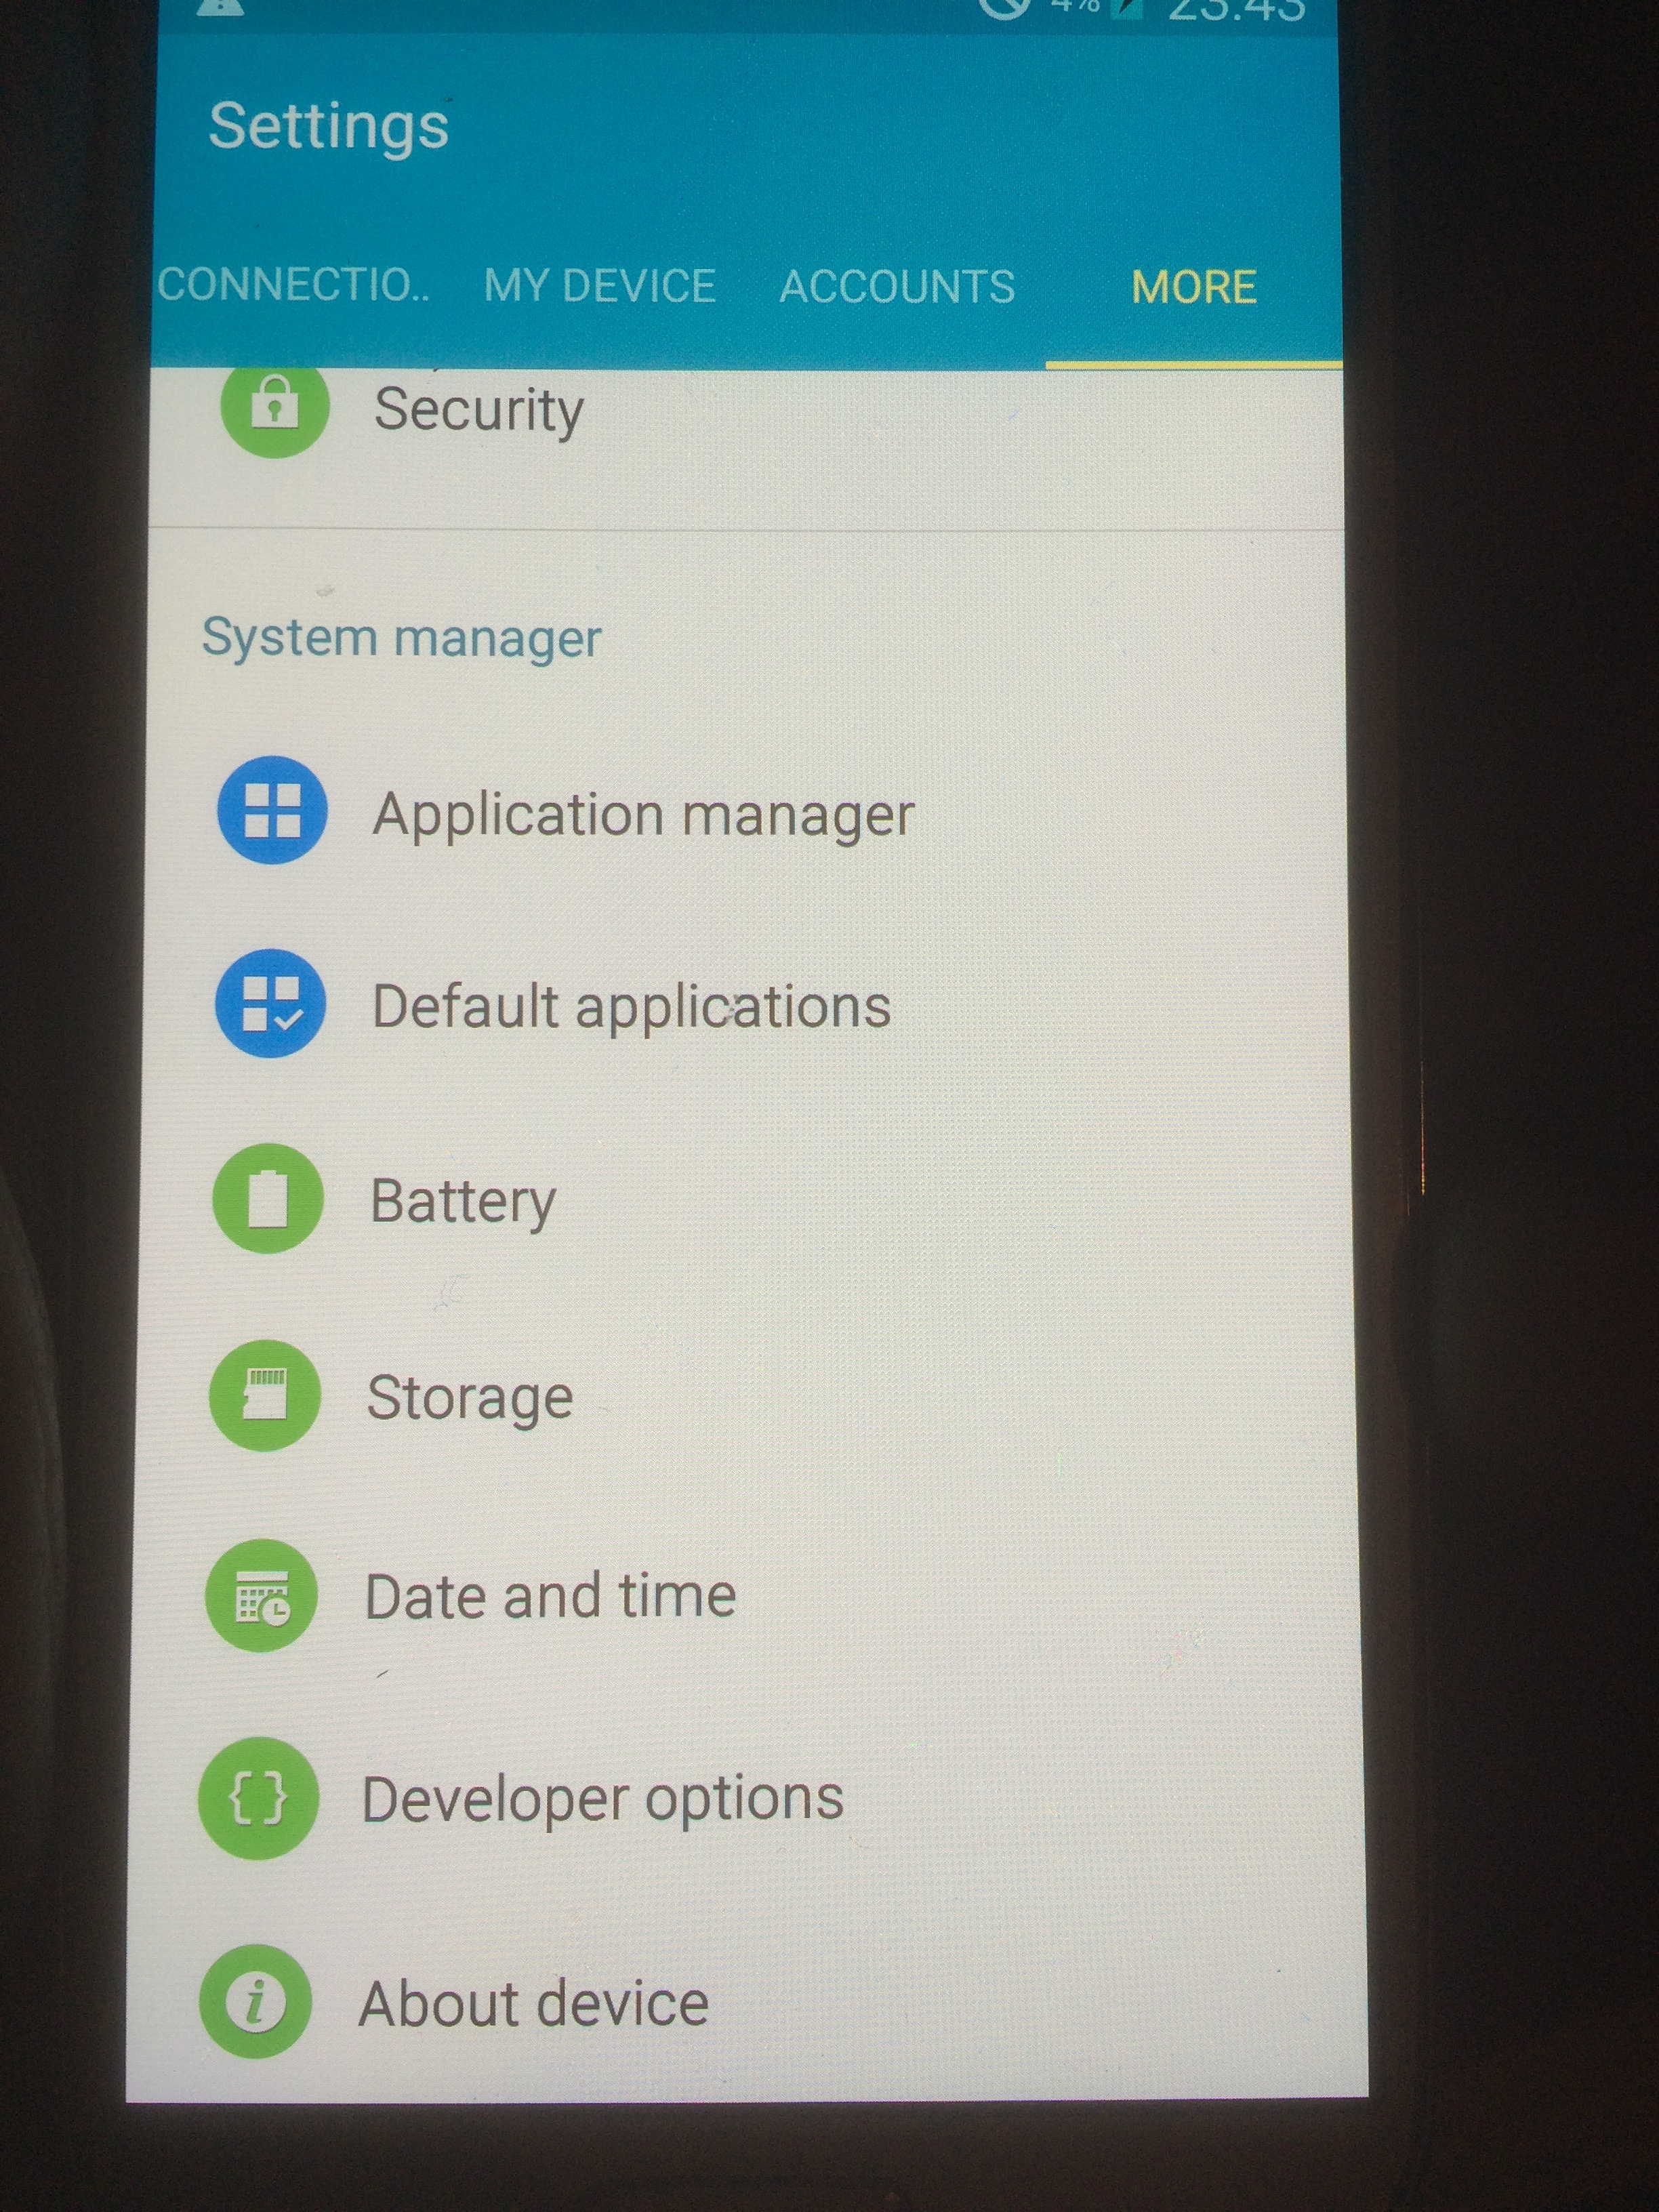
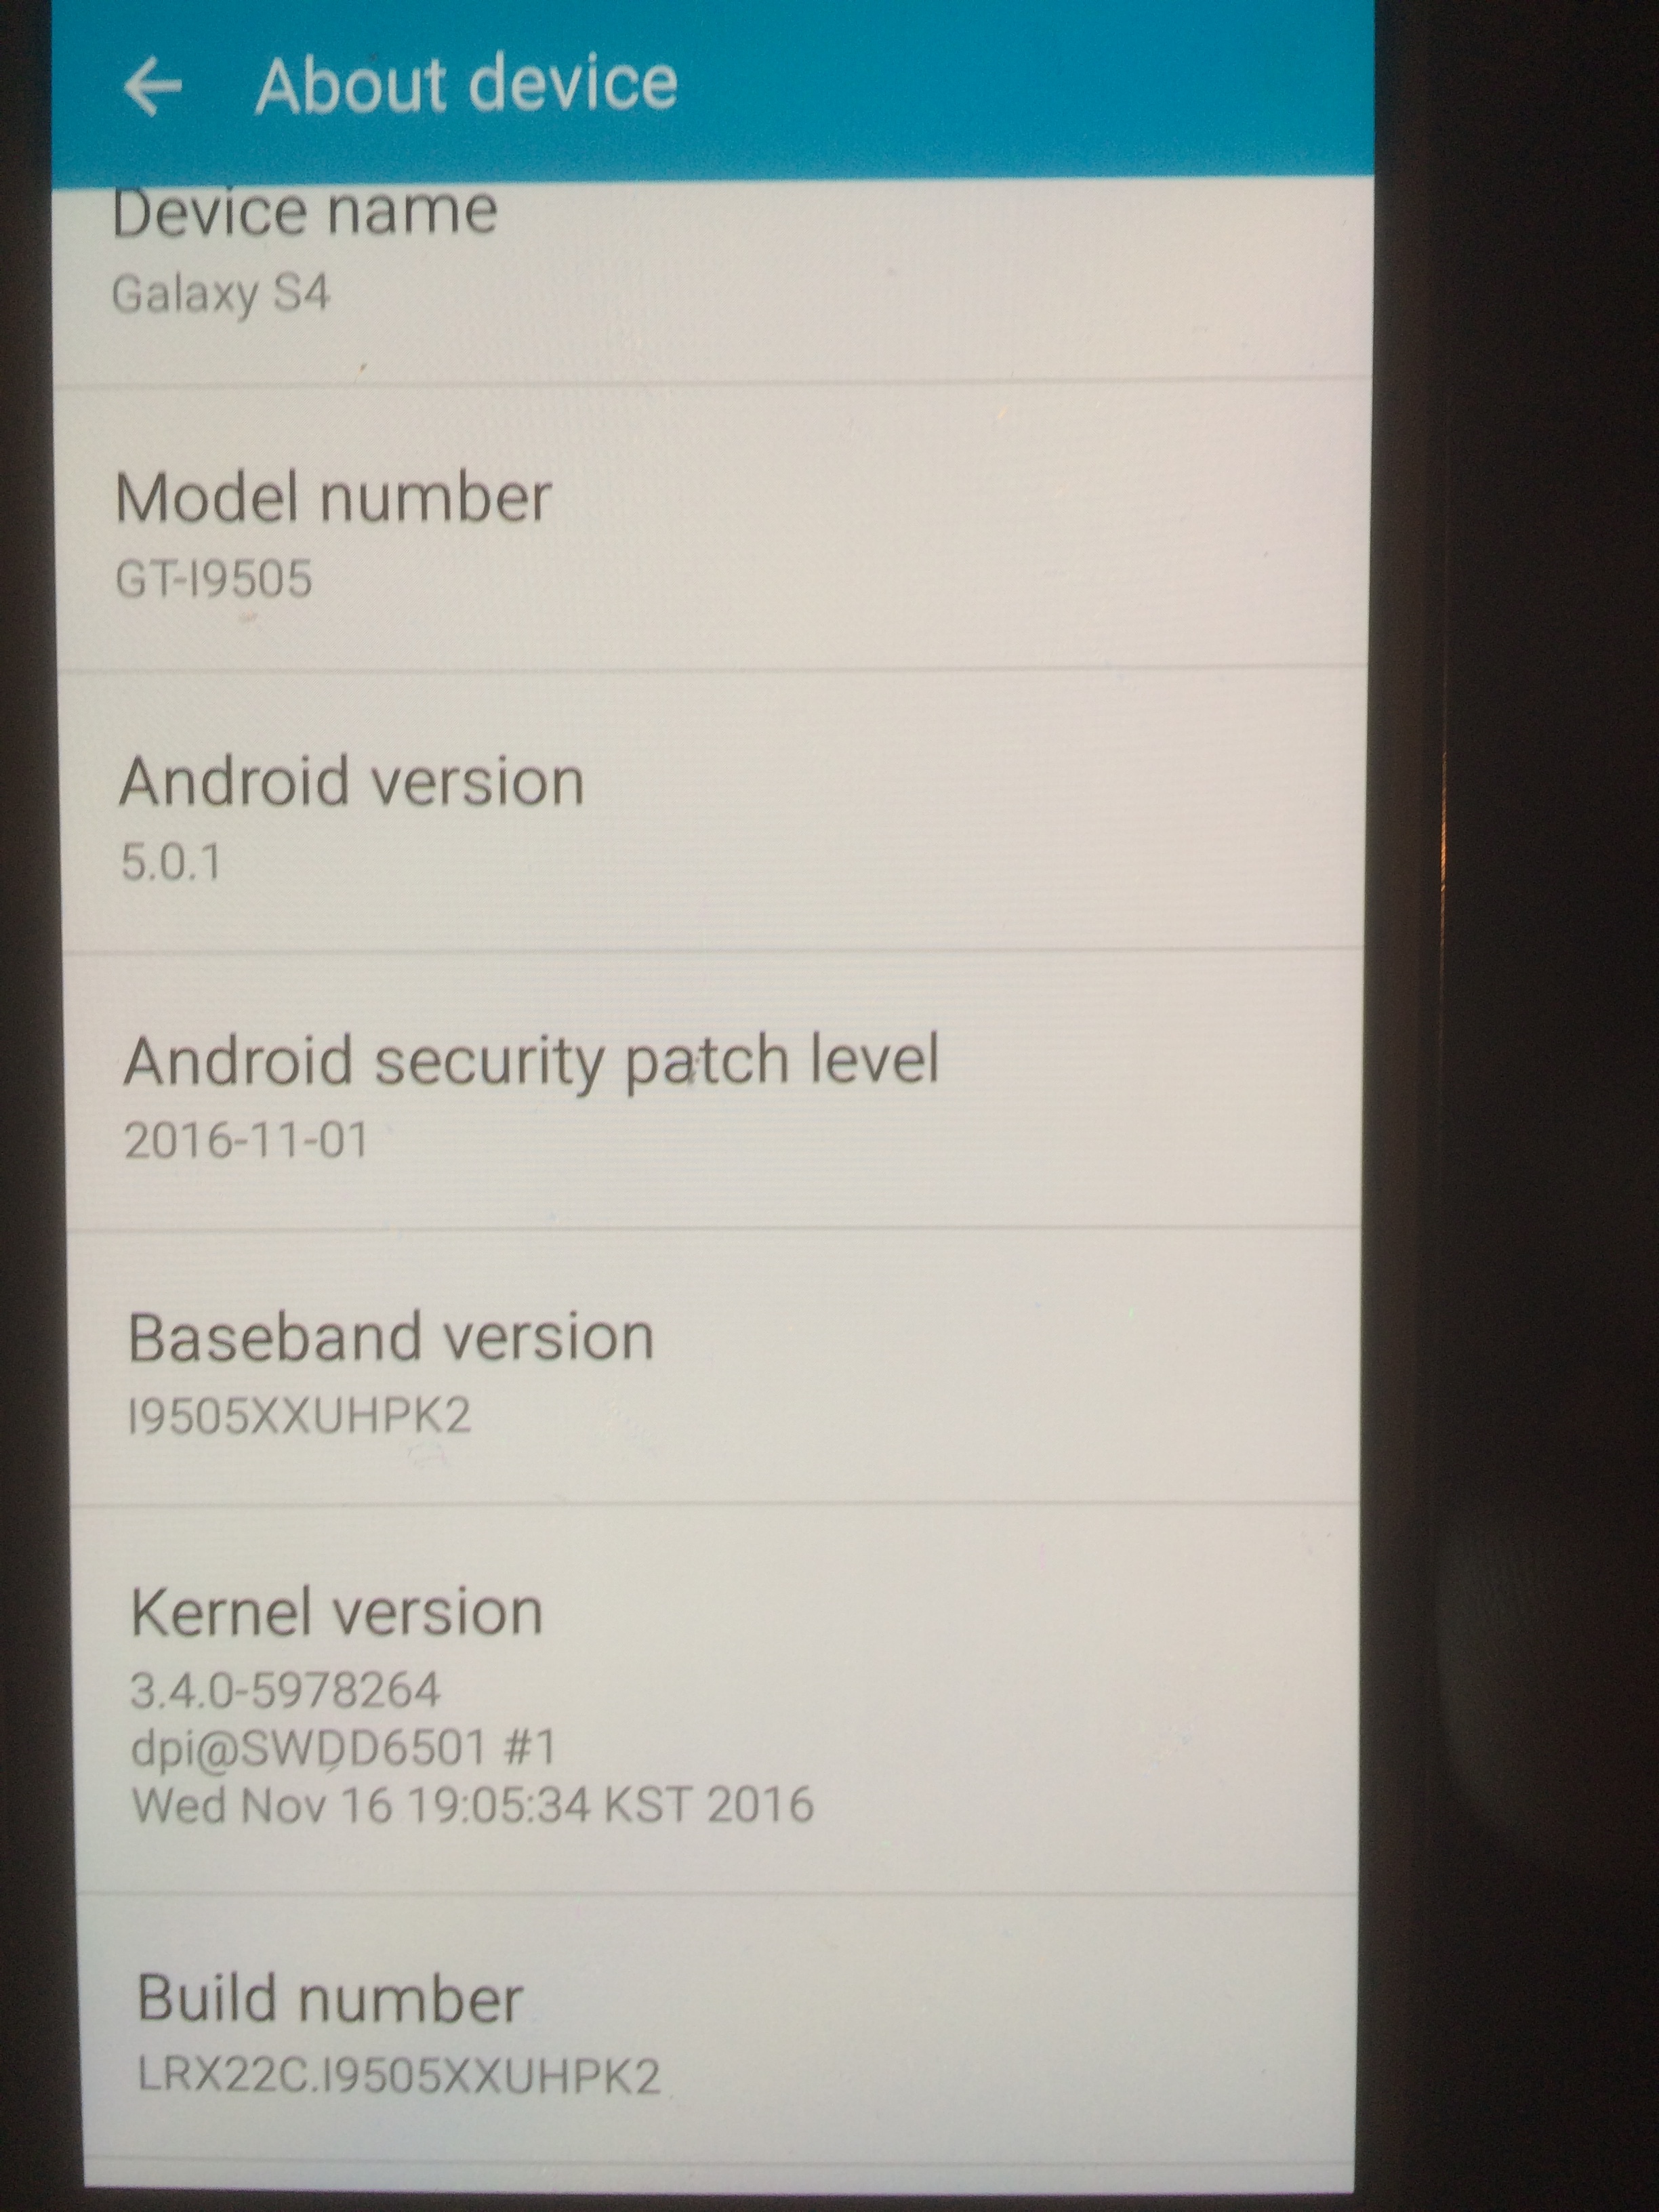
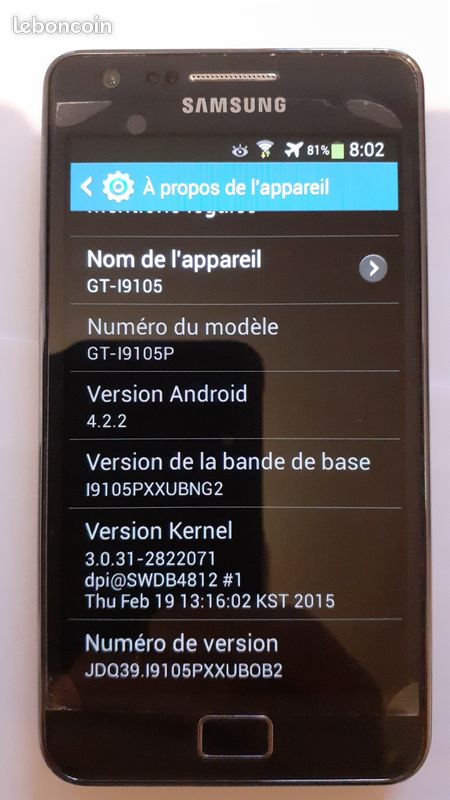
- Go to the >Settings menu >More/System , scroll down, tap on 'About phone’, scroll down,
.
in android 7 nougat :
.
in android 5 lollipop
.
in android 4 jelly bean :
.
- Tap 7 times on ‘Build number’ until it unlocks the Developer options mode as seen in the images below. Kindly enter password/PIN when asked.

.
Yay! You are a temporary developer now without any coding experience whatsoever!
-
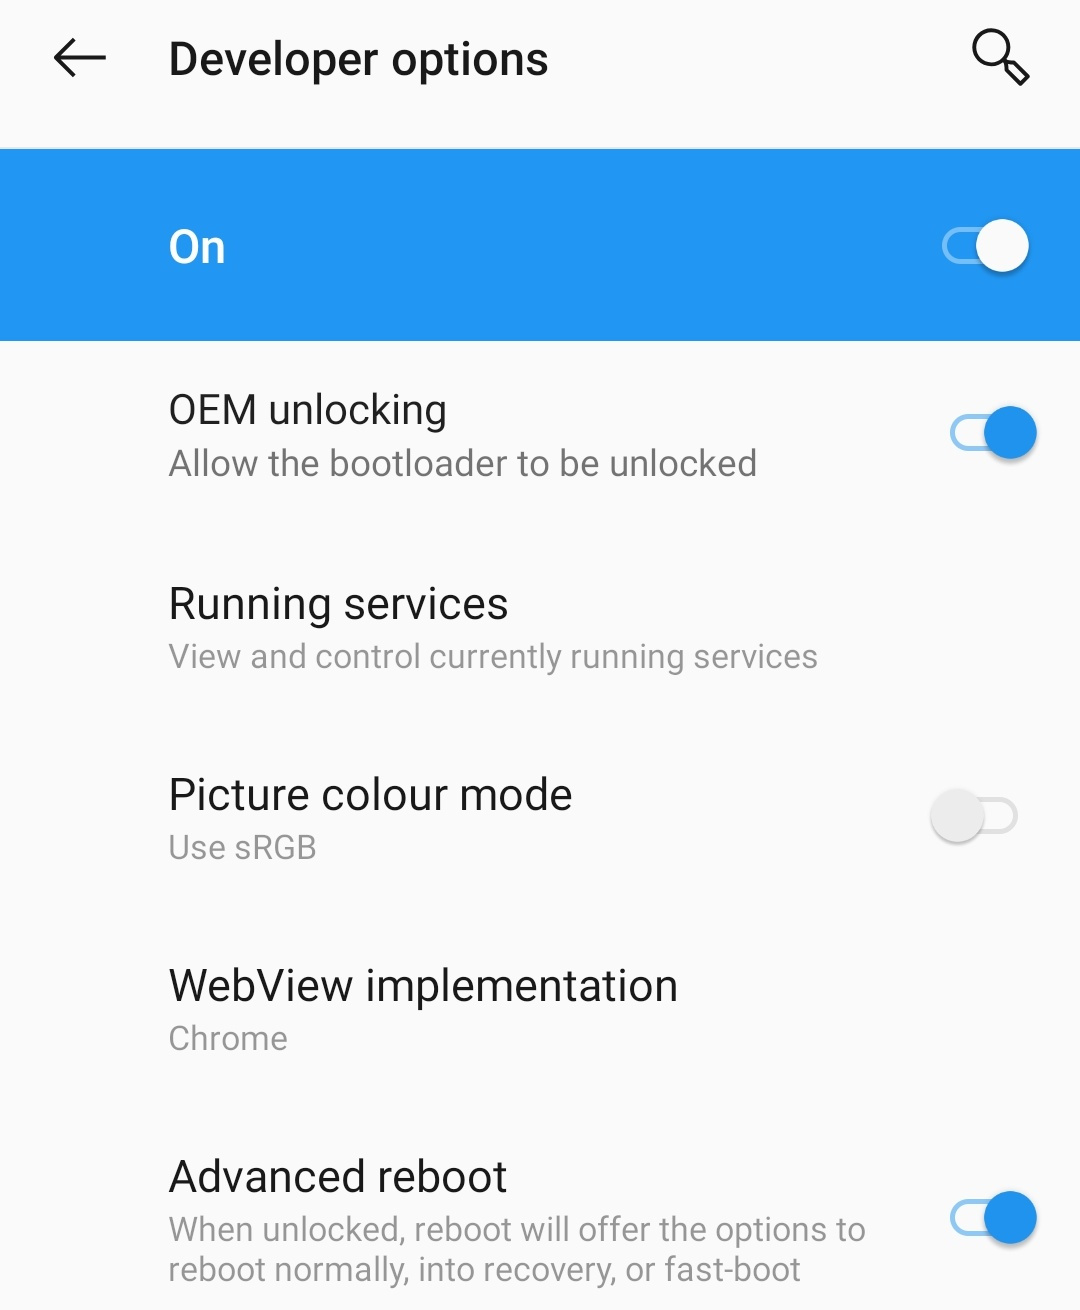
In Settings, navigate to More/System → Advanced* and scroll down to open Developer options.
-
in Developer options, allow OEM unlocking (on android 7 nougat or later)
in android 9 pie
.
if OEM unlocking is not visible on android 7 or older it is normal
if OEM unlocking is not visible on a s8 or later, follow this instruction :
Disable autoupdates and automatic time, put back the date minimal 7 days before the actual date. Finally reboot the phone. That should do the trick Fix Missing OEM Unlock Toggle on Samsung Galaxy Devices (Guide) | The Custom Droid
.
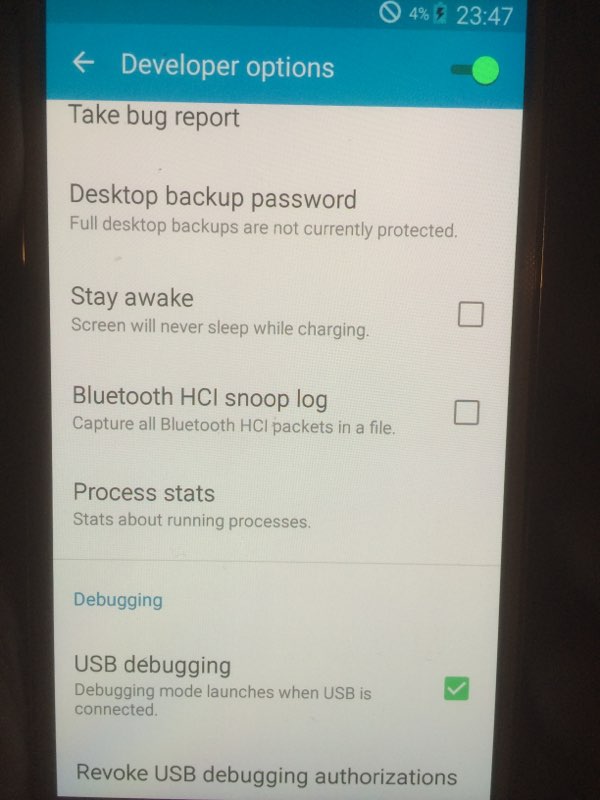
- In Developer options allow USB debugging under DEBUGGING
in android 5 Lollipop
.
- There is a disclamer :
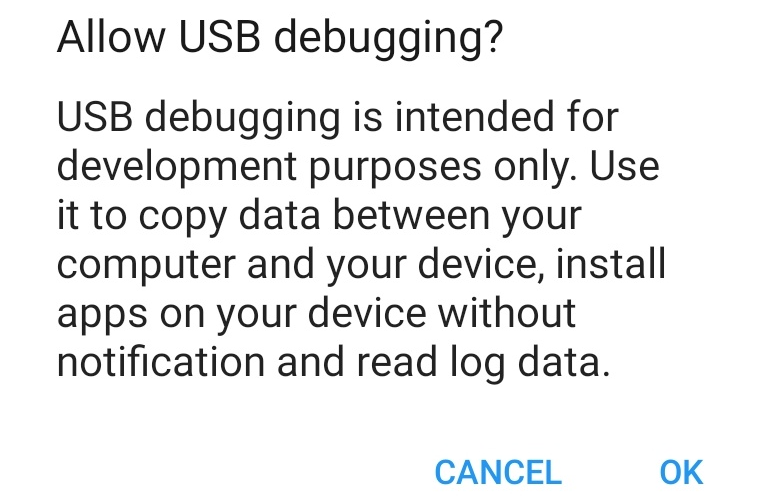
.
- Tap OK to Allow USB debugging and enable it.

.
- Connect your smartphone using USB cable to GNU/Linux PC to whitelist USB debugging from it to unlock bootloader .
- There is a disclamer :

.
- Tap OK to continue.
.
3) Check the communication between the PC and your smartphone
through USB cable
See details
Chances are that either the cable you use is not suitable for data transfer but only for charging the phone or the plug of the — possibly old — smartphone is defective or sometimes malfunctioning.
Check the connection by typing the command
adb devices
with your (USB debugging enabled) smartphone connected with the cable.
If you just receive :
List of devices attached
without a device serial number and a comment, then something between the PC and your smartphone is not correct and you cannot proceed further.
Try to change cable first and then check the state of the plug on PC and smartphone
change USB port, change PC, change phone, change life…
.
.
4) Download a custom recovery manager .img
(not needed for Fairphone, Gigaset, Teracube, or Murena phone)
On your PC,
see details for TWRP
Download the codenamed specific .img file for your device, it will to replace the original stock-recovery by a custom recovery calledTWRP, the Team Win Recovery Project from :
twrp version 3.5.x-x is designed for recent devices type " a/b_slot" or “treble”, originaly shipped with Stock Android 8, and above,
twrp version 3.4.x-x was buggy, don’t choose it
If installing /e/OS nougat 7, oreo 8, pie 9, quince tart 10, or red velvet cake 11, on a device originally shipped with an Android version older than 8, you should see red errors,
Better is use an older version like 3.3.x-x witch is reputed working well
For recent device you need to download the vbmeta file to pass “Verified Boot” conditions, it is retrievable aside TWRP file on their website
.
see details for recovery-e
for official and community supported devices only, you will find link for the recovery-e and other partitions to flash, aside to the official build at Smartphone Selector
for unofficial devices, you will find the recovery-e and other partitions to flash, into the unofficial build install .ZIP ,
.
how to extract recovery-e from the .ZIP
.
Extracting recovery.img from block-based OTAs
you will need to extract, decompress and convert system and vendor as outlined below.
follow this instructions,
at the end, the “recovery.img” wil be in the /system/vendor/etc folder
Create a temporary directory and move there:
mkdir ~/android/system_dump/
cd ~/android/system_dump/
Extract system.transfer.list and system.new.dat.br or system.new.dat from the installable /e/OS zip:
If your OTA includes vendor.transfer.list and vendor.new.dat.br or vendor.new.dat, extract them from the installable /e/OS zip as well:
In the case of system.new.dat.br/vendor.new.dat.br/super.new.dat.br/etc. (a brotli archive) exists, you will first need to decompress them using the brotli utility:
sudo apt install brotli
brotli --decompress --output=system.new.dat system.new.dat.br
And if you have a vendor.dat.new.br :
brotli --decompress --output=vendor.new.dat vendor.new.dat.br
You now need to get a copy of sdat2img. This script can convert the content of block-based OTAs into dumps that can be mounted. sdat2img is available at the following git repository that you can clone with:
git clone https://github.com/xpirt/sdat2img
Once you have obtained sdat2img, use it to extract the system image:
python sdat2img/sdat2img.py system.transfer.list system.new.dat system.img
You should now have a file named system.img that you can mount as follows:
mkdir system/
sudo mount system.img system/
And if you have a vendor.new.dat :
python sdat2img/sdat2img.py vendor.transfer.list vendor.new.dat vendor.img
If you have a file named vendor.img, or similar, you can mount them as follows:
sudo rm system/vendor
sudo mkdir system/vendor
sudo mount vendor.img system/vendor/
Unlike the above, if you have a super.new.dat file:
python sdat2img/sdat2img.py super.transfer.list super.new.dat super.img
You will now have a file named super.img, You need to get a copy of lpunpack to extract images from it. This script can extract the content of the Super partition into it’s respective component partitions that can be mounted.
Download lpunpack.zip (Samw662)
Once you have lpunpack, use it to extract the super image:
lpunpack super.img /output/dir
You must also now mount any other image files that you have in their respective directories as shown above with vendor.img.
Once you’ve extracted the recovery.img file, unmount the vendor dump if you mounted it earlier:
sudo umount ~/android/system_dump/system/vendor
Then unmount the system dump:
sudo umount ~/android/system_dump/system
Finally, unmount any other images before deleting the no longer needed files:
rm -rf ~/android/system_dump/
.
Extracting recovery.img from payload-based OTAs
-
Create a temporary foder,
-
download the /e/OS build you want to install,
-
do not extract it, but put it into the folder you have just created.
-
download payload-dumper-go from Releases · ssut/payload-dumper-go · GitHub,
-
extract it and put it into the folder you have just created.
use the right clic to open a terminal from there and run :
./payload-dumper-go name-of-the-/e/OS-build-you-want-to-install.zip
[Walkthrough] Extract eRecovery and boot images using payload-dumper-go
.
If needed, move the Downloaded Files into the Folder where you have extracted the “Platform-Tools.zip”
.
5) Download /e/OS.zip
.
On your PC ( adb sideload method ),
or
On your Phone ( Internal Storage / SDcard method ),
.
Download the devicecodenamed specific image of /e/OS
see details
your model number, available in the
“settings menu” → Plus/System → About phone → “Model number”
must be supported by the device code name of the build you choose.
Be careful about Regional or Carrier variants for the same commercial appellation
example :
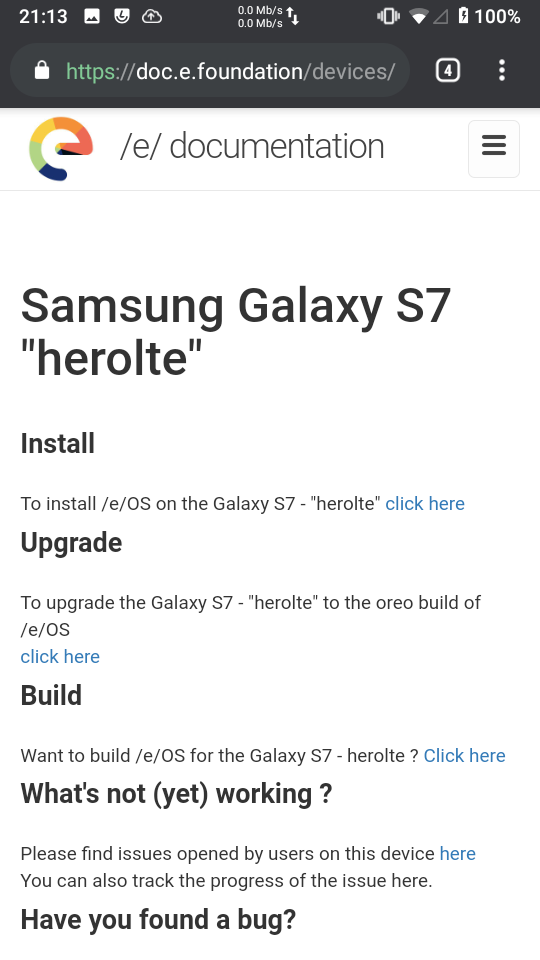
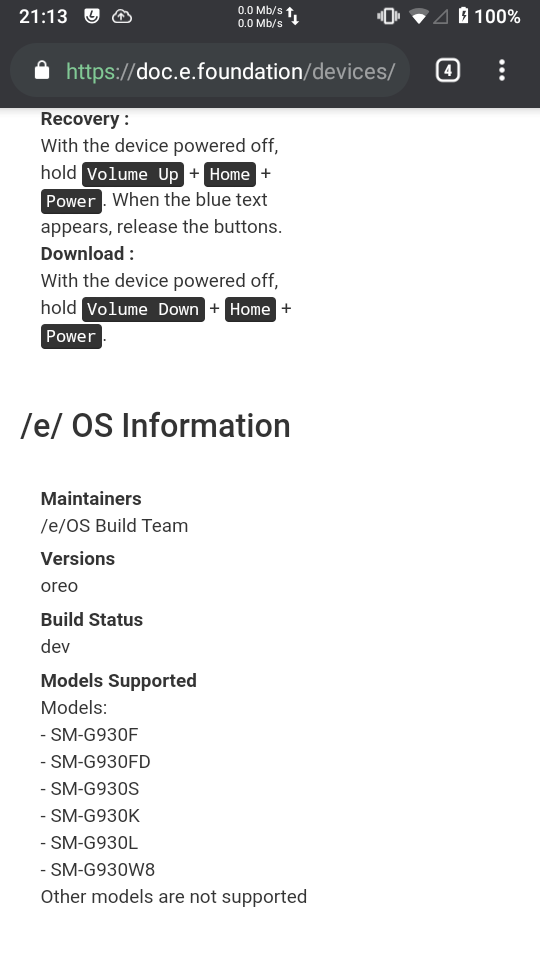
model name : Galaxy s7
code name : herolte
model number : SM-G930F, SM-G930FD, SM-G930S, SM-G930K, SM-G930L, SM-G930W8
(lineage_wiki/_data/devices/herolte.yml at master · LineageOS/lineage_wiki · GitHub)
.
To find your device codename you can run this command in the console of an adb enabled PC with you phone connected via a usb data cable (and "USB debugging selected in developer options)
$ adb shell getprop ro.product.device
In case you don’t have the device in your hands, here is a list of all ever existing android devices
.
builded for the ROM and the specific hardware configuration of your device :
.
.
-
- List of Supported devices (up to date)
.
.
.
.
If needed, move the Downloaded Files into the Folder where you have extracted the “Platform-Tools.zip”
.