.
Let’s roll !
6) Unlock the Bootloader
- Please allways refer to your device specific official install documentation in parallelle,
- and compare it with the various detailed illustrations of this guide into the installation process for :
a “Custom android OS”, on any supported device !
Warning: This process will completely wipe all data in the internal storage of your smartphone, please make sure you have a full backup of critical data on your smart phone
On some devices, that could lead to a warning message that “verified boot” is corrupted and device “can’t be trusted” by google
.
see details
.
see Brands detailled steps
please report or edit Brand detailed steps and Device specific steps
.
Asus
Asus text
.
BQ
BQ text
.
Essential
Essential text
.
FairPhone Brand detailled steps
Follow the FairPhone steps
.
Gigaset
Gigaset text
.
Google text
.
HTC
HTC text
.
Huawei
Huawei text
.
LeEco
LeEco text
.
Lenovo
Lenovo text
.
LG
LG text
.
Motorola
Motorola text
.
Nextbit
Nextbit text
.
Nubia
Nubia text
.
OnePlus
OnePlus text
.
OPPO
OPPO text
.
Razer
Razer text
.
Realme
Realme text
.
Samsung Brand detailled steps
- Tip :
$ adb reboot bootloader
or
- unplug the device from the PC
- Power Off the device,
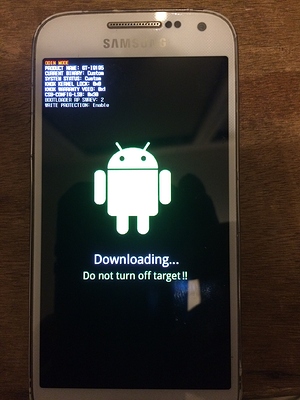
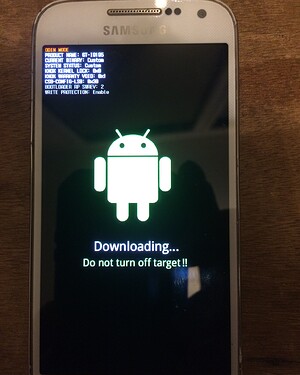
- Boot to Download mode :
hold Volume Down + Home + Power.
.
- Now you can plug the device to your PC with a good data USB cable
.
Samsung steps using Odin on Windows
Odin will do that for you next step, when flashing the custom recovery manager
.
Samsung steps using Heimdall on Linux or MacOS
fastboot commands don’t work with samsung devices, you must use heimdall commands instead.
From the Terminal application on GNU/Linux PC,
- execute the following command to unlock the bootloader :
$ heimdall print-pit
It results that the device reboots
.
Congratulation !
.
the bootloader of your Samsung device is unlocked and the device is factory reseted, now rebooting…
.
Sony Brand detailled steps
Important Note: This process is not reversible. Once you have unlocked the bootloader, you will not be able to revert the device back to a locked or original state or restore the DRM security keys. Without these keys, some advanced functionality in e.g. Sony camera and audio apps may no longer work. Neither will EMMA the Sony Flash tool for Xperia devices . Unlocking the bootloader will also will trigger a factory reset that erases all device settings, user data, third-party applications and associated data from the device’s hardware storage.
To obtain an unlock code, you will need to know your device IMEI. You can find this number, by opening the Phone app and dialling *#06#*. There is no need to press the Call or Send button. The IMEI number will appear as soon as you finish dialling the code. Make a note of the IMEI number - you will need it later.
Full instructions on unlocking the bootloader can be found on the Sony Developer World website. (They are not reproduced here, to avoid the risk of including errors)
First, read the ‘How to unlock bootloader’ page - including the FAQs, to understand what is involved in the process
https://developer.sony.com/develop/open-devices/get-started/unlock-bootloader/how-to-unlock-bootloader/
When you have done that, follow the steps on the ‘Unlock Bootloader’ page
Unlock bootloader | Developer World
Teracube
Teracube text
.
Wileyfox
Wileyfox text
.
Wingtech
Wingtech text
.
Xiaomi brand detailed steps
https://xdaforums.com/t/how-to-unlock-bootloader-on-xiaomi-hyperos-all-devices-except-cn.4654009/
to the phone. Go to ‘Settings’ > ‘Additional Settings’ > ‘Developer Options’ > ‘Mi Unlock Status’, choose to add an account, deactivate Wi-Fi and activate mobile data as indicated, create or add an account. Note that you need a phone number for that – don’t know if several Mi accounts can be linked to a single phone number.
Request the unlocking of your phone from Xiaomi
CAUTION: it may be – it happened to me – that the unlocking happens instantaneously, in which case all data on your phone will be erased at the very second when you request the unlocking, before you’ve done anything properly related to /e/OS. Be sure to backup important data before requesting the unlocking. In some cases though, you’ll have to wait for some days and nothing will happen until you then actually unlock.
Download the Mi Unlock tool from here .
Extract the .zip file f.ex. in C:/, run the file ‘batch_unlock.exe’. When the Mi software has started, connect to your Mi account with your 10-digit identifier + password, enter the verification code received by SMS.
Then only, turn off your phone. Enter the so-called ‘Fastboot mode’ by pressing simultaneously two buttons for 5 to 10 seconds: ‘Volume Minus’ and ‘Power’. A cartoon with a white rabbit and a green robot appears on a black background: you have successfully entered the Fastboot mode.
Connect the phone to the PC via USB. On the phone, make sure to choose ‘File transfer’ and not ‘USB charging’, otherwise you won’t be able to communicate with the phone.
In the Mi software click on ‘Refresh (F5)’, your phone should show up in the list, with its serial number, its codename (here: ‘lavender’) and status: ‘locked’. If it doesn’t show up, check all ‘Settings’ options listed above, or try from another PC. I was stuck for some time at this step and trying from another PC solved that, not sure why.
Make sure your data is backed up, then click on ‘Unlock (F6)’, which sends the request to Xiaomi.
In my case, the unlocking was instantaneous, all personal data was erased, and I was able to proceed. I don’t know if this is true for all Redmi Note 7. While trying on a Redmi Note 9 (merlin) though, the following message was displayed after some seconds: “Please unlock 168 hours later. And do not add your account in MIUI again, otherwise you will wait from scratch”, meaning that my request had successfully been sent to Xiaomi and I just needed to wait for seven days. I believe this is often the case with Xiaomi phones. See if you are lucky!
Unlock your phone
After the waiting period has elapsed, start the Mi Unlock Tool again, turn off the phone, enter Fastboot mode as described above and connect your phone to the PC. When the phone shows up in the list, click again on ‘Unlock (F6)’, the phone should restart. If you have no waiting period, the phone should restart without further notice the first time you click on Unlock.
The boot takes some time, a small open lock should be displayed at the top of the screen, meaning that the change was successful. One more quick step will finalize the unlocking.
A black screen says “This device is locked”. Before clicking anything, write down the Unlock code displayed in small characters at the bottom – I didn’t need it but one never knows!
Choose “Open Wi-Fi settings”, connect to the Internet and go back, choose “Activate this device”, enter the password of your Xiaomi account, follow the instructions.
Your phone should now be fully unlocked, i.e. devoid of your previous data + you are now authorized to installed a new OS.
Authorize again some options on your phone
You need to re-activate the Developer options by going to ‘Settings’ > ‘About Phone’ > ‘MIUI Version’ and tapping seven times at this precise place.
Then go to ‘Settings’ > ‘Additional Settings’ > ‘Developer Options’ > ‘OEM Unlock’ and check that is says ‘Bootloader already unlocked’.
Check that your phone is indeed unlocked.
Still in the menu ‘Developer Options’, find ‘Mi Unlock Status’: it should say ‘Unlocked’ if your steps were successful. If so, congrats!! the phone is unlocked and Part 1 is accomplished!
.
Yandex
Yandex text
.
YU
YU text
.
ZTE
ZTE text
.
ZUK
ZUK text
.
.
see standard / common devices steps
To obtain an unlock code, you will need to know your device IMEI. You can find this number, by opening the Phone app and dialling *#06#*. There is no need to press the Call or Send button. The IMEI number will appear as soon as you finish dialling the code. Make a note of the IMEI number - you will need it later.
.
Text need contributions/translations
.
adb devices
adb reboot bootloader
fastboot devices
fastboot flashing unlock
fastboot reboot
7) Flash the custom recovery manager, TWRP or recovery-e
.
see details
.
Redo the first android boot setup quickly. Since all the settings have been wiped from your device.
Once done, you have to re-enable the Developer options, and the USB debugging in the Developer options with steps above :
-
Go to the Settings menu , scroll down, tap on 'About phone’ , scroll down,
-
Tap 7 times on ‘Build number’ until it unlocks the Developer options mode as seen in the images below. Kindly enter password/PIN when asked.
-
Yay! You are a temporary developer now without any coding experience whatsoever!
-
In Settings , navigate to System and scroll down to open Developer options .
- In Developer options enable USB debugging under DEBUGGING
- There is a disclamer :
- Tap OK to Allow USB debugging and enable it.
- Connect your smartphone using a good USB cable to your GNU/Linux PC to whitelist USB debugging from it.
There is a disclamer :
- Tap OK to continue.
.
see Brands exceptions steps
please report or edit Brand exceptions and Device specific steps
.
Asus
Asus text
.
BQ
BQ text
.
Essential
Essential text
.
Brand exeption steps, FairPhone
FairPhone steps
.
Gigaset
Gigaset text
.
Google text
.
HTC
HTC text
.
Huawei
Huawei text
.
LeEco
LeEco text
.
Lenovo
Lenovo text
.
LG
LG text
.
Motorola
Motorola text
.
Nextbit
Nextbit text
.
Nubia
Nubia text
.
OnePlus
OnePlus text
.
OPPO
OPPO text
.
Razer
Razer text
.
Realme
Realme text
.
Brand exeption steps, Samsung :
- Tip :
$ adb reboot bootloader
or
- Unplug the device from the PC
- Power Off the device,
- Boot to Download mode :
hold Volume Down + Home + Power.
.
- Now you can plug the device to your PC with a good data USB cable
.
see Samsung Windows steps
If using the recovery-e instead of TWRP,
Rename the downloaded image to “recovery.img”, open a Command Prompt and TAR the file by running
tar -cvf %USERPROFILE%\Downloads\recovery.tar %USERPROFILE%\Downloads\recovery.img
- WARNING : make sure you have enough battery power to avoid any tricky situation, whether for your smartphone or your computer.
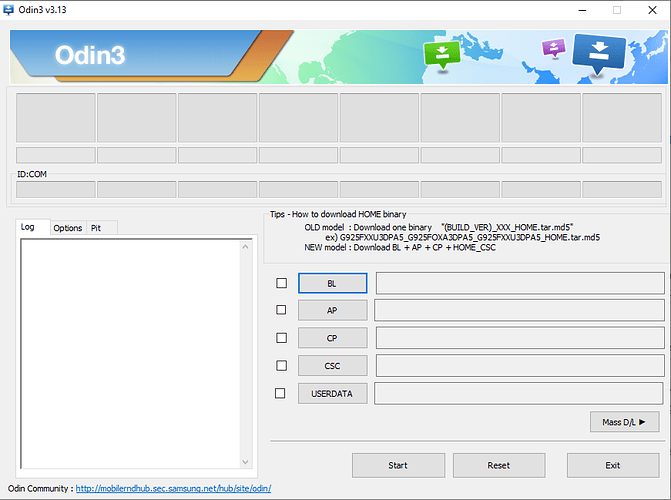
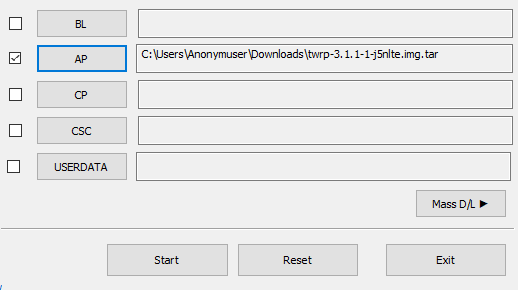
- Open Odin (the tool we put aside earlier).
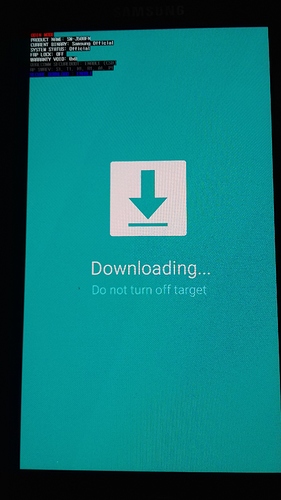
- Put your smartphone in download mode (see above how to do this).
The display differs according to the version of Android, here 6.0.1 Marshmallow.
- Connect your smartphone to your computer with a reliable cable.
The word “Added” should appear on Odin. This means the smartphone in download mode is detected.If nothing happens, it means your computer doesn’t have the necesary drivers. So you need to install them, by following the steps of the following 7) part. Sometimes you just have to wait a few minutes that Windows install them automatically.
- For recent devices only (s8 and newer), Click on “CP”, then select the vbmeta file in .tar format previously downloaded.
For all, Click on “AP”, then select the TWRP file in .tar format previously downloaded.
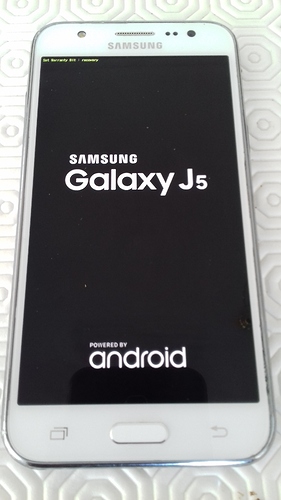
- Click on “Start” to start installing TWRP on your device. It will take a few seconds. Once finished, Odin will display in a green box “PASS”.WARNING : Immediately after clicking on “Start”, press the home and volume up buttons simultaneously and for a long time. This allows you to enter in TWRP directly when the phone automatically reboots. If you don’t, Android will start normally but the TWRP installation will be deleted. It will therefore be necessary to repeat the procedure.If you don’t like to do things quickly or if your phone reboots into the system instead of TWRP, here is a procedure that will work on every device : in the “Options” tab (between “Log” and “Pit”) untick the “Auto-reboot” box. Therefore you will have to manually reboot the device by pressing the main button, the power button and the volume down button. As soon as the screen turns off, move your finger from the volume down button to the volume up button (while continuing to press on the other buttons) in order to enter into TWRP.When TWRP is starting, a small line appears at the top left of the screen with the word “recovery” on some devices.
Install the necessary drivers if needed
In order for your smartphone to communicate with the computer, and therefore be flashed, you must install the necessary drivers. (If you have already successfully installed TWRP, skip this step.)
- Download them from the official source (you need to have a Samsung account) or directly from an unofficial source .
- Unzip the downloaded directory.
- Open the unzipped directory created and launch the utility (the file ending by “.exe”).
- Click on “Yes” in the Windows warning message and follow the steps indicated.
Perfect, your device can now correctly communicate with Odin.
.
see Samsung MacOS steps
inputs needed, see Linux steps (as Heimdall is Heimdall and Linux and MacOS are both based on Unix)
.
see Samsung Linux steps
For recent devices (s8 and newer), you must flash first the vbmeta file to disable encription protection, it is foundable
included into the /e/OS installable.zip (extract it)
or aside with the TWRP file on their website
- From terminal application on PC, navigate to file path where you have downloaded the recovery-e-for-your-device.img or the TWRP-for-your-device.img, (could be in the “/platform-tools” folder
- execute the following command to install it .
using Heimdall
$ heimdall flash --RECOVERY recovery.img --no-reboot
- It will result in the following output on PC:
target reported max download size of 536870912 bytes
sending ‘recovery’ (33684 KB)…
OKAY [ 1.048s]
writing ‘recovery’…
OKAY [ 0.346s]
finished. total time: 1.394s
If needed,
$ heimdall flash --RECOVERY recovery.img --VBMETA vbmeta.img --no-reboot
using Odin4Linux
Rename the downloaded recovery image to “recovery.img”,
Open a Command Prompt in the folder where the file was downloaded, and TAR the file by running
tar --format=ustar -cvf recovery.tar recovery.img
- boot to Download mode and flash it using Odin4Linux
Open a Command Prompt in the folder where the file was downloaded, and flash the recovery by running
sudo odin4 -a recovery.tar
.
.
if needed,
- take the vbmeta.img include in the /e/.zip, TAR it
tar --format=ustar -cvf vbmeta.tar vbmeta.img
- and flash it along the recovery
sudo odin4 -a recovery.tar -b vbmeta.tar
.
…NOW COMES THE CRUTIAL STEP !..
- To get out of the Download mode you must Force Power Off your Samsung device,
(on some old devices, unplug the device,)
hold Volume Down + Power.
release when you see the screen turn off..
…IT IS THE CRUTIAL STEP !..
- immediately Boot to Recovery before any other boot mode attempt,
hold Volume up + Home + Power
release Power when you see the very little blue line in the top of the screen…
…IT WAS THE CRUTIAL STEP !..
!! Only if coming from full stock firmware on s8 and later
- In TWRP home screen press wipe - format data - yes
- Download and flash multidisabler-samsung-3.* zip to disable security and encryption.
.
Sony
Sony text
.
Teracube
Teracube text
.
Wileyfox
Wileyfox text
.
Wing tech
Wingtech text
.
Yandex
Yandex text
.
YU
YU text
.
ZTE
ZTE text
.
ZUK
ZUK text
.
.
see a/b_slot type devices particular steps
.
Text need contributions/translations
as said in introduction, safe is to compare this guide with Official /e/ documentation for your device or with Official TWRP documentation for your device also often, especially for unofficialy supported devices on XDA forum [OFFICIAL][TWRP] for your device (use the seach bar)
- Open a terminal from the folder where you have stored the downloaded recovery-manager-for-your-device.img (could be the /Plateform-tools folder)
in short :
You must load and boot to custom recovery
instead of flash and reboot to custom recovery.
fastboot boot /recoveryfilenameforyourdevice.img
.
see standard fastboot devices steps
.
Text need contributions/translations
as said in introduction, safe is to compare this guide with Official /e/ documentation for your device or with Official TWRP documentation for your device also often, especially for unofficialy supported devices on XDA forum [OFFICIAL][TWRP] for your device (use the seach bar)
in short,
.
- Open a terminal from the folder where you have stored the downloaded recovery-manager-for-your-device.img (could be the /Plateform-tools folder)
adb devices
adb reboot bootloader
fastboot devices
fastboot flash recovery /recoveryfilenameforyourdevice.img

fastboot reboot recovery
- Note that many devices will replace your custom recovery automatically during first boot. To prevent this, use the appropriate key combo to enter recovery (Volume + and power). After typing fastboot reboot, hold the key combo and boot to TWRP.
.
you can read this TWRP first boot explanation by @aibd
.
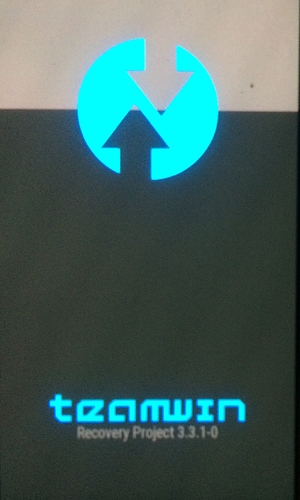
You must successfully end with :
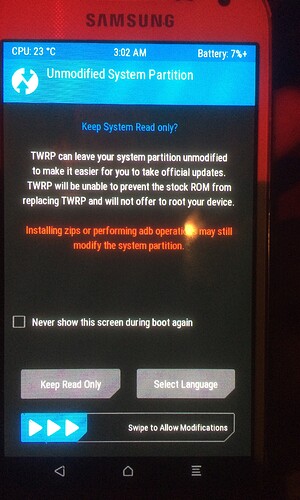
- the TWRP splash logo ! And the welcome screen
or
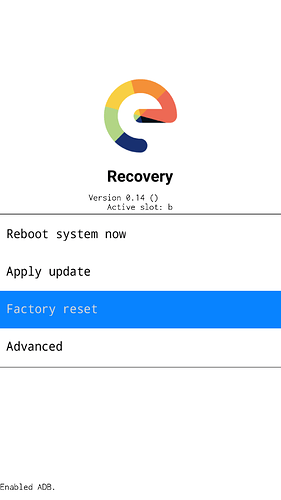
- the “recovery-e” main screen :
.
.
.
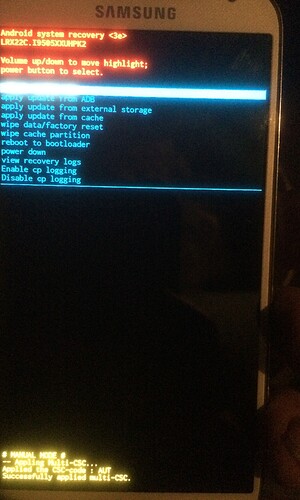
if you see something like that :
.
.
It FAILED ! that is the Official Stock Vendor Samsung / Gogol Firmware Recovery screen !
Please re-read and retry the flashing process of TWRP
.
.
